IKEA dressers are blank canvases: affordable, simple, and ready for a creative upgrade. This round-up collects 19 approachable dresser-hack ideas that turn plain pieces into personality-packed furniture. Each concept focuses on visible style moves—paint, trim, hardware, and surface treatments—that create a designer look without reinventing the structure. Use them as inspiration to suit your room’s scale and aesthetic, from coastal casual to boutique-modern and playful kid-friendly pieces.
You’ll find options that preserve storage while changing the mood of a space. Think mixed finishes, fabric and wallpaper accents, modular joins, and even ideas for converting a dresser into a desk or a nursery-changing surface. These projects emphasize finishing touches and styling strategies that guide outcome, not technical blueprints—so you can adapt color, texture, and hardware to make each dresser uniquely yours.
1. Two Small, One Wide
Pairing two compact dressers side-by-side gives you the presence of a single wide piece while keeping the budget-friendly bones of both units. Focus on unifying finishes: paint the cases the same color, swap or match hardware, and align or replace feet for continuous sightlines. A single top—real wood or veneered board—visually stitches them together and provides a clean surface for styling. Internally you retain the original drawer layout but gain a commanding silhouette suitable for entryways, bedrooms, or beneath a long mirror. This approach embraces asymmetry where needed and makes storage feel intentional and built-in.
Key Design Elements
- Paint both cases same color
- Install matching hardware
- Add a continuous top
Pro Tip: When joining two units, fasten the top across both pieces and use trim at the seam to hide gaps; choose a paint that blends wood and laminate finishes.
2. Stained and Polished
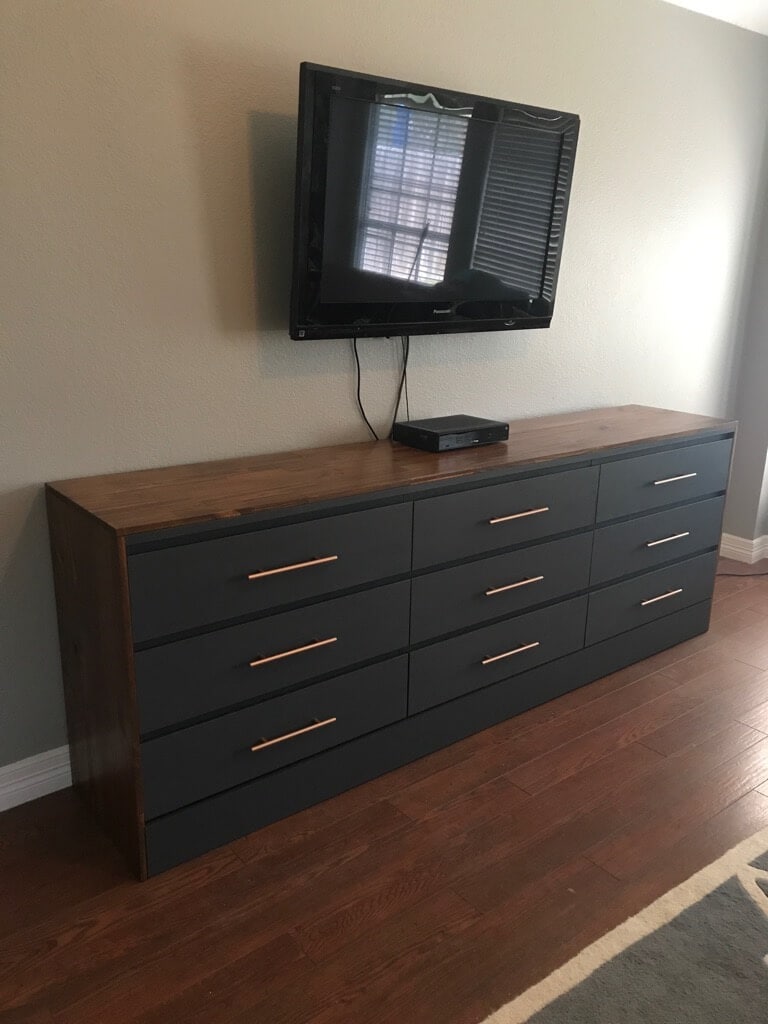
A plain, economical dresser can read richer with an intensified stain and a few metallic accents. Staining drawer fronts or a whole case deepens tone while preserving wood grain interest. Add gilded motifs—subtle corners, thin inlays, or hand-painted accents—to elevate the look without heavy ornamentation. Swap out stock pulls for slim, modern hardware in aged brass or matte black to complete the transition. The contrast between a warm wood tone and a contemporary silhouette makes the piece feel custom and layered, ideal for living rooms or bedrooms that favor a sophisticated, tactile finish.
Key Design Elements
- Deep-stain drawer faces
- Add thin gilded accents
- Replace pulls with brass
Pro Tip: Test your stain on hidden areas to confirm depth and compatibility with existing finishes; use a wipe-on stain for even results and finish with a clear satin topcoat.
3. Geometric Overlay Statement
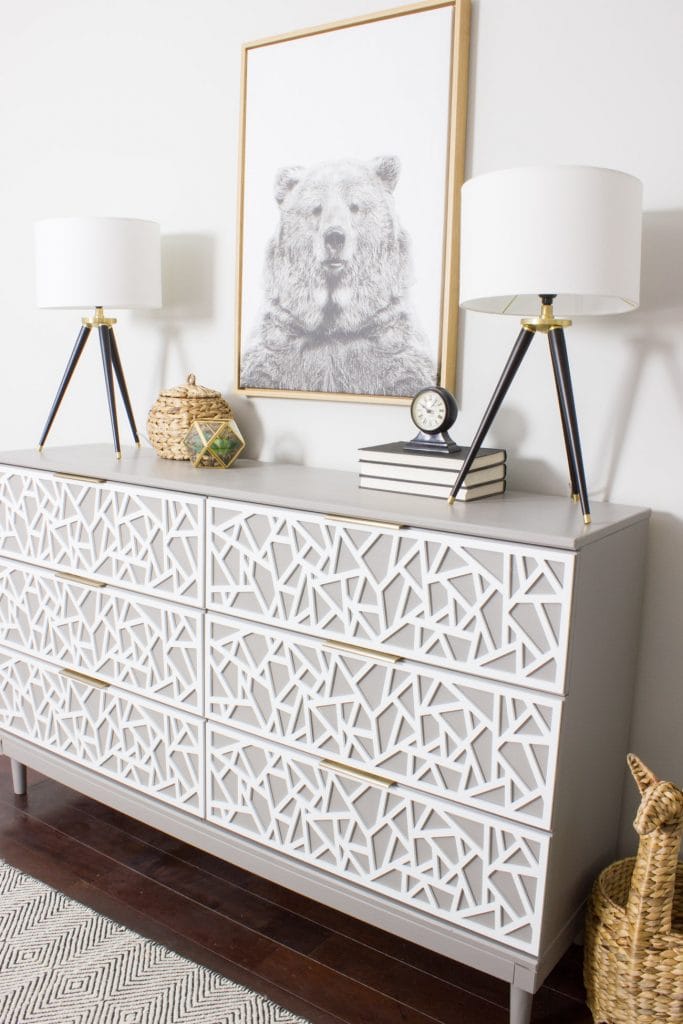
Dimensional geometric overlays create a crisp, contemporary focal point out of a simple dresser. Apply thin routed or laser-cut panels in triangles, chevrons, or staggered rectangles to build depth across drawer fronts. Paint the overlays in a contrasting or complementary hue to emphasize pattern and shadow, and consider elevating the case on new feet to lighten the scale. Choose hardware that reads minimal so the geometry remains the star. This tactic translates well to modern bedrooms, guest rooms, or a hallway that needs a bold, architectural accent without changing the piece’s storage function.
Key Design Elements
- Attach thin geometric panels
- Use contrasting paint tones
- Add modern, low-profile feet
Pro Tip: Map your geometric layout with painter’s tape before affixing panels so proportions feel balanced; keep hardware streamlined to avoid visual clutter.
4. Playful Textured Surface
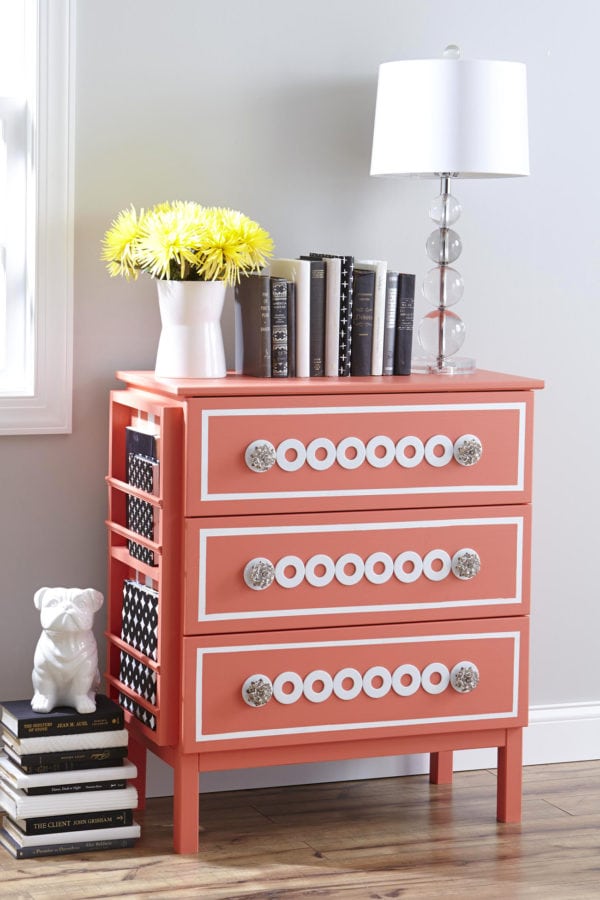
A whimsical surface treatment using found objects turns a dresser into a tactile showpiece. Think glued-on buttons, wooden beads, small knobs, or seashells arranged in repeating patterns or organic compositions across drawer faces. A single color wash can unify varied materials for a cohesive look, or leave items in natural finish for contrast. This approach is perfect for a child’s room, creative studio, or casual kitchenette—somewhere playful is welcome. Keep the objects lightweight and arrange them so drawers still open easily; the goal is visual texture rather than heavy, permanent embellishment.
Key Design Elements
- Compose playful object patterns
- Unify with single color wash
- Choose lightweight, shallow items
Pro Tip: Secure decorative items with a strong adhesive suited for both wood and plastic; avoid heavy layers near edges so drawers remain functional and balanced.
5. Pine with Personality
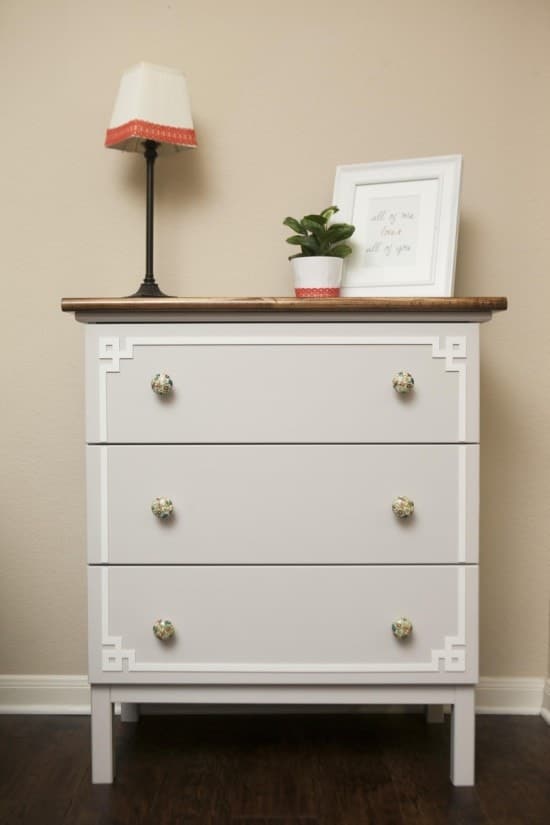
A plain pine dresser becomes distinctive with layered paint and decorative drawer overlays. Start with a rich base color on the case, then add paneling or applique pieces to drawer fronts for visual interest. A secondary tone can be used inside recessed panels or along edges to emphasize depth. Update hardware to match the new identity—soft brass or matte black both work depending on the palette. The finished piece feels crafted; it suits bedrooms that want warmth and personality without ornate detailing and pairs effortlessly with linen textiles and textured rugs.
Key Design Elements
- Paint case in a rich base
- Add decorative drawer panels
- Swap to complementary hardware
Pro Tip: Choose overlay molds that match your style—rounded for traditional, square for modern—and paint overlays either slightly lighter or darker than the case for subtle contrast.
6. Rustic Grain with Painted Frame
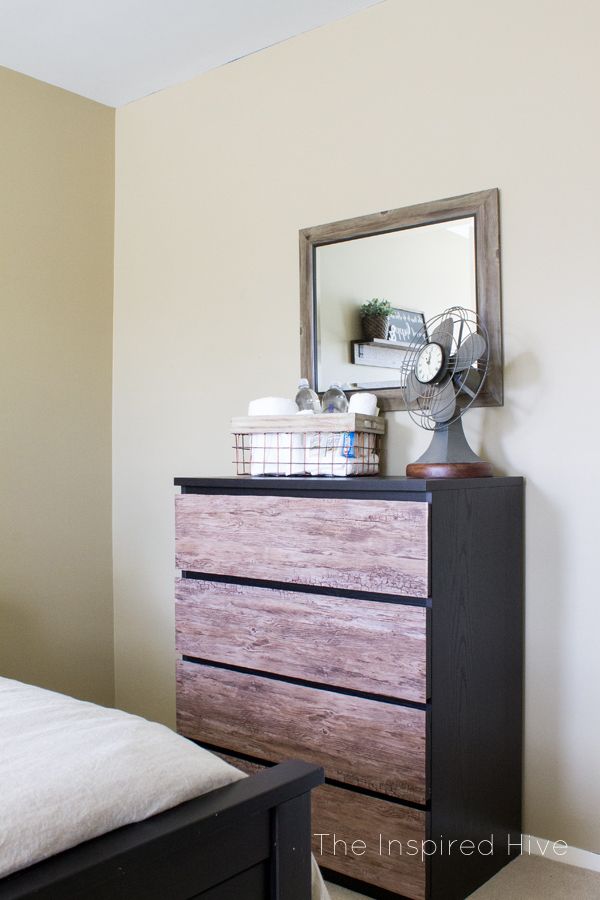
To warm up a clean-lined dresser, pair wood-grain vinyl drawer treatments with a painted case. The vinyl suggests natural texture, while a crisp painted frame defines form and adds color. This fusion balances modern simplicity with rustic charm and is ideal for bedrooms or entryway storage. Choose a muted paint color that complements the wood tone, and consider slightly raised or fluted trim at the base to add presence. The result reads polished and bespoke without committing to full wood restoration, and it’s a practical option for renters or fast redecorating.
Key Design Elements
- Apply wood-grain vinyl fronts
- Paint the outer frame
- Add modest base trim
Pro Tip: Match vinyl grain direction to natural wood patterns for realism; keep seams tight and finish edges with thin quarter-round trim for a tailored look.
7. Fluted Drawer Makeover
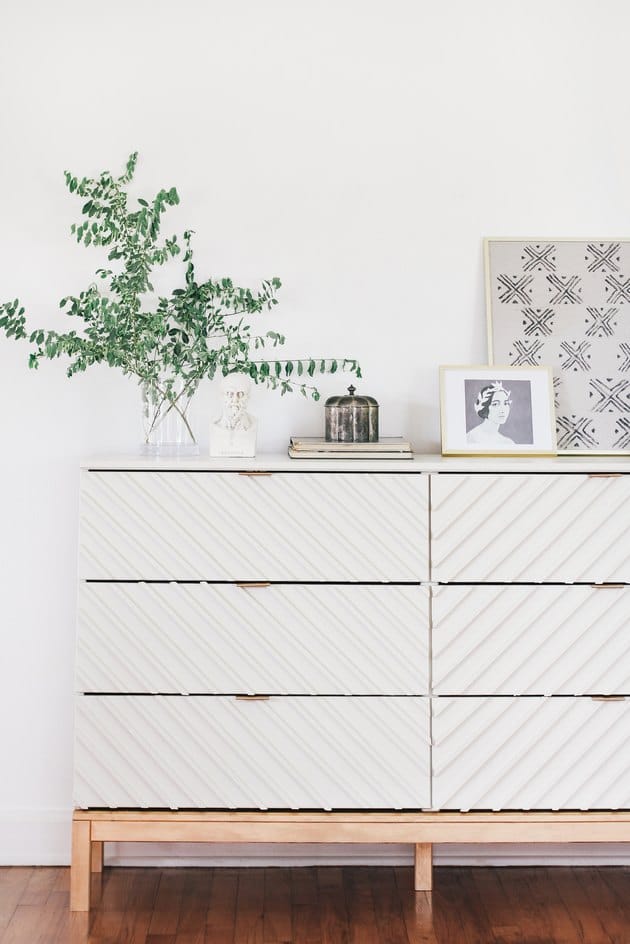
Fluting adds elegant shadow and rhythm to otherwise flat drawer faces. Use narrow timber strips or dowels applied vertically across drawers to create a fluted effect, then paint with a matte finish for understated luxury. Warm metal hardware—brass or bronze—complements the texture and elevates the piece further. This style works well in bedrooms and living rooms where you want a timeless, tactile focal point. Fluting reads custom and pairs beautifully with layered textiles, brass lamps, and soft rugs, helping a basic dresser fit into a higher-end interior language.
Key Design Elements
- Apply narrow timber strips vertically
- Finish with matte paint
- Choose warm metal hardware
Pro Tip: Space fluting evenly and sand edges lightly before painting to ensure crisp shadow lines; a matte finish hides minor imperfections while highlighting texture.
8. Paneling for Polished Presence
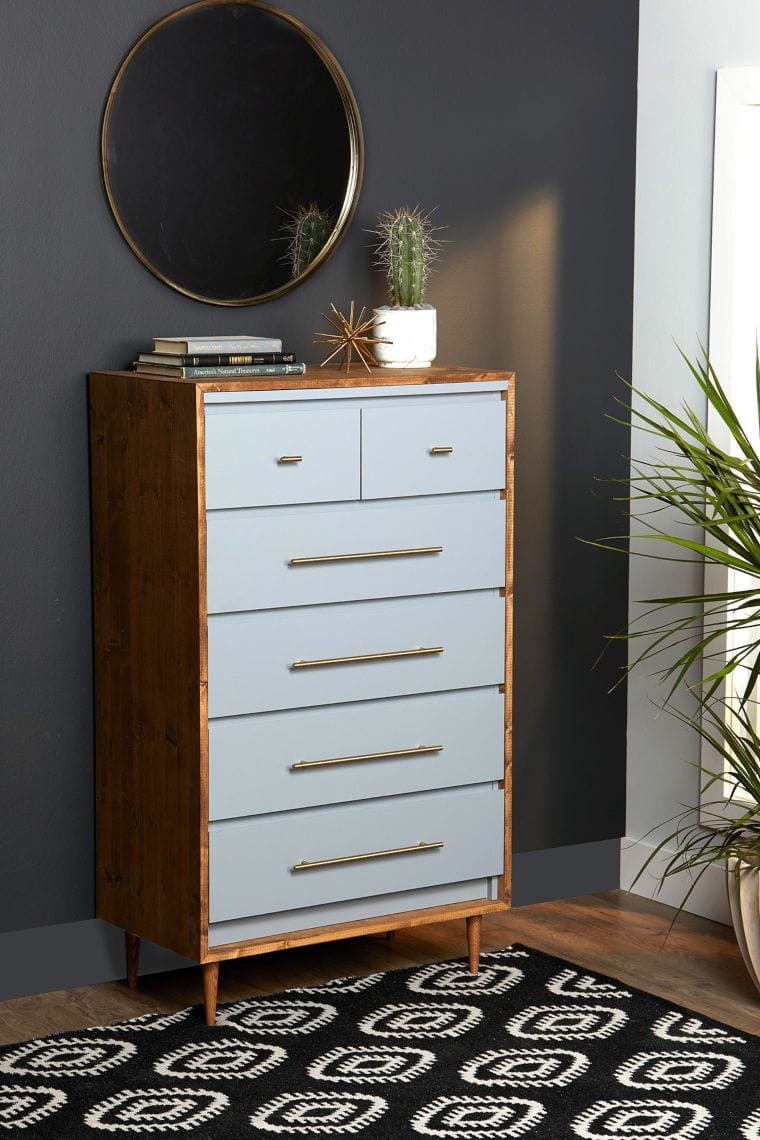
Applying decorative wood paneling across a dresser case creates depth and a high-end profile. Paint the panels in a polished tone and use substantial, statement pulls to suggest custom furniture. The paneling shifts perception, making an inexpensive base read as tailored and architectural. Consider a single saturated color for dramatic effect or a two-tone approach for contrast. This upgrade suits entryways, dressing rooms, or anywhere you want a refined anchor piece. It’s a styling-forward technique that relies on proportion and finish rather than structural complexity.
Key Design Elements
- Install shallow decorative panels
- Paint for a polished look
- Add substantial statement pulls
Pro Tip: Keep panel proportions in scale with the dresser width; too-large panels make the piece feel heavy—medium-width panels read most refined.
9. Simple Colorblock Nightstand
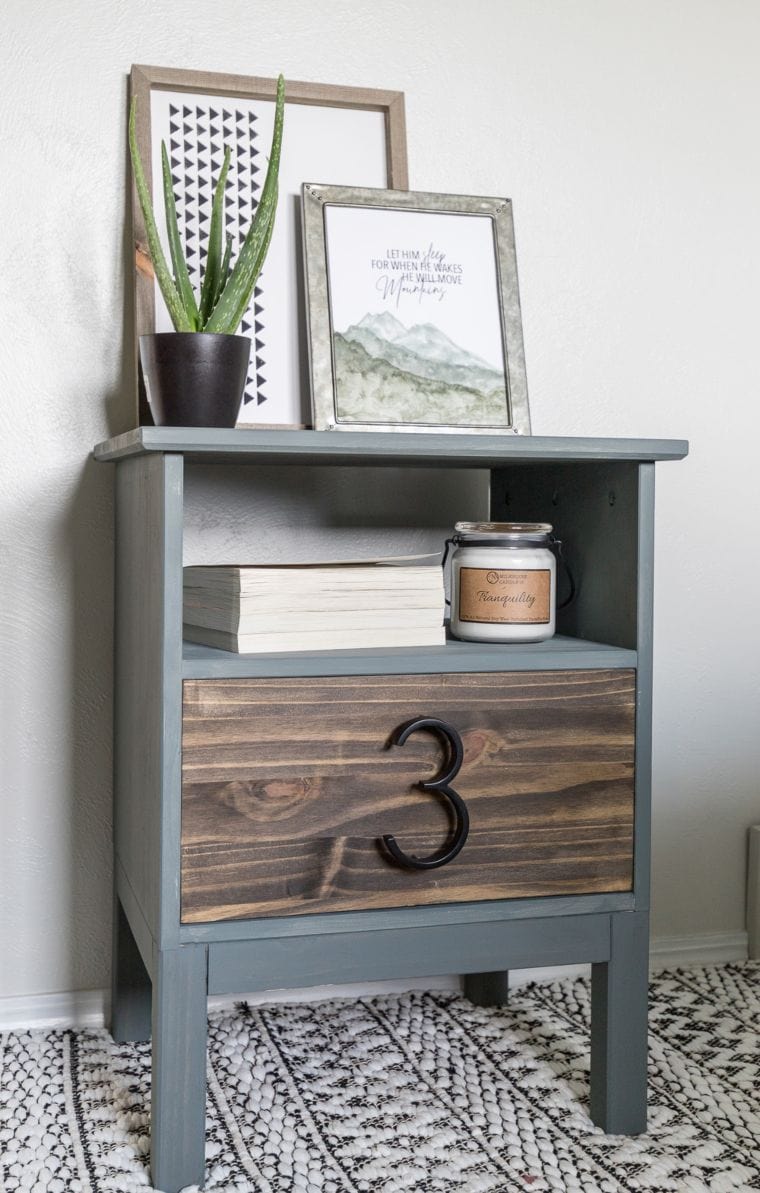
A small nightstand gets a graphic refresh with color blocking. Pick two complementary hues and paint the drawer front one color and the case another, then create an open cubby effect by removing a shallow drawer or cutting a framed opening. This adds an airy spot for books and display while keeping the piece compact. Color blocking is an excellent way to introduce a bold accent into a bedroom without overwhelm, and it works well paired with a neutral bed and layered textiles. Keep the lines clean to emphasize the modern, youthful vibe.
Key Design Elements
- Paint case and drawer contrasting
- Create an open cubby space
- Keep lines crisp and simple
Pro Tip: Use painter’s tape to mark crisp colorblock boundaries; choose semi-gloss for durability on high-touch surfaces like nightstands.
10. Layered Fabric and Molding
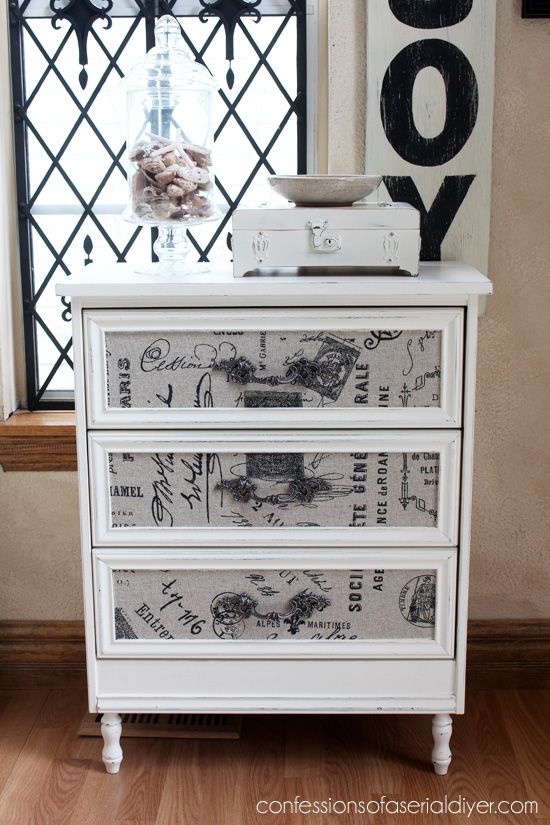
Combining fabric-covered drawer fronts with applied molding creates a rich, layered look that feels couture rather than DIY. Select a durable upholstery or woven fabric for drawer faces, secure with adhesive or double-sided tape, and border each panel with thin applied molding for structure. Paint the case and molding to harmonize with the fabric, and update legs and pulls to complete the boutique look. This technique brings softness and pattern to a room while maintaining the dresser’s storage. It’s a stylish way to introduce texture and color where wallpaper or a rug won’t fit.
Key Design Elements
- Cover drawers with durable fabric
- Frame panels using thin molding
- Coordinate case color with fabric
Pro Tip: Choose fabrics with low stretch and seal edges with fabric-friendly adhesive; test a scrap to ensure pattern repeat and colorfastness before committing.
11. Pretty in Pink (Or Your Color)
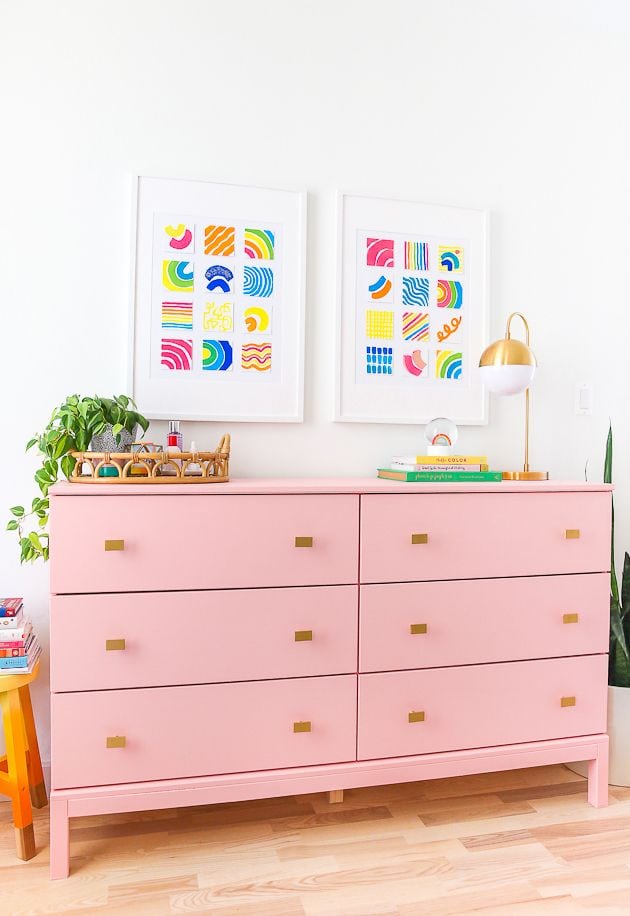
A confident coat of durable furniture paint can turn a humble dresser into a boutique-ready piece. Choose a personal favorite—blush, deep rose, or a saturated jewel tone—and finish with elevated pulls for a polished result. The key is even coverage and a topcoat suited for daily use. This approach makes color the hero, so keep added details minimal and let the hue shape the room’s palette. It’s a direct route to a cohesive, lively bedroom or dressing area and translates well to accent walls and coordinating textiles.
Key Design Elements
- Paint with durable furniture paint
- Select statement pulls
- Keep extra details minimal
Pro Tip: Test paint color under different light; pair intense hues with neutral textiles to prevent visual overload and maintain balance in the room.
12. Nursery-Ready Changing Station
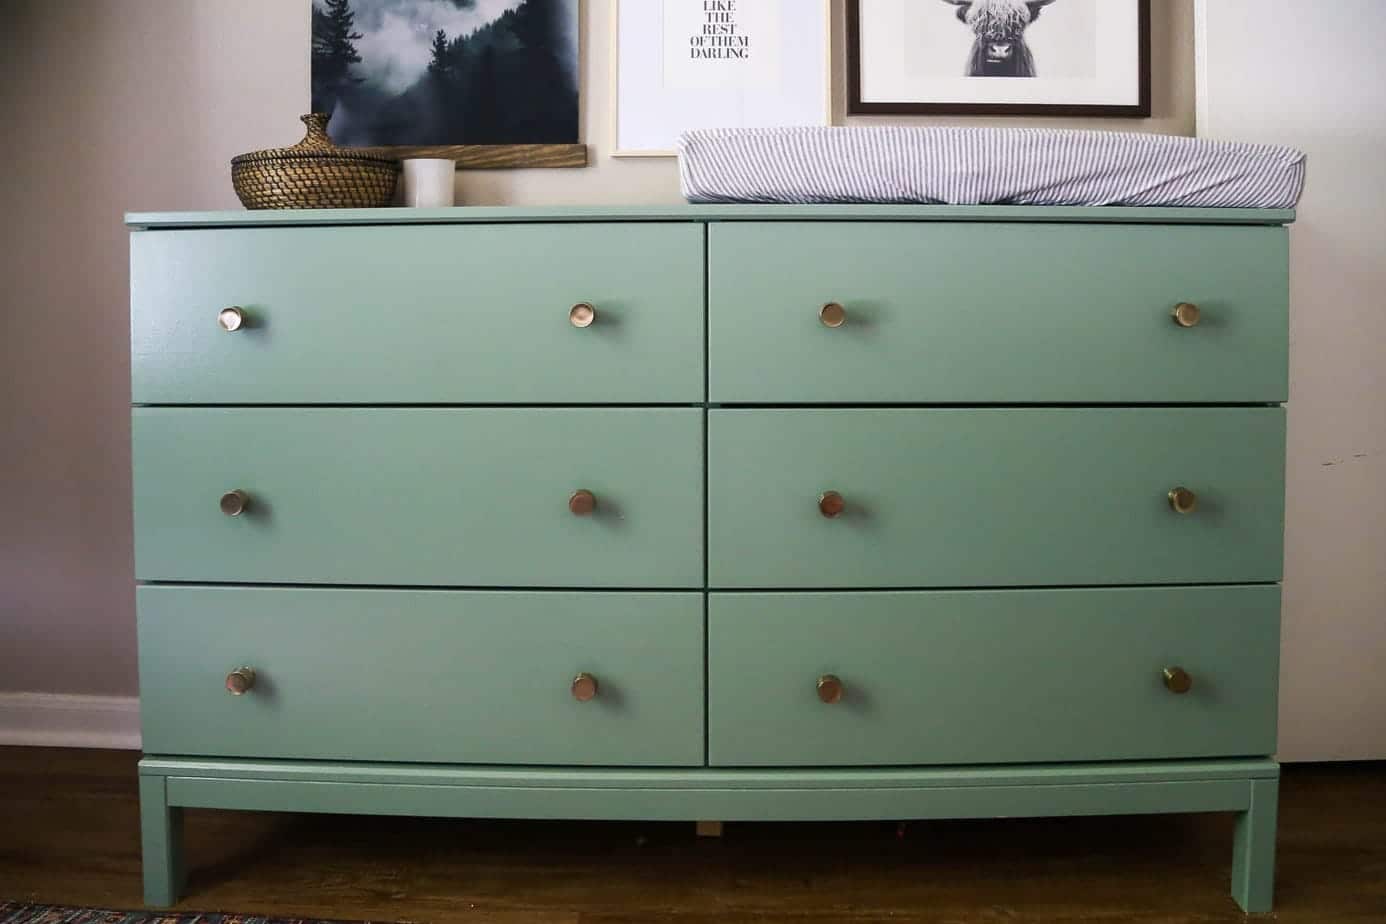
A sturdy dresser can become a charming nursery changing station with a removable changing pad on top, small vintage-style knobs for character, and a durable painted finish for easy cleaning. Add raised lip trim to keep the pad in place and leave lower drawers accessible for essentials. Important: secure the dresser to the wall and use a proper changing pad only as intended. This conversion keeps storage functional and creates a warm, tailored look for the nursery while prioritizing practical surface space and accessibility for caregiving items.
Key Design Elements
- Paint with durable, washable finish
- Add a removable changing pad top
- Secure dresser to the wall
Pro Tip: Use a removable, wipeable changing pad and anchor the dresser to the wall; confirm the pad’s fit and follow its manufacturer guidelines for safe use.
13. Personalized Rast Refresh
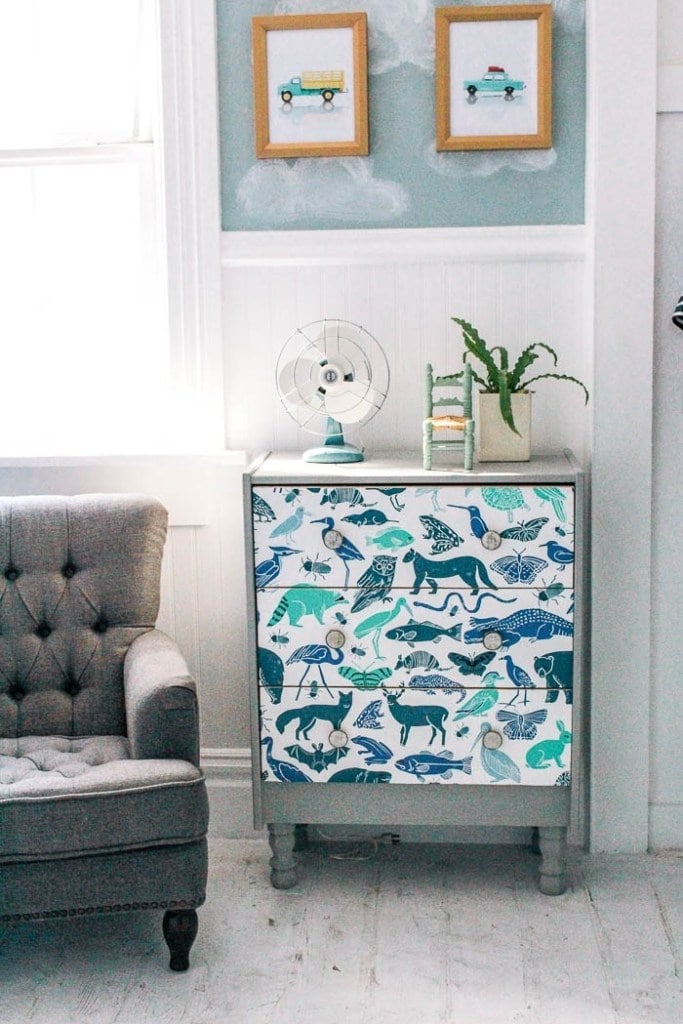
Small personalization choices can dramatically update an affordable Rast. Swap in new tapered legs, apply chalky or matte paint colors, and add wallpaper or patterned drawer liners to create depth and charm. These cosmetic changes increase visual presence without altering storage capacity and suit eclectic, cottage, or shabby-chic schemes. Consider mixing hardware styles—like small knobs with a central pull—for character. The result is a customized piece that feels intentionally chosen for your space while remaining adaptable as tastes change.
Key Design Elements
- Install new tapered legs
- Use chalk-style paint
- Line drawers with wallpaper
Pro Tip: Coordinate leg stain or paint with room accents; removable wallpaper on drawer interiors is an easy way to add surprise without permanent commitment.
14. Coastal Rope and Cleat Details
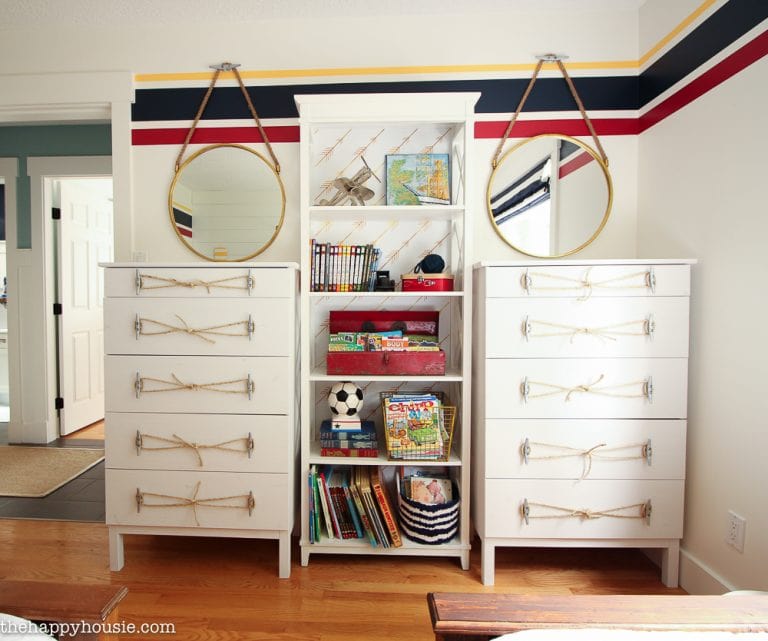
Give a basic dresser nautical personality by introducing rope accents and dock-cleat-inspired pulls. A navy, white, or red paint palette pairs naturally with natural rope trim wrapped around drawer edges or applied as subtle banding. Choose hardware that nods to maritime forms—rounded cleats or heavy eyelets—for authenticity. This approach reads relaxed and curated, ideal for beach houses, lake cabins, or interiors that borrow coastal cues. Keep rope minimal and sealed where necessary to avoid fraying, and balance the look with driftwood accessories and linen textiles.
Key Design Elements
- Incorporate rope banding sparingly
- Paint in classic coastal hues
- Choose nautical-inspired hardware
Pro Tip: Seal natural rope with a clear matte finish to reduce fraying and dust pickup; pair with soft linen accents for a lived-in coastal feel.
15. Dresser Reimagined as Desk
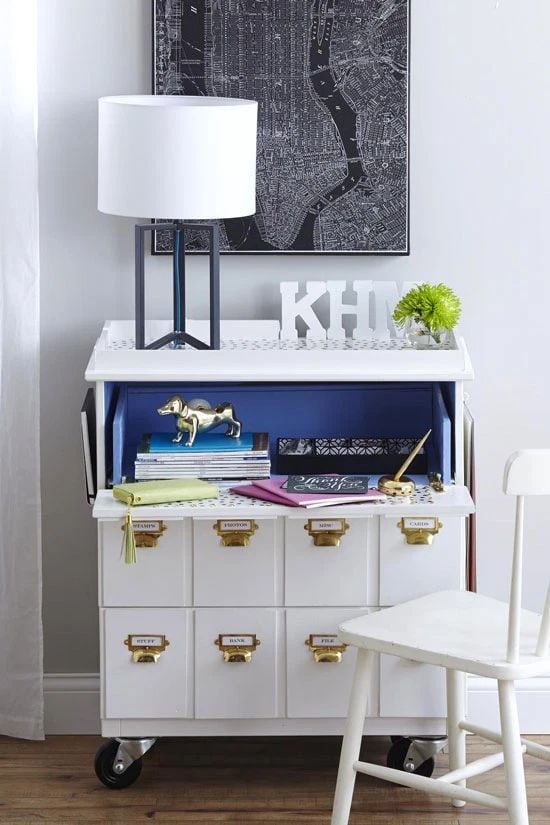
Transform a dresser into a compact rolling workstation by removing or refacing one drawer to form a fold-out work surface and retaining other drawers for office supplies. Add castors for mobility and create a shallow cubby for charging devices or a small printer. Keep the desktop area stylish by refinishing the top and adding a modest lip to conceal cables or papers. This conversion preserves storage while serving as a practical, space-saving desk for a guest room or apartment nook—especially effective when combined with a simple task lamp and a comfy chair.
Key Design Elements
- Refit a drawer into a fold-out surface
- Add castors for mobility
- Refinish top for a desktop look
Pro Tip: Choose a durable top surface and keep one drawer accessible for office essentials; a shallow lip at the back helps manage cords and keeps the surface tidy.
16. Bold Fabric Fronts
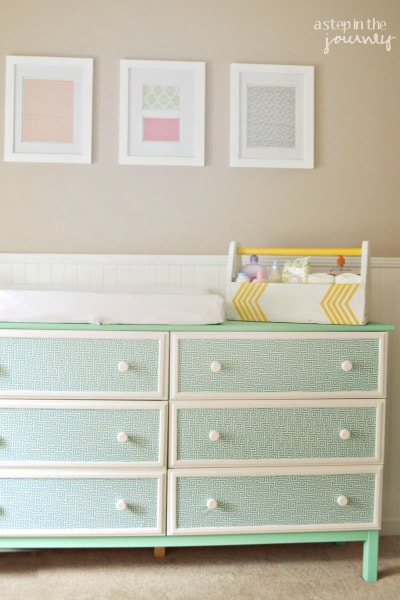
Adhering or wrapping fabric to drawer faces creates an instant statement. Pick a bold, tightly woven textile that complements the dresser case color and secure smoothly for a polished finish. Coordinate the case hue to pick up a secondary tone in the fabric so the piece reads cohesive. Consider protective clear coat or laminate strips at edges to protect high-contact areas. This strategy introduces pattern and softness and works well in bedrooms, craft rooms, or media spaces where fabrics can echo curtains or cushions, tying the room together with texture and color.
Key Design Elements
- Select tightly woven, durable fabric
- Coordinate case color to fabric
- Protect edges with trim or lacquer
Pro Tip: Press fabric with starch for stability before application; use double-sided tape under corners for a smooth finish and to prevent bubbling over time.
17. Wallpaper as Drawer Art
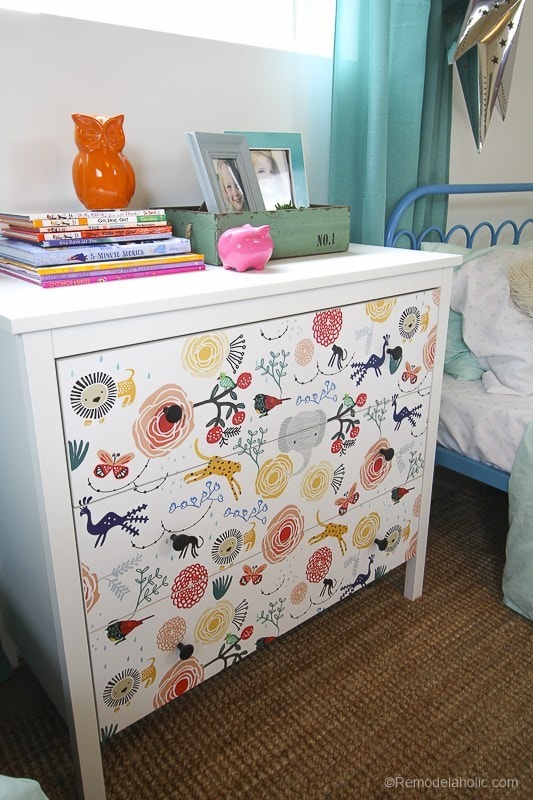
Removable wallpaper on drawer faces offers high-impact pattern with low commitment. Choose bold motifs for a focal point or subtle textures for a refined update. Match or contrast new pulls based on whether you want the paper or hardware to dominate visually. Because the wallpaper is removable, you can refresh the look seasonally or when tastes shift. This solution brightens rental-friendly spaces and allows playful layering—pair patterned drawers with a solid, muted case color to keep the balance. It’s a fast, flexible way to add visual interest without structural changes.
Key Design Elements
- Apply removable wallpaper to drawers
- Balance bold paper with neutral case
- Swap hardware as needed
Pro Tip: Smooth wallpaper from the center outward to avoid bubbles and align repeat patterns carefully across drawer faces for a crisp, intentional look.
18. Tonal Ombre Fronts
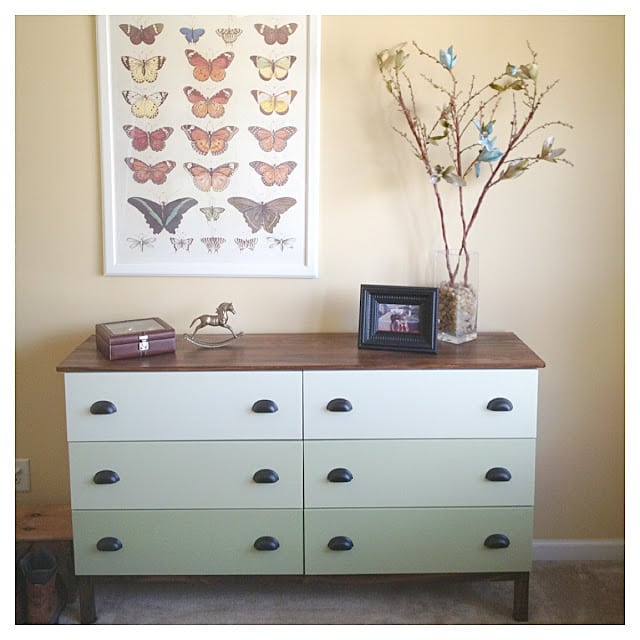
An ombre treatment across drawer fronts creates a soft, modern gradient that feels fresh and elegant. Choose three or more shades from the same color family and transition from light to dark down the stack of drawers. Contrasting hardware—such as matte black or polished nickel—adds a crisp finish and anchors the gradient. This technique works beautifully in calming bedrooms or gender-neutral nurseries and can be adjusted for boldness by selecting saturated or muted tones. The visual flow of ombre adds movement to a room while keeping the dresser’s form simple and refined.
Key Design Elements
- Select three-to-four tonal shades
- Paint drawers light-to-dark
- Use contrasting hardware
Pro Tip: Lay out swatches before painting to ensure smooth transitions; feather edges slightly between tones for a gentle, blended ombre effect.
19. Tailored Rast Upgrade
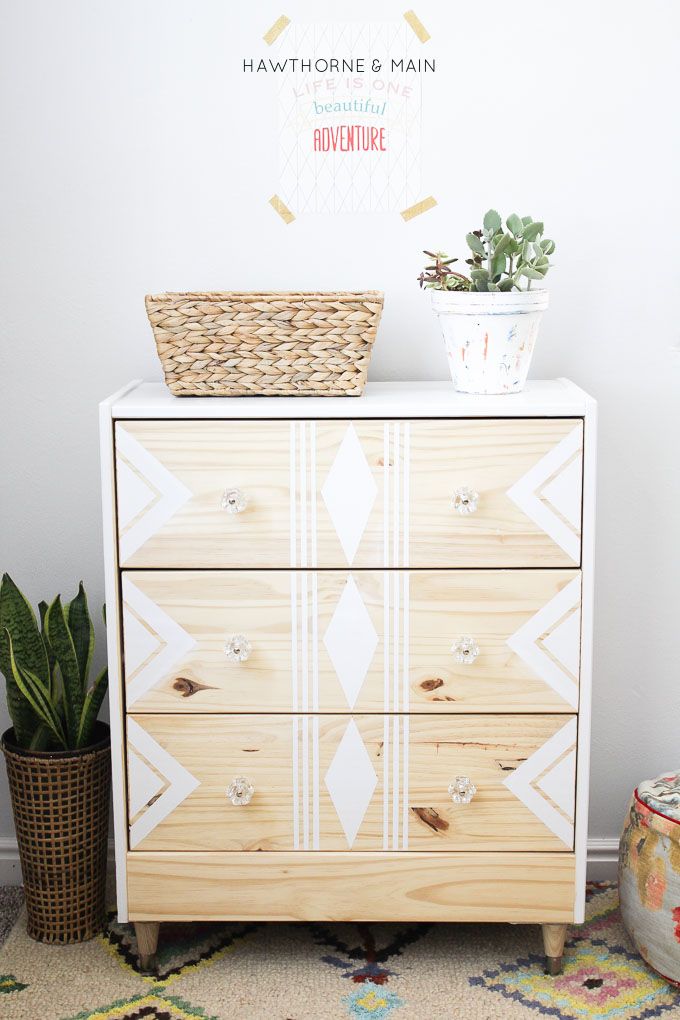
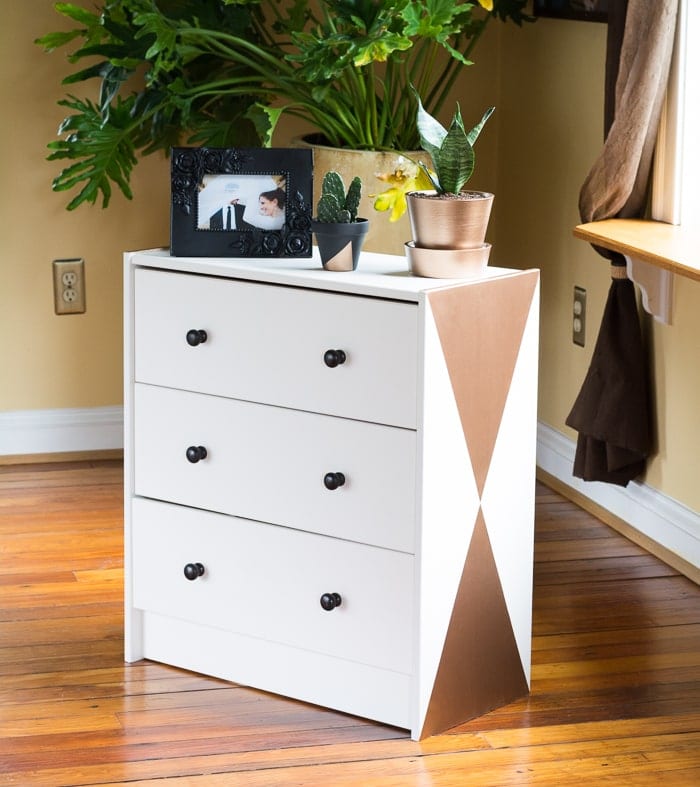
Add legs, a painted pattern, and a coordinated topcoat to turn a compact Rast into a tailored accent piece. Tapered or hairpin legs lift the unit visually, while a simple painted design—stripes, squares, or a single bordered color field—adds refinement. Finish with a coordinating top treatment like faux marble contact paper or a stained wood plank to elevate the surface. The combination of height, crisp pattern, and a neat top makes the small dresser feel intentional and styled, perfect for entryways or small bedrooms where footprint matters but design does too.
Key Design Elements
- Install tapered or hairpin legs
- Paint a defined surface pattern
- Finish top in coordinating material
Pro Tip: Ensure leg screws are anchored into a reinforced base for stability; choose a top material that complements room finishes for a cohesive overall look.
Conclusion
IKEA dresser hacks open up big design possibilities from a small investment: paint, applied panels, hardware swaps, and surface treatments all change how a piece reads in a room. Use these 19 ideas as inspiration—mix colors, textures, and small architectural details to arrive at a look that feels curated and personal without overcomplicating the process.
Remember to consider scale, function, and safety as you plan. Keep drawers accessible, choose finishes that match daily use, and secure taller pieces to the wall as needed. With thoughtful finishing choices and a few tailored touches, an ordinary dresser can become a memorable focal point that reflects your style.