
Training a Dream: How We Turned a Blank Wall into a Blooming Espalier with Star Jasmine
Growing up, I remember my parents spending at least a couple hours every weekend at our local nursery. Gardening was a sweet hobby they shared, and my siblings and I were just along for the ride. California’s moderate climate and fertile soil gave them unlimited planting options, and I was always amazed at their ability to identify so many different types of plants. Now, of course, there are apps that can do that for you in seconds, but back then it felt like a superpower.
Here in Texas, gardening looks a little different. We deal with extreme heat, shorter growing seasons, and long periods of drought. So while the gardening bug stuck with me in spirit, it’s taken me a while to figure out how to make it work practically in our space.
Falling in Love with Espalier
We have this giant, stark wall on the exterior of our home that I always envisioned transforming with a flowering vine—something graphic, elegant, and timeless. Think: diamond pattern, European country garden vibes. I’m sure you’ve seen the look before—it’s that chic, structured design where plants are trained to grow flat against a wall in an ornamental pattern.
At the time, I had no idea what this style was even called. I fell down a Pinterest rabbit hole, found a few scattered inspiration photos (most with no credits—Pinterest, do better!), and finally discovered that this beautiful, classic look is known as espalier.
Espalier is the art of training trees, shrubs, or vines to grow in a flat, decorative pattern, usually against a wall or fence. This technique has been used for centuries—from Roman gardens to French chateaus and British estates—not just for fruit production but also as a way to add sculptural beauty to solid walls.

I loved this inspiration photo I found on Pinterest, source unknown so please tag me in the comments if you know who I can credit.

Designer here is Sylvia Martin. As you can see, espalier can also be used to to highlight or divide one area of the garden from another.
Design Inspiration from Across the Globe
Once I discovered the term “espalier,” I was fascinated by how different cultures interpreted it. The diamond pattern I had in mind is just one version. Some espalier designs follow horizontal or vertical lines, fan out like rays of sunlight, or mimic candelabras with elegant curves. There’s even a super minimalist version that looks like it belongs in a Japanese rock garden or Scandinavian greenhouse.
This rabbit hole was so much fun to explore, and it reminded me that this isn’t just a garden trend—it’s living architecture. If you’re considering trying espalier at home, I highly recommend pulling inspiration from beyond social media. Look at garden books, vintage estate plans, or even historical illustrations of castle walls. The shapes may be centuries old, but they still look timeless.
Choosing the Right Vine
While Nick and I are no strangers to DIY, we’re not exactly green thumbs. We knew we needed something relatively low-maintenance but still beautiful and fragrant. I’ve always loved jasmine—the scent alone transports me—and was thrilled to learn that star jasmine is well-adapted to Central Texas’s climate.
It’s not native to the region, but it grows vigorously, can tolerate heat, and won’t damage the foundation the way ivy or wisteria might. Bonus: our local nursery (highly recommend Barton Springs Nursery if you’re in Austin!) said these vines can grow up to six feet in a single year. I was sold.
The DIY Journey Begins (With Help from Dad!)
After all this research, I called my dad to share the plan—he’s always had an eye for landscaping. Of course, he was already familiar with espalier (because of course he was), and to my surprise, he volunteered to take on the project with us. From that moment, it became a collaboration. He was the brains (and muscle) behind the build, and I got to be the designer and creative director.
Love you, Dad!
Planning the Space
Before installation, we spent a good chunk of time planning out the design. Our wall faces south, so it gets plenty of sun—ideal for star jasmine. We also have geometric hardscaping in the backyard (lots of concrete pavers), so we wanted the vine lattice to complement those shapes without competing visually.
You can also install espaliers on fences, pergola posts, or even large wooden panels—so don’t feel limited to house walls. The key is picking a spot with enough sun and enough visual presence to make the work worthwhile.


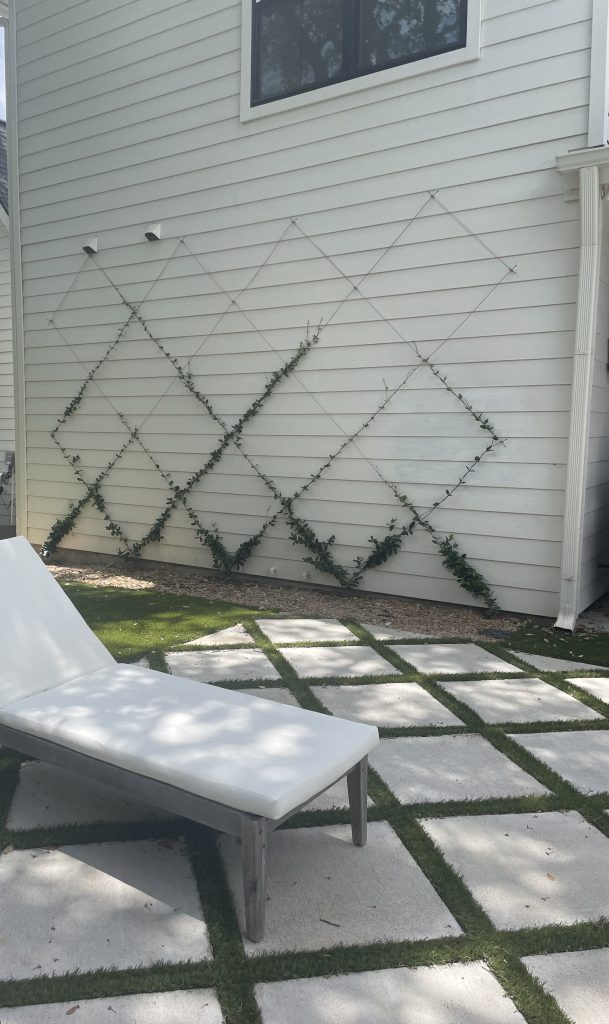
Here was the finished product. Would you believe it took less than two months for the jasmine vines to take off this high on the wall?

You can see I need work on “training” a few pieces by wrapping them around the wire in some places in a couple of these more current photos. Just wrap the the wispy vines around the wire. Otherwise use the floral wire to wrap multiple vines and consolidate thicker sections of growth.


Creating a Garden Moment: Styling Around the Espalier
Once the trellis was installed and the star jasmine had taken root, I quickly realized that this project could be more than just a wall feature—it could become a whole moment in the garden. A beautifully trained vine is a showstopper, but the area surrounding it can elevate the entire look and make it feel like a true destination in your outdoor space.
To start, we added a slim gravel border around the base of the wall. It helps with drainage and gives the vines a clean space to grow without competition from lawn grass. Then, I found a couple of vintage-style terracotta pots and planted them with lavender and rosemary—both drought-tolerant, fragrant, and complimentary to the soft white blooms of star jasmine.
Next came furniture. We had a small bistro table set that never really had a home. Placing it right in front of the espalier made it the perfect spot for morning coffee or a glass of wine in the evening. It’s amazing how quickly that simple setup transformed our backyard. Suddenly, we weren’t just looking at our garden—we were living in it.
Lighting was the final touch. We added soft, solar-powered uplights at the base of the wall to give the trellis a little drama after sunset. The light filters through the leaves and creates shadows that dance along the brick at night. A couple of lanterns on the table and a strand of bistro lights above pulled it all together into a cozy little nook that feels like a private retreat.
If you’re thinking of taking on an espalier project, I highly recommend planning out what will surround it. Do you want a seating area? A path? A flower border? Even a small bench or garden stool can encourage you to pause and admire the growth. Think of it not just as a wall improvement but as an anchor for your entire outdoor space.
And for those who might not have the space for a full wall installation, consider a panel trellis or free-standing screen. These can be placed behind container gardens or along walkways to bring that same sculptural beauty to smaller footprints. The key is treating your espalier like a living piece of art—and curating the space around it as you would a gallery wall in your home.
Now when I walk through the backyard, I don’t just see a vine. I see a memory with my dad. I see a space we dreamed about and brought to life. And I see the potential to create more corners of beauty, one garden moment at a time.
So if you’ve got a bare wall, a little patience, and a love for fragrant blooms—go for it. You might just end up with your own little slice of European garden magic. Spring can’t come soon enough when some blooms start to pop!


2 Comments
Hello. Thank you for sharing! I’m wondering did you break up a larger pot of star jasmine? I don’t seem to find it with such a small base. (does that make sense??) I want to plant it in a narrow path but I only see it in large gallons.
Hi Angelica, First of all, I’m not sure how we missed your message, but I’m so sorry for the late response! You’re right—star jasmine usually comes in larger gallon pots. For our espalier, we didn’t break up a larger pot, but instead planted the smaller base plants side by side to fit the narrow path. You can do the samee, jspace them evenly along your path, and they’ll fill in beautifully as they grow! Hope this helps 🙂