Let’s be honest, we all have it. That digital folder on your computer bursting with thousands of photos, snapshots from years gone by. It’s funny, growing up I always felt like my parents were always behind a lens. Some may have a real-life shoebox (or an entire room for my parents!) overflowing with photos. So when it comes to actually getting these photos off our phones, out of shoeboxes, and onto our walls, we freeze. Suddenly, the question becomes overwhelming: How do you display a lifetime of love without creating a cluttered mess? How do you make your personal photos look like intentional, beautiful art instead of just… stuff?
Good news. I think we’ve figured out how to celebrate those family photos with style. Don’t think of your photos as sentimental clutter and start seeing them for what they are: your own personal art collection. With a few insider tricks, you can transform those cherished memories into a sophisticated, soulful, and stunning feature in your home. Ready for a masterclass in turning your family history into high design? Let’s do this.

Step One: Play Curator
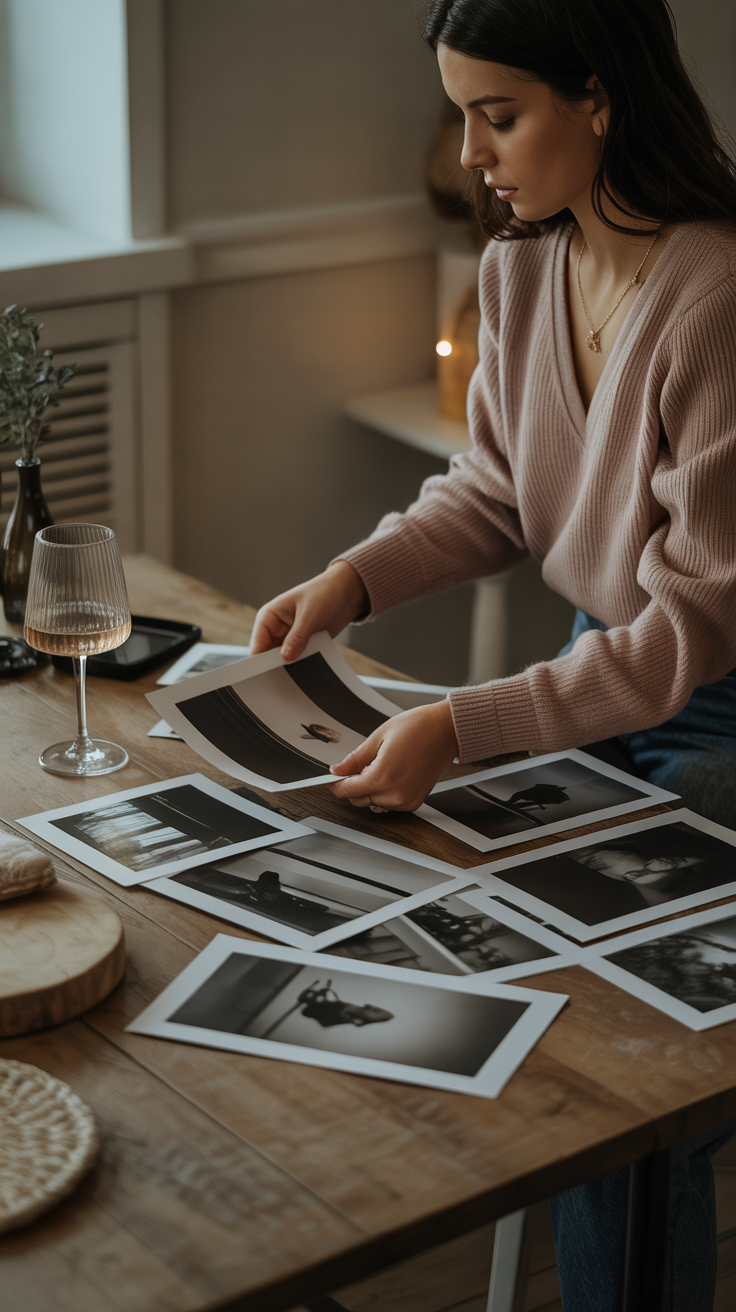
Before you even think about frames or hammers, the first step is to become the curator of your own life. Truly, this is is the fun part! Pour a glass of wine, put on some music, and start sifting through your photos. You’re not looking for perfection; you’re looking for feeling. The goal is to find the images that make you smile, the ones that tell a story, the ones that capture a personality in a single, unscripted moment.
Go for the Real Moments: Forget the awkward, “everyone say cheese” portraits and go for candid. That shot of your kids dissolving into laughter, your partner caught in a quiet, thoughtful moment, the joyful chaos of a family dinner. These are the images that feel alive. My tip? Shoot more videos and pull out stills to grab the right moment. It’s a pressure-free way to capture those fleeting, authentic expressions that are impossible to pose.
The Magic of Black and White: So, you’ve got a photo from a sunny beach trip, another from a dimly lit birthday party, and a third from a fluorescent-lit school play. The colors are all over the place. My tip? Go with black and white. Converting your photos to a monochrome palette is the fastest way to create a cohesive, elegant collection. It instantly unifies images from different times and places, making them feel like they belong together. Plus, it’s incredibly forgiving, hiding a multitude of sins like digital graininess or weird lighting. Suddenly, your random assortment of photos looks like a curated art exhibit. It’s the great equalizer, turning your iPhone snapshots into something that could hang in a gallery.
The Gallery Wall: Your Wall, Your Story
The gallery wall is a classic for a reason, it’s a fantastic way to make a big impact and tell a rich story. But a great gallery wall doesn’t just happen; it’s planned. Here are a couple of strategies I swear by.
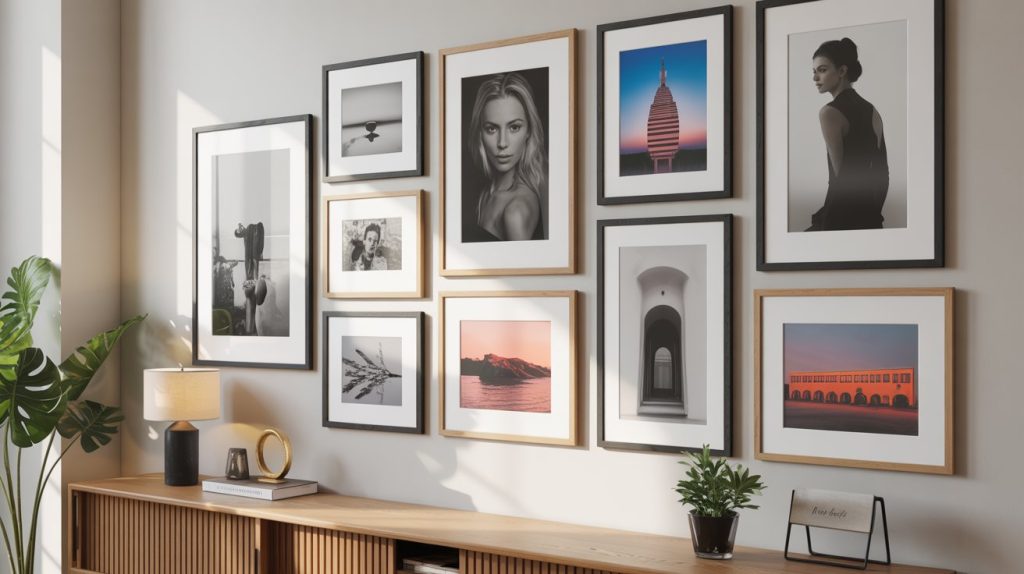
The Clean Grid: If you’re a Type A who loves clean lines and symmetry, the grid is your best friend. This involves using identical frames and hanging them in a perfect, geometric arrangement (think a neat square or a long, orderly row). It’s a polished, architectural look that feels incredibly high-end. This look works beautifully in modern spaces, offices, or anywhere you want to make a bold, graphic statement. It’s clean, it’s confident, and it looks like you really know what you’re doing. The key here is consistency. Use all black and white photos, or all color photos. And measure, measure, measure (and level, level, level)! The spacing between the frames needs to be exact for the grid to have that sharp, intentional effect. My favorite hack is to use painters tape to lay out my grid before nailing any holes.
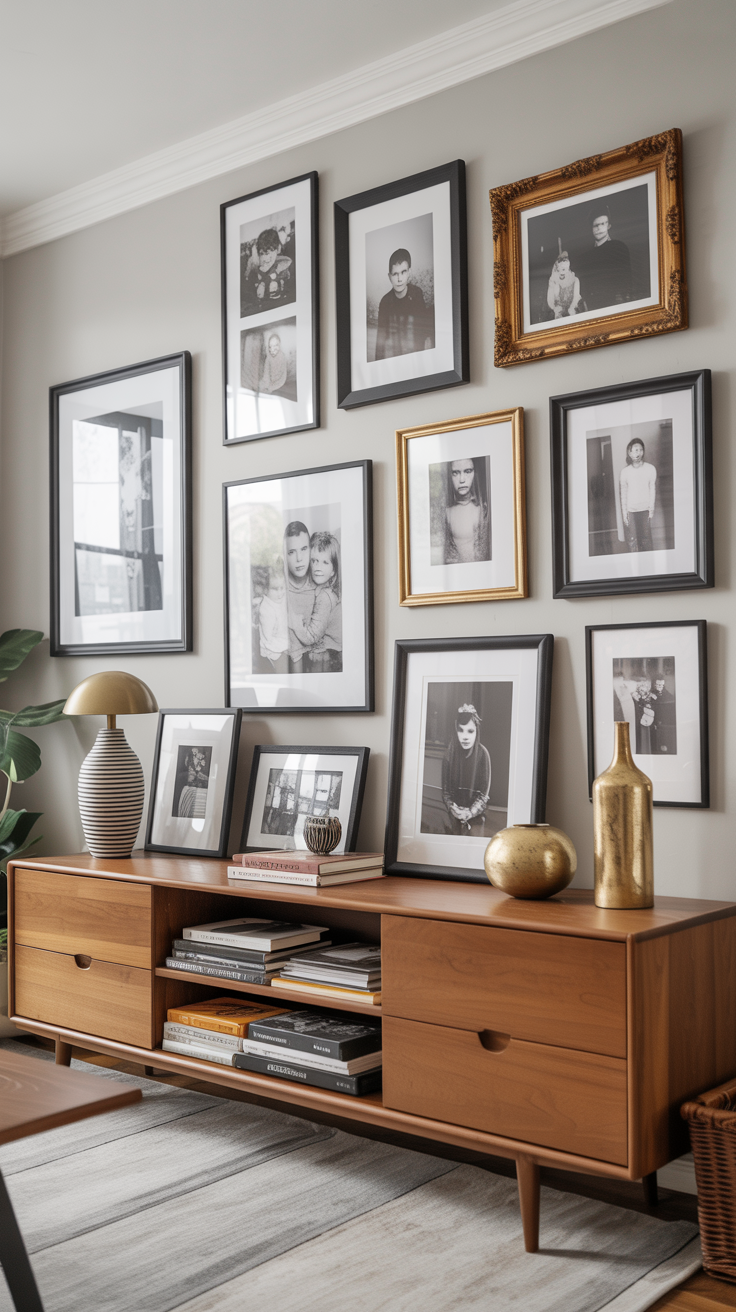
The Free-Spirited Salon Wall: If a perfect grid feels too rigid for you, embrace the relaxed, eclectic vibe of a salon-style wall. Go ahead and mix and match frames of different sizes, materials, and styles. The trick to making it look cool and collected, not chaotic, is to find a common thread. Maybe it’s a shared color family in the frames (like warm woods and golds), or maybe you use the same color mat in every frame. A great pro-tip is to lay out your entire collection on the floor first. Start with your biggest piece in the middle, and then build out from there, playing with the arrangement until it feels balanced and just right. Take a photo of your floor layout before you start hammering nails, TRUST ME. This look is perfect for homes with personality, where a little bit of organized chaos feels right at home.
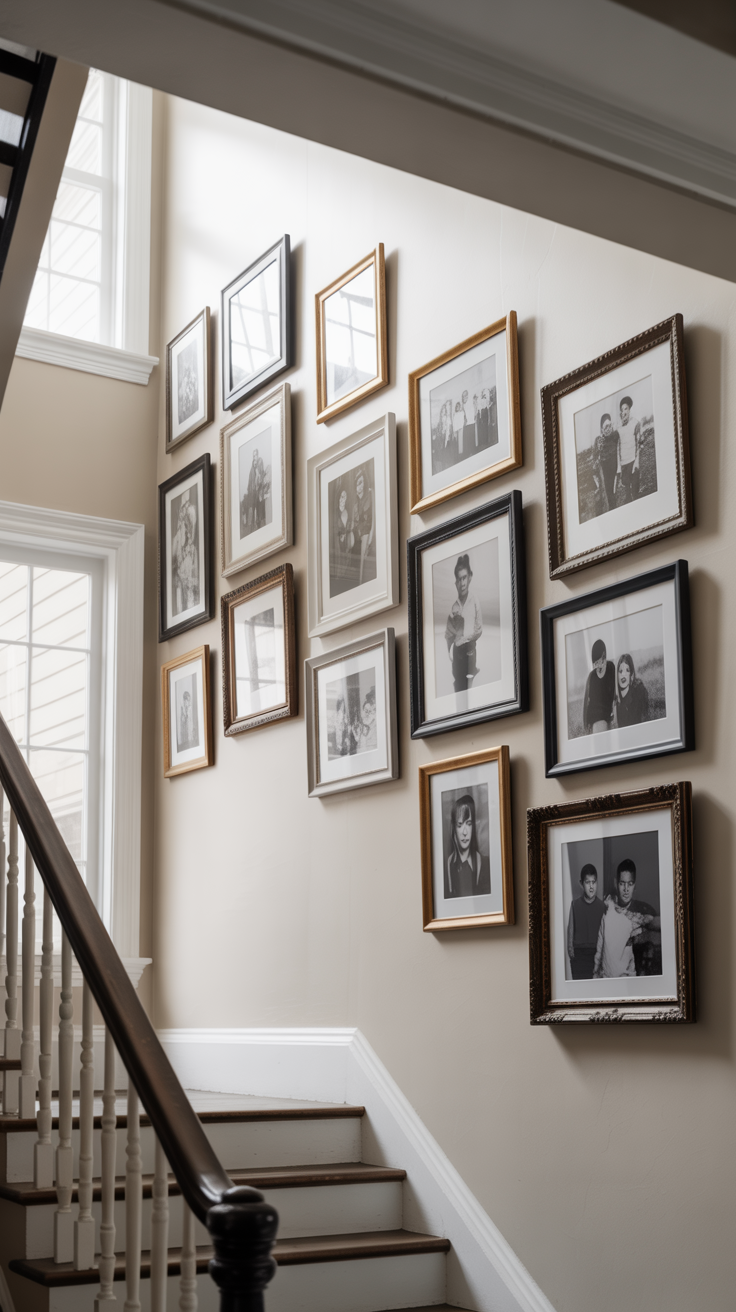
A Stairway of Memories: The wall along your staircase is prime real estate for a photo display. It’s a natural journey, and your photos can tell a story as you walk up or down. You can arrange them chronologically to create a visual timeline of your family’s growth, or just mix and match favorite moments. The key is to hang them so they follow the upward slope of the stairs, creating a pleasing line that draws your eye along the path. I love this look for hallways and stairs because the images naturally unfold as you move through the space. It creates a real life memory lane, sparking conversations and stories.
Tell a Story with Your Photos
Speaking of sharing stores, one of the most powerful things you can do with your photo display is to think like a storyteller. Rather than just hanging up random favorites, consider grouping your photos in a way that creates a narrative.
The Timeline Approach: This is especially beautiful on a long hallway or staircase. Start with the oldest photos, maybe your grandparents or parents in their youth, and progress through time to the present day. It’s a powerful visual representation of your family’s journey, and it creates a sense of legacy. It’s also a great conversation starter when guests visit.
Theme It Out: Another fun approach is to create themed collections. Maybe you dedicate a wall to travel, showcasing photos from all the adventures your family has taken. Or create a collection around a specific color palette, choosing photos that all feature similar hues. You could even do a “summer wall” or a “holiday wall” that you update seasonally. The possibilities are endless, and it keeps your displays feeling fresh and intentional.
Celebrate the Generations: One of the most moving ways to display photos is to honor different generations side by side. Pair a photo of your grandmother as a young woman with a photo of your daughter at the same age. Create a display that showcases all the matriarchs or patriarchs of your family. This kind of display isn’t just decorative, it’s deeply meaningful, creating a visual bridge between past and present.
Think Beyond the Wall: Fresh Ideas for Your Photos
Gallery walls are great, but they’re not the only game in town. Don’t be afraid to use photos in all sorts of creative ways that feel modern, fresh, and totally doable.
The Lone Star: Sometimes, one is all you need. A single, oversized photograph can have more impact than a dozen smaller ones. And sometimes it has other visual effects like making a space feel larger or the ceiling feel taller. The trick is to choose the right image. This isn’t the place for a tight, formal portrait. Think bigger. Maybe a breathtaking landscape from a family trip, a dramatic black-and-white shot of your kids running on the beach, a moody silhouette at sunset. Blown up to a large scale, this kind of photo becomes a true piece of art, a personal and powerful statement that can anchor an entire room. I’d veer toward more scenic family photos rather than close-up portraits which can feel a bit overwhelming, especially in a central part of the living space.
The Ledge Life: If you’re a commitment-phobe when it comes to hanging art, go photo-ledge. These slim shelves are a designer’s dream because they offer ultimate flexibility. You can lean a collection of framed photos, overlap them, and mix in other little treasures like small plants, candles, or souvenirs. My daughter’s bedroom also features a collection of ledges to display her troll collection–such a fun way to display all forms of art. It’s a low-stakes way to create a display that feels layered, personal, and easy to change whenever the mood strikes. I like to use ledges in varying lengths to create a cohesive but not-too-uniform look, mixing both black and white and color photos for visual interest.
Tabletop Treasures: Don’t forget about the surfaces in your home! A small, curated collection of photos on a console table, a nightstand, or tucked into a bookshelf adds such a warm and intimate touch. Designer Ellie Christopher loves this move, noting that a little trio of frames on a bedside table feels “intimate and collected.” Play with different frame materials and heights to create a stylish little vignette that tells a story. Mix a sleek acrylic frame with a vintage brass one, or pair a modern black frame with a rustic wood one. The contrast adds interest and keeps it from feeling too matchy-matchy.

The Polaroid Moment: Polaroids are and have been having a major moment. Did you know you can print your iPhone photos as Polaroids now? Polaroids make for the coolest, most casual displays. Pin them directly to the wall, float-mount them in a grid, or clip them to a string with mini clothespins. There’s something about the square format and the white border that just feels fun and nostalgic. It’s a perfect solution for a kid’s room, a home office, or anywhere you want to keep things light and playful.
The Finishing Touches: Framing and Matting Matter
I grew up in an art filled home and to this day have a great appreciation for frames and matting. Think of the frame and mat as the perfect outfit for your photograph. They truly do complete the look and make your photo feel polished and important. Trust me when I say this is what elevates your display from “nice” to “WOW.”
Find the Right Frame: The frame’s job is to complement the photo, not compete with it. A simple, thin frame in black, white, or a natural wood is a can’t-go-wrong classic. For a vintage photo, an ornate gold frame can add a touch of importance. The trick is to look at your photo first, and let it tell you what kind of frame it needs. A beachy, casual photo might want a light, natural wood frame. A formal black and white portrait might call for something sleek and modern in black or gold. Trust your instincts.
Seriously…don’t skip the mat! The mat, that paper border between the photo and the frame, is the queen of framing. It gives your photo breathing room and instantly makes it look more professional and gallery-worthy. A crisp white mat is always a good choice and works with virtually any photo or decor style. And here’s a pro tip: using an extra-wide mat with a smaller photo is a chic trick that gives your image a ton of importance and visual weight. It’s the difference between a snapshot and a piece of art. For a more modern look, you can try float mounting, where the photo appears to float on top of the mat. It’s especially beautiful for photos with interesting edges or textures.
Designer Red Flags: What to Avoid
Knowing what not to do is half the battle. Keep these common design mistakes in mind to ensure your photo display is chic, not cringey.
The Canvas Curse: Step away from the canvas prints. While they’re great for paintings, designers almost universally agree that printing photos on canvas can make them look dated and a bit like something you’d find in a cheesy mall portrait studio. A beautiful paper print behind glass will always look more timeless and sophisticated. It preserves the detail and quality of the photograph in a way that canvas just can’t match.
The Size Struggle: It’s tempting to print that gorgeous wedding photo as big as possible, but bigger isn’t always better. I personally one of the biggest mistakes I see is that people tend to print photos too large. I prefer 9×12″ or smaller. There’s something about a smaller, more intimate scale that makes personal photos feel precious rather than overwhelming. The one exception? Go big with vintage photos! A huge print of an old black and white family photo can look incredibly cool and artful. It becomes less about “look at us” and more about honoring history and heritage.
Location is Key: Where you hang your photos matters just as much as how you hang them. In my opinion the big, personal displays should live in the more private and transitional areas of your home, like hallways, staircases, offices, and bedrooms. These are places where people can get up close and really enjoy the photos, turning a simple hallway into a personal gallery of your life’s best moments. Formal living rooms, on the other hand, are generally better suited to more traditional art. I will also say, limiting family photos to a few special spots throughout the home will also make them feel special versus overwhelming.
Get Creative: Frameless Ideas
Not every photo needs a frame. If you’re feeling creative or working with a tighter budget, there are tons of fun ways to display photos that skip the frame entirely.
Clip It Good: Grab some bulldog clips, binder clips, or even those pants hangers from your closet and use them to hang photos. It’s industrial, it’s casual, and it’s super easy to swap photos in and out. This works great for a home office or a teenager’s room where the vibe is more relaxed and ever-changing.
Tape It Up: Don’t underestimate the power of good tape. Washi tape, in particular, comes in gorgeous patterns and colors and can be used to create a fun, temporary photo collage directly on your wall. It’s perfect for renters or anyone who wants the flexibility to change things up regularly. Just make sure to use gentle tape that won’t damage your walls. I recently experimented with wall putty and seriously damaged my walls, so I can’t recommend that either. But if any of you had a good experience, please drop the brand in the comments!!
The String Thing: String up some fairy lights or a simple cord, and use mini clothespins to clip photos along the length. It’s whimsical, it’s warm, and it adds a lovely, soft glow to any room. This is especially charming in a bedroom or a cozy reading nook.
A Home with Heart
At the end of the day, your home should tell your story. And what better way to do that than with the faces of the people you love? By treating your photos with care and creativity, you’re doing more than just decorating, you’re infusing your home with soul. You’re creating a space that’s not just beautiful to look at, but beautiful to live in, surrounded by the moments and memories that matter most.
Scroll through your camera roll. Find the images that make you laugh, that make you nostalgic, that capture the essence of the people you love. Then give them the spotlight they deserve. Your walls are waiting, and they’re ready to tell your story in the most beautiful way possible.
The Practical Side: Making It Happen
Now that you’re inspired and ready to transform your walls, let’s talk about the practical side of making this happen. Because all the design inspiration in the world doesn’t help if you don’t know where to actually buy frames or how to hang them without creating a Swiss cheese situation on your walls.
Where to Shop: When it comes to sourcing frames, you’ve got options at every price point. For affordable, modern frames, I recommend Crate & Barrel, CB2, and even Amazon. If you’re looking for something with more character and patina, hit up your local vintage shops, flea markets, or estate sales. You never know what treasures you’ll find, and the mix of old and new can add so much personality to your display. For custom framing that’s actually affordable and easy, services like Framebridge and Artifact Uprising are good quality and convenient.
The Hanging Game: Here’s a secret that will save you so much frustration: before you put a single nail in the wall, create a template. I typically just use painters tape to create a grid but there is a much more scientific process for beginners. Trace your frames onto kraft paper or newspaper, cut them out, and tape them to the wall. This lets you play with the arrangement without committing to holes. Once you’ve got it just right, mark where the nails should go, remove the paper, and hang with confidence. For a gallery wall, start from the center and work your way out. Use a level (or a leveling app on your phone) to make sure everything is straight. And invest in good picture-hanging hardware. It makes all the difference.
Mix High and Low: You don’t need to spend a fortune to create a beautiful photo display. Mix expensive custom frames with affordable finds. Pair a vintage frame from a flea market with a sleek modern one from Target. The contrast actually makes the display more interesting and collected-looking. It’s the high-low mix that makes a space feel curated rather than catalog-perfect.
Room by Room: Where Photos Work Best
Let’s break it down by room, because where you place your photos can really change the vibe and impact.
Hallways: This is gallery territory. A long hallway is perfect for a chronological display or a salon-style wall. Since hallways are transitional spaces, people naturally slow down and look at what’s on the walls. It’s the perfect place to tell your family’s story in depth.
Staircases: As we mentioned, the staircase wall is ideal for a photo journey. The upward movement creates a natural narrative flow. Just remember to hang them following the angle of the stairs for the most pleasing visual effect.
Bedrooms: Bedrooms are intimate spaces, so this is where you can get really personal. A small collection of family photos on a dresser or nightstand, or a simple grid of photos above the bed, adds warmth and makes the space feel truly yours.
Home Offices: Working from home? Surround yourself with the people you love. A photo ledge above your desk or a small gallery wall behind your Zoom background can make your workspace feel less sterile and more human. Plus, it’s a nice reminder of what you’re working for.
Dining Rooms: You may be surprised to hear that I tend to think dining rooms are great place to park family photos because they’re social spaces where conversations happen. A beautiful photo display can be a conversation starter and makes the room feel more personal and inviting.
Living Rooms: Tread lightly here. While you can absolutely include family photos in a living room, keep them more curated and integrated with other art and objects. A photo ledge on a bookshelf or a single statement piece can work beautifully without overwhelming the space.
The Seasonal Refresh
One of the best things about photo displays, especially if you use ledges or clip systems, is that you can change them up. Consider doing a seasonal refresh where you swap out photos to reflect the time of year. Summer beach photos in the warm months, cozy holiday shots in winter. It keeps your home feeling fresh and gives you a reason to revisit all those wonderful memories throughout the year.
Your Story, Your Way
The most important thing to remember is that there are no hard and fast rules. If you love that big canvas print, keep it. If you want to cover an entire wall floor to ceiling with photos, go for it. The goal is to create a space that makes you happy, that tells your story, and that celebrates the people and moments that matter most to you.