As autumn arrives with its crisp air and vibrant colors, our homes naturally call for a touch of seasonal warmth. Anthropologie is well-known for its distinctive vibe, mixing whimsical charm with sophisticated style. Their fall collections, especially their wreaths are among my favorites in seasonal decor but they just come with a helfy pricetag…
This made me wonder if we could maybe come up with a copycat version to save a couple hundred bucks. So today two different DIY wreath projects to get you in the mood!
The Anthropologie Aesthetic: Deconstructed
The Anthropologie look is characterized by a harmonious blend of natural materials, unique textures, and a thoughtfully curated color palette, often leaning towards muted, earthy tones with unexpected pops of rich, jewel-like hues. The feeling is rustic elegance, both refined and effortlessly organic. They use a lot of dried botanicals, preserved leaves, delicate seed pods, and various types of branches and twigs. There’s also an undeniable artisanal feel to their creations. Each piece appears appears handcrafted, with slight variations that speak to its unique character rather than mass production which is why this makes for a perfect DIY project.
DIY Project 1: The Dried Botanical Wreath
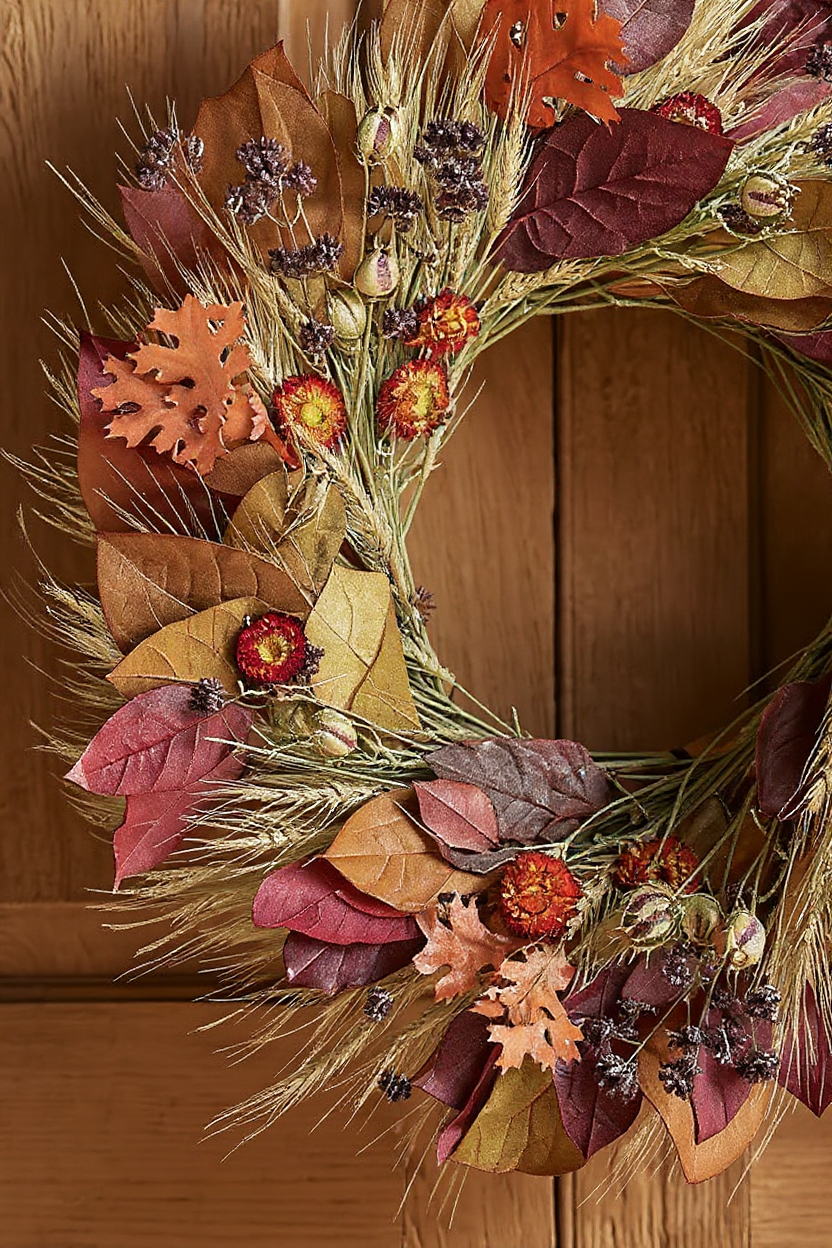
One of the most captivating styles frequently seen in Anthropologie’s fall collections is the dried botanical wreath. These pieces exude a timeless elegance, celebrating the delicate beauty and intricate textures of preserved flora. Unlike fresh flowers, dried botanicals offer lasting charm, their muted tones and delicate forms creating a sophisticated, almost ethereal aesthetic. The inspiration for this project comes directly from Anthropologie’s ability to transform simple dried elements into works of art that feel both wild and refined, perfect for adding a touch of natural beauty to any entryway or interior space.
Materials List:
•Wreath Base: 14-inch grapevine wreath (the natural texture provides an excellent foundation)
•Dried Flowers: A generous assortment of dried flowers in complementary fall colors. Consider: dried hydrangeas (for volume and texture), dried statice (for delicate clusters), dried strawflowers (for pops of color and shape), dried bunny tails or pampas grass (for softness and movement).
•Preserved Leaves: Bundles of preserved eucalyptus (silver dollar or seeded for varied shapes), preserved oak leaves, or magnolia leaves (for larger, more dramatic elements).
•Seed Pods: A small selection of interesting seed pods like lotus pods, poppy pods, or sweet gum balls (for unique textural accents).
•Filler Greenery: Dried or preserved fern fronds, or small bundles of dried wheat.
•Ribbon: 1.5-inch wide velvet ribbon in a complementary fall shade (e.g., deep burgundy, forest green, or burnt orange) for hanging.
•Tools: Floral wire (24-gauge green), floral tape, hot glue gun and glue sticks, wire cutters, sharp scissors.
Step-by-Step Instructions:
1.Prepare Your Materials: Begin by organizing your dried botanicals. Trim longer stems to a manageable length, typically 4-6 inches, leaving enough to secure them to the wreath. Group similar elements together. If any dried flowers are particularly fragile, you can gently mist them with a light coat of hairspray to help preserve their integrity, allowing it to dry completely before handling.
2.Establish Your Base Layer: Take your filler greenery, such as dried ferns or wheat, and begin attaching it to the grapevine wreath. Use floral wire to secure small bundles, wrapping the wire tightly around the stems and the wreath base. Aim for an even distribution, creating a soft, natural backdrop. You can choose to cover the entire wreath or leave some of the grapevine exposed for a more rustic look. Work in one direction, overlapping the stems slightly to create a sense of flow and fullness. This initial layer provides the volume and foundational shape for your wreath.
3.Add Volume with Hydrangeas and Larger Leaves: Next, incorporate your larger, more voluminous elements like dried hydrangeas and preserved magnolia or oak leaves. Break the hydrangea heads into smaller clusters if they are too large. Use floral wire to attach these, pushing the wire through the base of the cluster and wrapping it around the grapevine. For preserved leaves, you can either wire them individually or create small clusters of 2-3 leaves, securing them with floral tape before wiring them onto the wreath. Position these elements strategically to build depth and visual weight, ensuring a balanced composition. Think about creating small groupings rather than scattering them randomly.
4.Incorporate Dried Flowers and Seed Pods: Now, begin adding your dried flowers and seed pods. For delicate flowers like statice or strawflowers, create small bundles and secure them with floral tape before wiring them onto the wreath. For sturdier elements like seed pods, you can often hot glue them directly to the grapevine or to the base of a larger leaf. Distribute these elements evenly, paying attention to color balance and textural variety. Some flowers might look best clustered together, while others stand out individually. Use the floral wire to secure elements firmly, ensuring they won’t fall off once the wreath is hung. For a truly Anthropologie-inspired look, aim for an organic, slightly asymmetrical arrangement, allowing some elements to extend beyond the main circular form of the wreath.
5.Add Finishing Touches and Refinements: Step back and assess your wreath. Fill in any sparse areas with smaller pieces of dried greenery or additional flowers. Use your hot glue gun for any elements that need extra security or for attaching very small, delicate pieces that are difficult to wire. Pay attention to the overall shape and balance. You might want to add a few wisps of pampas grass or bunny tails for a soft, airy effect, tucking them into the existing arrangement. Ensure all wires are hidden and the back of the wreath is neat.
6.Attach the Hanging Ribbon: Cut a generous length of velvet ribbon, approximately 2-3 feet, depending on how low you want your wreath to hang. Loop the ribbon around the top of the wreath, ensuring it is centered. Tie a secure knot or a decorative bow at the top. You can also use a small piece of floral wire to secure the ribbon to the wreath frame, preventing it from slipping.

Styling Tips and Variations:
•Layering: For an extra touch of Anthropologie charm, consider layering your dried botanical wreath over a simpler, perhaps unadorned, grapevine wreath of a slightly larger size. This adds depth and visual interest.
•Scented Elements: Tuck in a few dried cinnamon sticks, star anise, or small bundles of dried lavender for a subtle, natural fall fragrance. These can be hot-glued discreetly among the botanicals.
•Monochromatic Palette: While a mix of colors is beautiful, a monochromatic dried botanical wreath (e.g., all creams and whites, or all muted purples) can create a very sophisticated and high-end look, reminiscent of minimalist Anthro designs.
•Asymmetrical Design: Instead of a perfectly balanced wreath, try concentrating the majority of your dried elements on one side or in a corner of the wreath, leaving other areas more sparse. This creates a dynamic, artistic composition that feels less traditional and more contemporary.
•Metallic Accents: Lightly spray a few dried leaves or seed pods with metallic gold or copper paint for a subtle shimmer. Integrate these sparingly to add a touch of unexpected glamour without detracting from the natural beauty.
V. DIY Project 2: The Foraged Woodland Wreath
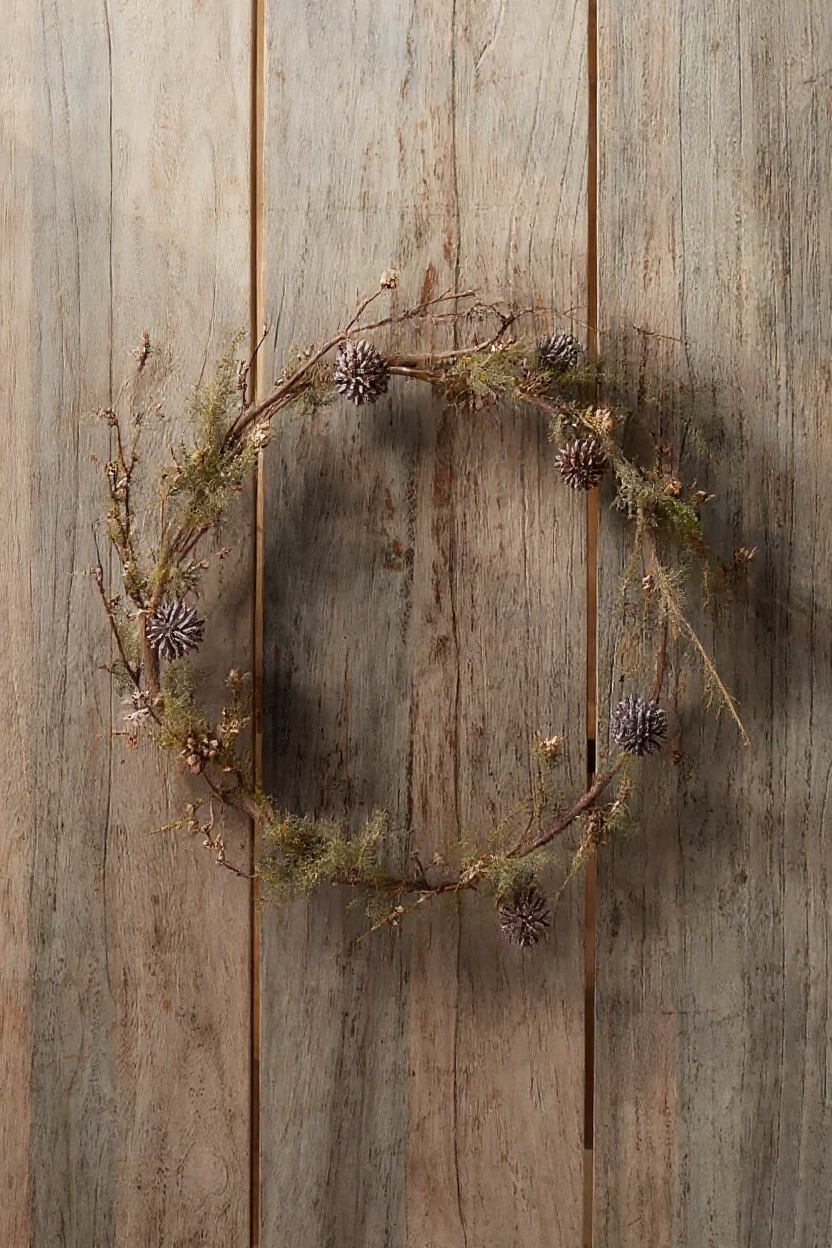
I think this one has to be my favorite! This wreath style celebrates the raw, unrefined beauty of branches, bark, moss, and other natural finds, creating a wreath that feels deeply connected to the earth and the changing seasons. It’s less about perfect symmetry and more about embracing the natural forms and textures.
Materials List:
•Wreath Base: A sturdy 16-inch wire wreath frame or a thick grapevine wreath.
•Branches/Twigs: A variety of small, flexible branches and twigs, preferably with interesting textures or slight bends. Look for fallen branches from oak, maple, or birch trees. Aim for lengths of 12-24 inches.
•Moss: Both sheet moss and Spanish moss for varied textures and coverage.
•Pinecones: Assorted sizes of pinecones, cleaned and dried.
•Acorns/Nuts: Cleaned acorns, walnuts, or other small nuts (optional, for added detail).
•Dried Berries: Clusters of dried faux berries (e.g., bittersweet, hawthorn) or real dried berries if available and non-toxic.
•Bark Pieces: Small, interesting pieces of fallen bark.
•Feathers: A few natural, ethically sourced feathers (e.g., pheasant, turkey) for a touch of wild elegance.
•Ribbon: A 2-inch wide burlap ribbon or natural linen ribbon for hanging.
•Tools: Floral wire (20-gauge for branches, 24-gauge for smaller elements), wire cutters, hot glue gun and glue sticks, pruning shears (for trimming branches).
Step-by-Step Instructions:
1.Prepare Your Base and Branches: If using a wire frame, begin by weaving your flexible branches through the frame, securing them with 20-gauge floral wire. Aim to create a somewhat irregular, organic shape, allowing some branches to extend beyond the circular form. If using a grapevine wreath, you can skip this step and move directly to attaching elements. Use pruning shears to trim any overly long or unruly branches.
2.Create a Mossy Foundation: Take your sheet moss and begin hot gluing it to the wreath base, covering sections of the wire frame or grapevine. Overlap pieces to create a continuous, lush green foundation. Once the sheet moss is in place, tuck in handfuls of Spanish moss in various areas to add depth and a softer, wispy texture. The goal is to create a rich, natural backdrop that mimics the forest floor.
3.Integrate Pinecones and Bark: Strategically place your assorted pinecones. You can hot glue them directly to the mossy base or wire them onto the frame for extra security. Vary the sizes and orientations of the pinecones to create visual interest. Tuck in small pieces of bark, securing them with hot glue, to add another layer of natural texture and mimic the rough surfaces found in a woodland environment.
4.Add Foraged Details: Now, begin incorporating your smaller, more delicate foraged elements. Hot glue individual acorns or small clusters of nuts into crevices within the moss or among the pinecones. If using dried berries, wire small clusters together and then hot glue or wire them onto the wreath. These details add a sense of discovery and authenticity to the wreath.
5.Place Feathers and Final Touches: Carefully insert a few natural feathers into the wreath, securing them with a dab of hot glue at their base. Position them so they appear to be naturally nestled within the branches and moss. Step back and assess the overall composition. Fill in any sparse areas with additional moss or small twigs. Ensure all elements are securely attached and that the wreath has a balanced, yet organic, appearance.
6.Attach the Hanging Ribbon: Cut a length of burlap or natural linen ribbon, about 2-3 feet. Loop it around the top of the wreath and tie a simple, rustic knot or a loose bow. The natural texture of the ribbon will complement the earthy elements of the wreath.
Styling Tips and Variations:
•Asymmetrical Design: This wreath style particularly lends itself to an asymmetrical design. Concentrate more elements on one side or the bottom, allowing other areas to be sparser, emphasizing the natural, wild growth.
•Twinkling Lights: Weave a delicate strand of warm white LED fairy lights through the branches and moss to give it an enchanted feel!
•Scented Elements: Infuse your pinecones with essential oils like cedarwood, pine, or cinnamon for a natural, inviting aroma that evokes the scent of a fall forest.
•Incorporating Found Objects: If you have any small, interesting found objects from nature walks – perhaps a unique stone, a piece of driftwood, or a particularly beautiful dried leaf – consider incorporating it as a focal point, securing it carefully with wire or strong glue.
•Monochromatic Green: Focus primarily on different shades and textures of moss and green branches for a lush, verdant wreath that still feels autumnal but with a more subtle color palette.
•Add a Small Bird’s Nest: For an extra touch of woodland charm, hot glue a small, artificial bird’s nest (available at craft stores) into a secure spot within the wreath. You can even add a few tiny faux bird eggs for a whimsical detail.
This Foraged Woodland Wreath is a celebration of nature’s raw beauty, bringing the serene and enchanting atmosphere of an autumn forest directly to your doorstep. Its organic forms and rich textures make it a truly unique and Anthropologie-esque statement piece.
There you go! Which one will you DIY first? Let me know how it goes in the comments. Happy (almost) Fall Y’all!