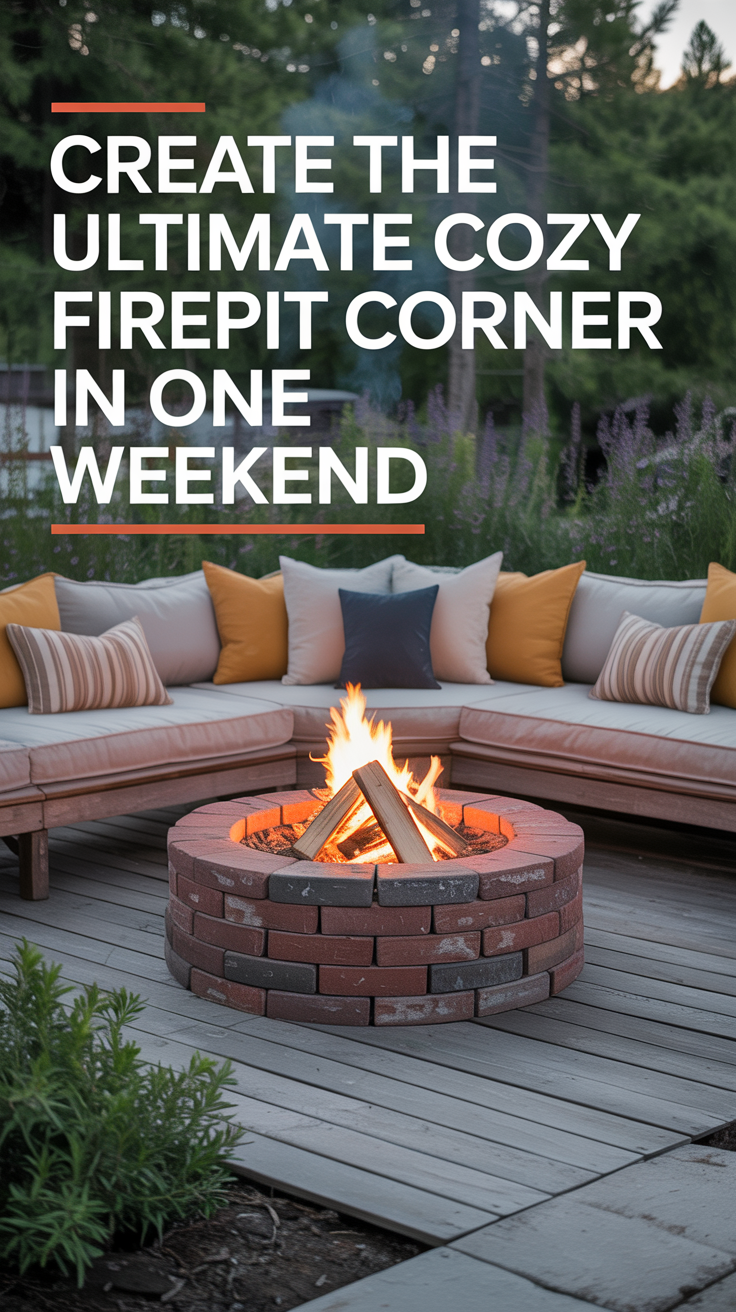
There’s a unique magic that a crackling fire brings to an outdoor space. It transforms a simple backyard into a warm, inviting sanctuary, extending your living area and creating a focal point for relaxation and connection. Imagine cool evenings spent under the stars, sharing stories, laughter, and perhaps a few s’mores with loved ones. A cozy firepit corner isn’t just an amenity; it’s an experience, a place where memories are forged and the stresses of the day melt away. While such an oasis might seem like a distant dream requiring extensive planning and construction, the truth is, you can create the ultimate cozy firepit corner in just one weekend. This comprehensive guide will walk you through every step, from meticulous planning and safe construction to thoughtful decorating, ensuring your backyard retreat is not only beautiful but also built to last and enjoyed responsibly.
Weekend Warrior Planning: Laying the Foundation
The success of any weekend project lies in thorough preparation. Before you even think about digging, a strategic planning phase will save you time, effort, and potential headaches. This involves selecting the perfect site, understanding local regulations, envisioning your design, and setting a realistic budget.
Site Selection: The Golden Rules of Location
The location of your firepit is paramount, primarily for safety, but also for maximizing enjoyment. Several critical factors must be considered:
•Safety First: Distance from Structures The most crucial rule is maintaining adequate distance from anything flammable. Fire pits should be placed a minimum of 10 feet away from your home, fences, sheds, and other structures . Some regulations might even suggest up to 25 feet, especially for larger fires or certain types of firepits . This clearance also applies to overhanging tree branches, dense shrubbery, and any other combustible materials. Always look up; low-hanging branches can catch fire, and overhead power lines pose a significant hazard. Ensure the ground beneath and around your chosen spot is level to prevent the firepit from tipping and to ensure even heat distribution. Good drainage is also essential to prevent water from pooling around the base, which can compromise stability and material integrity over time.
•Wind Considerations Observe the prevailing wind patterns in your yard. Placing your firepit in a spot that is naturally sheltered from strong winds will prevent embers from scattering and smoke from constantly blowing into your seating area. If natural shelter isn’t available, consider incorporating windbreaks into your design, such as a low wall or strategic planting, ensuring they still meet clearance requirements.
•Accessibility to Utilities While not strictly necessary for a wood-burning firepit, considering proximity to water (for extinguishing and cleaning) and electricity (for ambient lighting or future gas firepit conversion) can be beneficial for convenience and safety.
Local Regulations and Permits
Before any construction begins, it is imperative to check your local fire codes, city ordinances, and Homeowners Association (HOA) rules. These regulations vary widely by location and can dictate everything from the permissible size and type of firepit to the burning materials allowed and required distances from property lines .
Ignoring these regulations can lead to fines, safety hazards, or even the forced removal of your firepit. A quick call to your local fire department or city planning office can provide clarity and ensure your project is compliant.
Design Inspiration: Vision Boarding Your Cozy Corner
With safety and regulations addressed, it’s time for the fun part: envisioning the aesthetic of your firepit corner. Consider how the firepit will integrate with your existing outdoor space and home architecture.
•Style Integration: Do you have a rustic farmhouse, a modern minimalist abode, or a traditional suburban home? Your firepit corner should ideally complement this style. Rustic designs might feature natural stone and reclaimed wood, while modern spaces could benefit from sleek concrete or metal firepits with clean lines. Pinterest, Houzz, and home improvement magazines are excellent resources for gathering inspiration and creating a vision board.
•Shape and Size: The shape and size of your firepit will largely depend on the available space and your intended use. Round firepits are classic and encourage conversation, while square or rectangular designs can offer a more contemporary look and integrate well with modular seating. Consider the number of people you typically entertain; a larger firepit will require more surrounding space for comfortable seating.
•Material Choices for DIY: The materials you choose will impact both the aesthetics and the longevity of your firepit. For a weekend DIY project, certain materials are more manageable:
•Stone, Pavers, or Brick: These are popular choices for their durability, classic appeal, and excellent heat retention properties . They are relatively easy to work with, especially when using retaining wall blocks designed for stacking. Fire-rated bricks are crucial for the inner ring of a wood-burning firepit to withstand intense heat.
•Concrete: For a more modern and sculptural look, concrete can be poured into various molds to create unique shapes. While more involved than stacking blocks, pre-cast concrete blocks or even DIY concrete forms can be tackled in a weekend.
•Metal (Steel or Cast Iron): Often found in pre-made firepit rings or bowls, metal offers a sleek, contemporary option. Steel, in particular, is valued for its durability and high melting point . If building from scratch, a galvanized steel fire pit ring is often used as the inner liner to protect the outer masonry from direct heat .
•Important Material Caution: Avoid using porous rocks like river rocks or those collected from streambeds directly in your firepit. These rocks can contain trapped moisture, which, when heated, can turn to steam and cause the rocks to explode, posing a serious safety risk.
Budgeting for a Weekend Project
A weekend project implies a budget-conscious approach. Here’s a breakdown of potential costs and strategies for saving:
•Materials: The largest portion of your budget will likely go towards materials such as retaining wall blocks, fire bricks, paver base, and gravel. A galvanized steel fire ring is a wise investment for durability and safety. Shopping for materials during off-season sales or checking local classifieds for leftover building supplies can yield significant savings.
•Tools: Many of the essential tools (shovels, rakes, levels) you might already own. For specialized tools like a tamper or a tiller, consider renting them for a few hours or borrowing from a neighbor to reduce costs .
•Seating and Decor: This is where costs can quickly escalate. Look for secondhand outdoor furniture, repurpose existing items, or consider DIY seating options like simple wooden benches or tree stumps . For decor, string lights, outdoor cushions, and potted plants can be sourced affordably.
•DIY vs. Kit vs. Pre-made: Building a firepit yourself from raw materials is generally the most cost-effective option, as it eliminates labor costs. Firepit kits offer a convenient middle ground, providing pre-cut materials and instructions, which can save time but might be slightly more expensive than a full DIY. Pre-made firepits are the quickest solution but often the most expensive, especially for larger or more elaborate designs.
Building Your Firepit: A Step-by-Step Guide
With your planning complete, it’s time to roll up your sleeves and bring your cozy firepit corner to life. This section provides a detailed, step-by-step guide for constructing a block-based firepit with a metal insert, a popular and manageable weekend project.
Essential Tools and Materials Checklist
Before you begin, gather all necessary tools and materials. This prevents interruptions and keeps your project on track.
•Shovel (round and square point)
•Level (long and torpedo)
•String and a stake (for marking circles)
•Spray paint (for marking)
•Hand tamper or plate compactor (rentable)
•Utility knife (for weed barrier)
•Caulking gun (for adhesive)
•Gloves and safety glasses
•Galvanized steel fire pit ring (e.g., 36-inch diameter)
•Retaining wall blocks or fire-rated bricks (quantity depends on desired height and diameter)
•Paver base or crushed gravel (for foundation)
•All-purpose gravel or lava rocks (for inside the pit)
•Landscape fabric/weed barrier
•Construction adhesive (exterior grade, suitable for masonry) – optional but recommended for stability
The Construction Process: From Ground Up
This guide assumes a circular firepit design using retaining wall blocks and a metal fire ring. Adjust steps as necessary for square designs or different materials.
1. Site Preparation
•Clear the Area: Begin by clearing your chosen site of any grass, weeds, rocks, or debris. If there are tree stumps or large bushes, remove them. For a truly smooth start, consider renting a tiller to break up compacted soil, especially if you’re creating a larger seating area around the firepit .
•Mark the Outline: Place your galvanized steel fire pit ring in the center of your cleared area. Using a stake, string, and spray paint, mark the outer perimeter of where your blocks will sit. A common method is to tie a string to a central stake, measure out the desired radius (including the width of your blocks), and walk in a circle while spraying to create a perfect outline . Ensure this outer circle allows for adequate seating space around the firepit.
•Excavate the Base: Dig out the marked area to a depth of 3-6 inches. This depth will accommodate your paver base and the first course of blocks, ensuring a stable and level foundation. Use a square shovel to create clean, straight edges for your excavation .
2. Laying the Foundation
•Add Paver Base: Fill the excavated area with 1-2 inches of paver base or crushed gravel. This layer provides excellent drainage and a stable surface. Spread it evenly with a rake.
•Level and Compact: Use a hand tamper or plate compactor to thoroughly compact the paver base. This is a critical step for preventing settling and ensuring the longevity of your firepit. After compacting, use a long level to ensure the entire foundation is perfectly flat. Add or remove base material as needed to achieve a level surface.
•Install Fire Pit Ring: Place your galvanized steel fire pit ring in the center of the compacted base. Ensure it is level and centered within your marked outline. This ring will protect your masonry from direct heat and prolong the life of your firepit.
3. Building the Walls
•First Course: Begin laying your retaining wall blocks or fire bricks around the metal fire ring. The first course is the most important for stability. Lay each block directly on the leveled paver base, ensuring it is level both front-to-back and side-to-side. Use a rubber mallet to gently tap blocks into place if needed. Check the entire first course with your level to ensure it’s perfectly flat.
•Subsequent Courses: Continue stacking blocks for the next courses. To create a strong, interlocking structure, stagger the joints of each new course over the blocks below, similar to how bricks are laid in a wall. Apply a bead of exterior-grade construction adhesive between each course of blocks for added stability and durability. This is optional for a weekend project but highly recommended for a permanent structure. Ensure there are small gaps between the blocks on the outer perimeter to allow for some ventilation, especially if your fire ring is flush with the blocks.
•Height: Build the walls to your desired height, typically 12-18 inches (2-3 courses of blocks) for comfortable seating and fire containment. Always check for levelness as you go.
4. Filling the Pit
•Drainage and Heat Distribution: Once the walls are complete, fill the bottom of the firepit (inside the metal ring) with 2-4 inches of all-purpose gravel or lava rocks. This layer aids in drainage and helps distribute heat evenly. Lava rocks are particularly good for retaining heat and adding a natural aesthetic.
•Grates: If you plan to burn wood, consider adding a metal grate inside the firepit. This elevates the wood, improving airflow for a better burn and allowing ash to fall below.
5. Seating Area Preparation
•Outline and Excavate: If you plan to build permanent seating benches, outline their footprint around the firepit, maintaining a safe distance (at least 3 feet from the firepit edge). Excavate these areas to a depth similar to your firepit base.
•Weed Barrier and Gravel: For a clean, low-maintenance seating area, lay down landscape fabric (weed barrier) over the excavated ground. Secure it with landscape staples. Then, spread a layer of crushed marble gravel, pea gravel, or other decorative stone over the weed barrier. This creates a permeable surface that looks tidy and helps define the space .
Safety First: Enjoying Your Firepit Responsibly
Building your firepit is only half the battle; enjoying it safely is paramount. A firepit is a source of warmth and joy, but it also demands respect and adherence to safety guidelines to prevent accidents and ensure everyone has a good time.
Fire Safety Essentials
•Constant Supervision: Never, under any circumstances, leave a burning firepit unattended . A responsible adult should always be present from the moment the fire is lit until it is completely extinguished.
•Appropriate Fuel: Only burn dry, seasoned hardwood. This type of wood burns cleaner, produces less smoke, and reduces the risk of sparks. Avoid burning trash, leaves, pine needles, or any treated wood, as these can release toxic fumes and excessive embers . Never use lighter fluid, gasoline, or other accelerants to start or rekindle a fire; use natural fire starters instead.
•Fire Extinguisher Nearby: Always have a means to extinguish the fire readily available. This could be a bucket of water, a hose connected and turned on, a bucket of sand, or a fire extinguisher . Ensure everyone knows where it is and how to use it.
•Monitor Wind Conditions: Avoid using your firepit on windy days. Even a moderate breeze can carry embers beyond the firepit, potentially igniting dry vegetation or nearby structures . If conditions become windy unexpectedly, extinguish the fire immediately.
•Maintain Clearance: Establish a clear zone of at least 3 feet around the firepit. Keep children and pets outside this zone to prevent accidental burns or contact with hot surfaces . Ensure any outdoor furniture, cushions, or other flammable items are also kept well outside this perimeter.
Post-Fire Care
•Complete Extinguishment: Before leaving the firepit, ensure the fire is completely out. Douse the embers with water, stirring them with a poker until they are cool to the touch and no smoke or steam is rising. Never assume a fire is out just because it looks like it; embers can remain hot for hours.
•Ash Disposal: Allow ashes to cool for at least 24-48 hours before attempting to dispose of them. Once completely cool, scoop them into a metal container with a tight-fitting lid. Never dispose of ashes in plastic bins, cardboard boxes, or directly into compost piles, as lingering embers can easily ignite these materials.
Decorating Your Cozy Corner: Ambiance and Comfort
Once your firepit is built and safety measures are in place, it’s time to infuse your corner with personality, comfort, and ambiance. This is where your firepit truly becomes a
cozy retreat. Think about creating layers of comfort, light, and greenery to enhance the experience.
Seating Solutions
Comfortable seating is non-negotiable for a cozy firepit corner. The type of seating you choose will depend on your style, budget, and the permanence you desire.
•Adirondack Chairs: These classic chairs are a perennial favorite for firepit areas. Their low profile and wide armrests are perfect for lounging and holding a drink. They are durable, often made from weather-resistant wood or recycled plastics, and come in a variety of colors .
•Outdoor Sofas/Sectionals: For a more luxurious and inviting feel, consider weather-resistant outdoor sofas or sectionals. These can create a true outdoor living room experience, perfect for larger gatherings or extended relaxation.
•Built-in Benches: If you opted for a more permanent firepit structure, built-in benches can be a fantastic, space-saving solution. They can be constructed from the same materials as your firepit (stone, concrete, wood) and often include storage underneath for cushions or blankets.
•Poufs/Stools: For flexible, additional seating, especially for children or impromptu guests, outdoor poufs or stools are a great option. They are easy to move and can add a pop of color or texture.
•Cushions and Throws: No matter the seating, plush outdoor cushions and soft, weather-resistant throws are essential for maximizing comfort and adding a touch of warmth and color. Choose fabrics that are UV-resistant and easy to clean.
Lighting the Scene
Beyond the glow of the fire, thoughtful lighting can dramatically enhance the ambiance and functionality of your firepit corner.
•String Lights: Draped overhead or woven through nearby trees, string lights (fairy lights or Edison bulb styles) create a magical, festive canopy that instantly elevates the mood.
•Lanterns: Place decorative lanterns on side tables, hang them from shepherd hooks, or arrange them on the ground for a soft, atmospheric glow. Battery-operated LED lanterns are a safe and convenient option.
•Solar Lights: For an eco-friendly and easy-to-install solution, solar-powered pathway lights can illuminate paths to and from your firepit, while solar-powered stake lights can highlight surrounding plants or features.
•Pathway Lighting: Ensure safe navigation to and from your firepit area, especially after dark, with subtle pathway lighting. This can be integrated into your landscaping or simply be a few well-placed solar lights.
Greenery and Landscaping
Integrating natural elements around your firepit corner helps it blend seamlessly with your backyard and adds to the sense of an oasis.
•Potted Plants: Use weather-resistant planters to introduce color, texture, and height. Consider low-maintenance options like succulents, ornamental grasses, or herbs that can withstand outdoor conditions.
•Raised Garden Beds: Define the perimeter of your firepit area with raised garden beds. These can be filled with fire-resistant plants, flowers, or even edible herbs, adding visual interest and a subtle barrier.
•Privacy Screens: If your firepit corner feels too exposed, or you have close neighbors, privacy screens can create a more intimate setting. These can be decorative metal panels, wooden trellises with climbing plants, or strategically placed tall shrubs .
Functional and Decorative Accents
Small details can make a big difference in both the functionality and aesthetic appeal of your firepit corner.
•Side Tables: Provide convenient surfaces for drinks, snacks, s’mores ingredients, or small decorative items. Tree stumps, small garden stools, or weather-resistant end tables work perfectly.
•Outdoor Rugs: An outdoor rug can help define the space, add warmth underfoot, and introduce another layer of texture and color to your design.
•Firewood Storage: Keep your firewood neatly stacked and easily accessible with a stylish firewood rack. This turns a practical necessity into a rustic design element.
•Firepit Tools: A set of firepit tools (poker, log grabber, shovel, brush) is essential for safe fire management. Choose a set that complements your firepit’s style. A spark screen is also a crucial safety accessory to contain embers.
Personal Touches
Finally, infuse your firepit corner with personal touches that reflect your style and make the space uniquely yours. This could include outdoor art, wind chimes, or themed decor that evokes a particular feeling, whether it’s a coastal retreat, a bohemian lounge, or a rustic cabin escape.
Creating the ultimate cozy firepit corner in one weekend is an achievable and incredibly rewarding project. From the initial thrill of planning and selecting the perfect spot to the satisfaction of laying the final block and arranging the last cushion, each step brings you closer to a truly transformative outdoor space. This guide has provided you with the knowledge and steps to safely and efficiently build a beautiful firepit, ensuring compliance with local regulations and prioritizing the well-being of everyone who gathers around it. The investment of a single weekend will yield countless evenings of warmth, laughter, and connection, turning your backyard into a cherished extension of your home. So, gather your tools, ignite your creativity, and prepare to enjoy the enduring magic of your very own cozy firepit corner. It’s more than just a firepit; it’s a destination for making lasting memories, right in your own backyard.