Temperatures are slowly dropping out of the triple digits here in Austin which means it’s almost patio season, people!
If your backyard concrete patio looks outdated, cracked, or just plain boring, you’re not stuck with it forever. You don’t have to tear it all out either. Tiling over an existing concrete slab is one of the easiest ways to upgrade your outdoor space and instantly boost curb appeal.
We recently tackled this project in our back patio, and let me tell you — the transformation is night and day. If you’ve been dreaming of an outdoor space that feels cozy, inviting, and polished, tiling your patio could be the move. Below, I’ll walk you through the exact steps we used, the tools you’ll need, and my pro tips to avoid common mistakes.
Why Tile Over Existing Concrete?
Instead of ripping out the old concrete (expensive, messy, and time-consuming), you can simply work with what you already have. Here’s why tiling makes sense:
Cost-effective: Save thousands by skipping demolition.
Instant facelift: Swap that dull gray slab for a sleek, textured finish.
Endless styles: Choose tiles that match your vibe — natural stone, porcelain, wood-look, or patterned.
Durability: Outdoor-rated tiles hold up against heat, rain, and snow when installed properly.
Bonus: If your patio is next to a pool, textured porcelain tiles are a smart choice since they resist slipping and fading.
Tools & Supplies You’ll Need
Here’s everything we used (and a few extras I recommend for an easier install):
Pressure washer
Outdoor-rated porcelain or natural stone tiles
Tile spacers
Large format thin-set mortar (polymer-modified for outdoor use)
Grout (fade-resistant, outdoor-rated)
Wet tile saw
Buckets, mixing paddle, and trowels
Self-leveling underlayment primer
Self-leveling caulk for expansion joints
Sponge and microfiber towels
Kneepads (trust me on this one)
Choosing the Right Outdoor Tile
Not all tile is created equal — especially for patios. Here’s what to look for:
Porcelain over ceramic: Porcelain absorbs less water and won’t crack in freeze-thaw conditions.
Textured surface: Prevents slipping when the tile gets wet.
UV-resistant finish: Keeps colors vibrant even under direct sun.
Larger formats: Tiles like 12×24″ or 8×16″ reduce grout lines for a modern look.
Pro Tip: If you love the vibe of natural stone but not the price tag, choose textured porcelain tiles that mimic stone. It’s budget-friendly but still gives you that luxe “old world” aesthetic.

#DIYPatio #PatioMakeover #OutdoorLiving #BackyardGoals
Step 1: Clean and Prep the Surface
The foundation of a flawless patio starts with a clean, level surface:
Pressure wash thoroughly — remove dirt, debris, and algae.
Fill cracks and expansion joints using self-leveling sealant.
Prime the surface with an underlayment primer for better adhesion.
Check drainage — ensure your patio has a slight slope away from your home to avoid pooling water.
Skipping prep work is the fastest way to ruin this project — don’t.
Step 2: Plan Your Tile Layout
Before touching mortar, dry-lay your tiles to see how patterns look. A few ideas to consider:
Running bond (brick style): Simple and timeless.
Herringbone: Adds visual interest and works great with rectangular tiles.
Stacked grid: Clean, modern, and great for minimalists.
Mark a center line and start your layout there for even spacing.
Step 3: Install the Tile
Mix your polymer-modified thin-set mortar according to instructions.
Apply mortar to the concrete and back-butter each tile for maximum grip.
Set each tile carefully, using spacers to maintain consistent grout lines.
Keep a damp sponge nearby to wipe up any excess mortar immediately.
Pro Tip: Work in small sections. Outdoor mortar dries faster than indoor mixes.

Step 4: Grout Like a Pro
Once the tiles are set and dry:
Use an outdoor-rated grout that’s fade-resistant and stain-proof.
Work in small sections, pressing grout into joints with a float.
Wipe away excess with a damp sponge, rinsing often.
Once dry, buff tiles with a microfiber cloth to remove haze.
Step 5: Seal (Optional but Recommended)
If you’re using natural stone or porous grout, seal everything to protect against stains, mold, and fading. Porcelain tiles generally don’t need sealing, but sealing grout is always a good idea for outdoor projects.
Extra Tips for Success
Weather matters: Avoid installing tile in extreme heat or freezing temps.
Expansion joints: Leave small gaps around edges and fill with flexible caulk to prevent cracking.
Patio furniture: Use protective pads under heavy items to avoid chipping.
Test one tile first: Check mortar adhesion before committing to the entire surface.
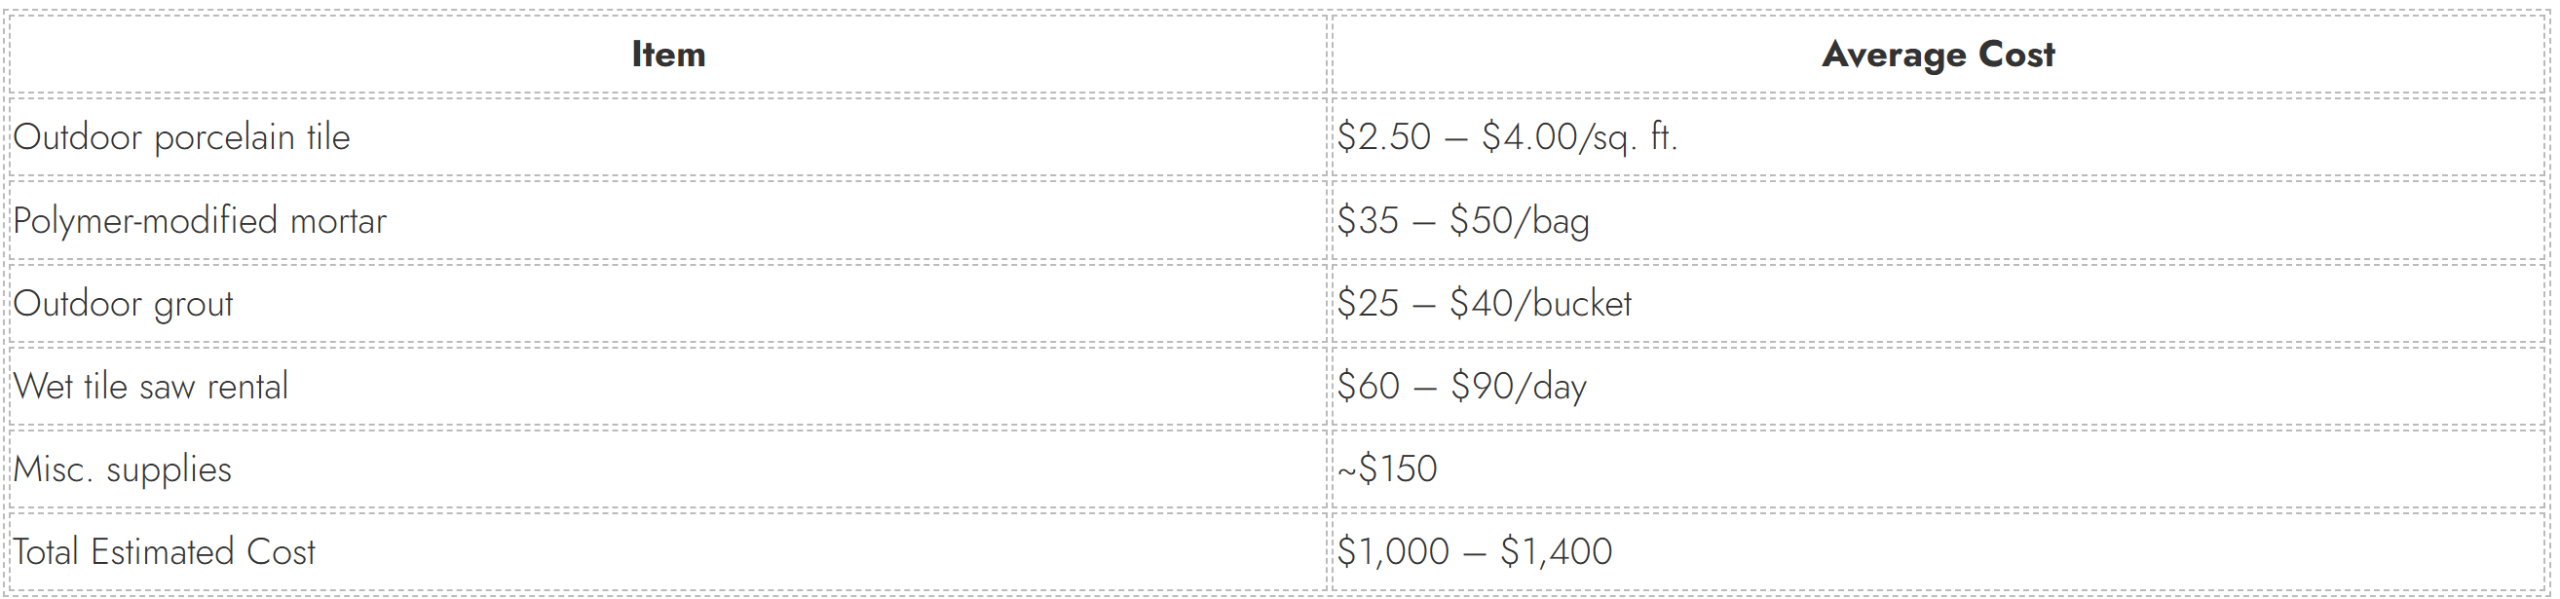
Budget Breakdown
Here’s a rough cost estimate for a 200 sq. ft. patio:
Design Ideas for a Modern Patio Makeover
Since you’re upgrading your surface, why stop there? Here are a few finishing touches:
String lights: Create a cozy ambiance.
Outdoor rugs: Soften the look and add texture.
Built-in planters: Bring greenery and life to your space.
Fire pit area: Perfect for cooler nights.
DIY outdoor kitchen: If you love to entertain, plan for one now.
Tiling over your concrete patio might sound intimidating, but once you break it down step by step, it’s totally doable — even for beginners. With the right prep work and quality materials, you’ll end up with a stunning outdoor space that looks custom-designed and feels like an extension of your home.
This project instantly transformed our backyard, and we’re already spending more time outside because of it. If you’ve been debating tackling your patio, let this be your sign — go for it.