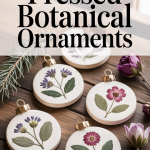
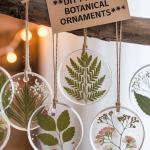
There’s something magical about bringing the beauty of nature indoors during the holidays. From garlands to fresh wreaths, the season celebrates organic materials, texture, and warmth — all hallmarks of classic, timeless design. This year, one trend stands out on Pinterest and social media: pressed botanical ornaments.
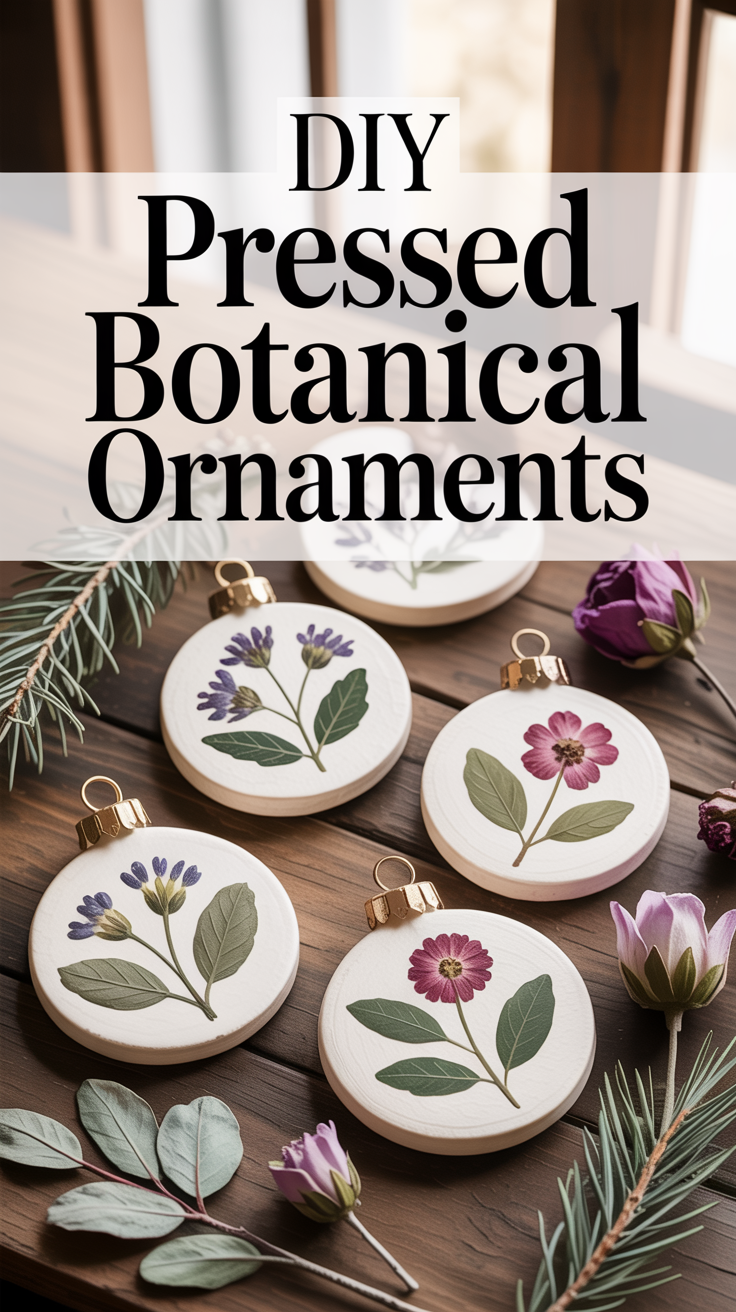
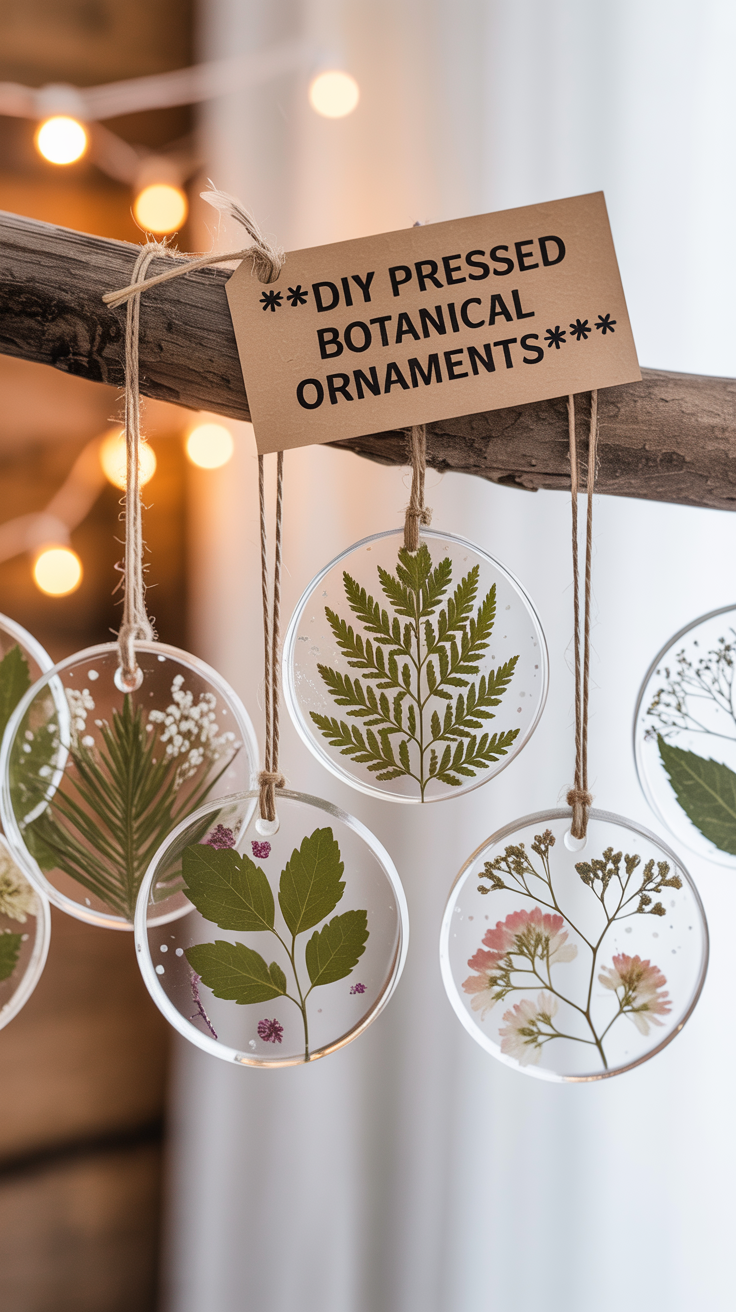
Elegant yet simple to make, these ornaments capture the delicate shapes and colors of nature — pressed flowers, sprigs of herbs, and bits of greenery — sealed in clear ornaments for a look that’s effortlessly chic. They’re perfect for your Christmas tree, as window decor, or tied to a beautifully wrapped gift.
Whether your home leans modern farmhouse, Scandinavian minimalism, or traditional elegance, these ornaments blend with any style. And best of all? You can craft them using natural materials and a few simple supplies — no fancy tools required.
Check out how to create pressed botanical ornaments step-by-step, plus ideas for styling them, gifting them, and customizing them to fit your home’s holiday look.
Why Pressed Botanical Ornaments Are the Season’s Must-Try DIY
Pinterest and TikTok are overflowing with DIY decor ideas, but few manage to balance sophistication with simplicity. Pressed botanical ornaments do exactly that. Here’s why they’re catching fire this holiday season:
They celebrate nature. Using real botanicals — dried flowers, leaves, herbs — adds authenticity and organic charm to your holiday decor.
They’re endlessly customizable. You can tailor the color palette, materials, and ribbons to your own style.
They fit every design style. Whether you prefer neutral elegance or bright holiday colors, you can make them feel perfectly at home.
They’re sustainable. No plastic glitter or disposable materials — just glass, paper, and nature.
They double as keepsakes or gifts. Personalize them with names, dates, or pressed flowers from a meaningful bouquet.
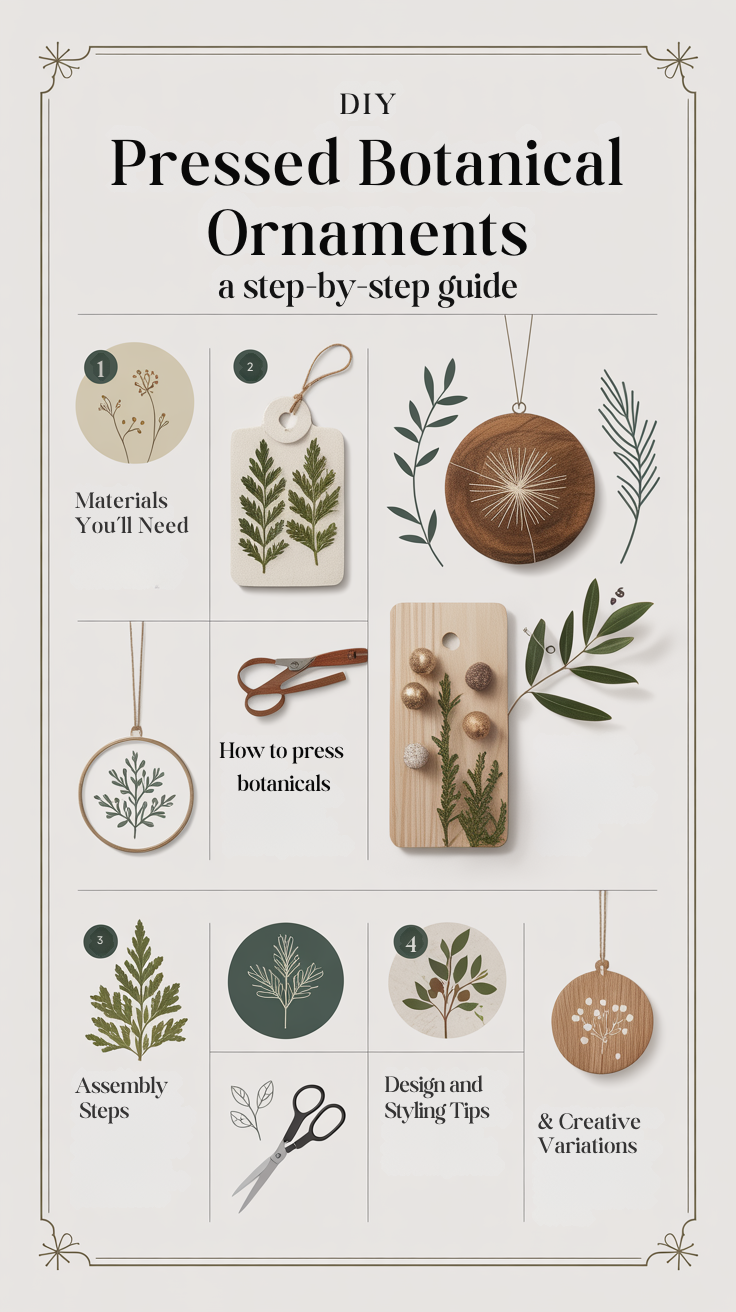
Materials You’ll Need
Creating pressed botanical ornaments doesn’t require any special equipment — just a few affordable supplies you can find online or at craft stores.
Essentials:
Clear glass or acrylic ornament halves (available in 2.5″–4″ sizes). Choose round, flat, or oval shapes.
Pressed botanicals — such as ferns, eucalyptus, rosemary, small flowers, or delicate leaves.
Tweezers or fine-tipped scissors for arranging small pieces.
Mod Podge or clear-drying craft glue (optional, for securing delicate botanicals).
Velvet, silk, or linen ribbon in neutral or seasonal tones.
Small paintbrush (if you’re using glue or Mod Podge).
Optional Enhancements:
Gold leaf flakes for an elevated, luxe look.
Handwritten labels or small paper tags for personalization.
Essential oils (think pine, clove, or citrus) to make them subtly scented.
Fine glitter or mica powder for a frosted, festive finish.
Step 1: Gather & Press Your Botanicals
You can either purchase pre-pressed botanicals online or collect and press your own. Pressing botanicals at home adds a personal touch — plus, it’s a beautiful way to preserve small clippings from your garden or nature walks.
How to Press Botanicals:
Choose your materials carefully. Select thin, flat flowers and leaves — like ferns, pansies, baby’s breath, and herbs such as rosemary or thyme. Avoid thick or waxy leaves that retain moisture.
Prep your press. If you have a flower press, great! If not, sandwich botanicals between two sheets of parchment paper and place inside a heavy book.
Add weight. Stack additional books or a heavy object on top to apply consistent pressure.
Wait patiently. Leave your botanicals pressed for 7–10 days, changing parchment every few days if they feel damp.
Pro Tip: For faster results, use a microwave flower press — they can dry botanicals in under a minute without burning.
Once fully pressed, store your botanicals between clean parchment sheets until you’re ready to assemble your ornaments.
Step 2: Clean & Prep Your Ornament Halves
Before assembling, make sure the inside of your clear ornaments is spotless. Any dust or fingerprints will show through the transparent surface.
Wipe each ornament half with a lint-free cloth and a bit of glass cleaner.
Let them dry completely before handling.
Lay out your ornament halves on a soft surface like a towel to prevent scratching.
Step 3: Design Your Composition
Now comes the fun part — designing your mini botanical scene.
Lay your pressed botanicals on a white background so you can see how colors and shapes interact.
Choose one or two main botanical pieces as focal points. Too many elements can make the ornament look cluttered.
Add smaller accents like sprigs, petals, or tiny gold leaf flakes for texture and contrast.
Think of it like creating a tiny art piece: minimal, intentional, and balanced.
Design Tip:
For a Scandinavian look, use muted greens, whites, and neutrals.
For a classic Martha Stewart vibe, add sprigs of holly, soft gold ribbons, and touches of red or burgundy.
For a boho aesthetic, mix wildflowers, dried grasses, and linen string.
Step 4: Assemble the Ornaments
Carefully place your botanical elements into one ornament half using tweezers.
If needed, secure them with a tiny dab of clear glue using a fine paintbrush. Avoid excess — it can cause fogging.
Once you’re happy with the placement, gently attach the second ornament half.
Seal the edges with a small bead of clear-drying craft glue if desired for extra protection.
Optional: Add a few drops of essential oil onto the botanicals before sealing for a faint, natural scent every time the ornament moves.
Step 5: Add Finishing Touches
Now it’s time to personalize your ornaments and give them that designer polish.
Ribbon & Hanging Details
Choose a ribbon that fits your aesthetic — velvet for luxury, linen for a natural look, or metallic silk for a festive touch.
Loop through the ornament’s top and tie in a neat bow or knot.
Consider adding a small charm, initial tag, or date label for personalization.
For a Modern Look:
Use sheer ribbon in neutral tones like ivory or champagne.
For a Traditional Holiday Feel:
Opt for deep red, emerald green, or navy velvet.
For a Minimalist Home:
Choose twine, jute, or raw-edge linen.

Step 6: Display & Style Ideas
Pressed botanical ornaments are stunning on a Christmas tree, but don’t stop there — they’re versatile decor pieces that bring organic texture to your whole home.
Display Ideas:
Hang in windows where sunlight catches the pressed botanicals.
Use on garlands or wreaths for a layered, curated look.
Place several in a shallow bowl or tray on a coffee table or entry console.
Attach to wrapped gifts with ribbon for a custom, luxury presentation.
Create a hanging mobile using a branch or driftwood for a Scandinavian wall accent.
Pro Tip: Mix sizes and shapes of ornaments — round, flat, teardrop — for visual interest.
Step 7: Long-Term Care & Storage
Because these ornaments are made with natural materials, handle them gently and store properly to keep them looking beautiful year after year.
Store in a dry, cool place, away from direct sunlight.
Wrap each ornament in tissue paper or place them in individual boxes to prevent scratches.
Avoid high humidity — moisture can warp or discolor the botanicals over time.
If any glue yellows over the years, you can carefully disassemble and replace elements as needed.
Creative Variations to Try
Once you master the basic technique, the possibilities are endless. Here are a few creative twists to make your DIY ornaments stand out:
1. Monogrammed Botanical Ornaments
Layer a pressed leaf or flower with a small paper or vinyl initial for a personalized keepsake. These make perfect hostess gifts or stocking stuffers.
2. Botanical Snow Globes
Add a pinch of mica flakes or biodegradable glitter between the ornament halves for a subtle, snowy shimmer.
3. Sentimental Keepsake Ornaments
Press flowers from a wedding bouquet, baby shower, or special trip, then use them to create memory ornaments. Add a handwritten note or tag inside.
4. Dried Citrus & Herb Ornaments
For a rustic farmhouse feel, add thin dried orange slices, cinnamon sticks, or sprigs of thyme. These smell amazing and look festive.
5. Botanical Wall Garland
Instead of individual ornaments, string together multiple pressed botanical discs with ribbon or twine to create a hanging garland for mantels or windows.
Styling Your Ornaments for Photography or Pinterest
If you’re creating these for your design blog or to share on Pinterest, styling is key.
Shoot in natural light near a window to capture the translucence of the botanicals.
Use neutral backgrounds like linen, wood, or marble for a timeless look.
Add subtle props such as scissors, ribbon spools, or dried greenery for context.
Photograph both close-ups and lifestyle shots — the ornaments hanging, displayed in a bowl, or tied to a gift.
Pinterest Tip: Infographics and step-by-step collages perform especially well for DIY tutorials. Use soft, warm color tones and elegant typography.
Where to Source Materials
If you want the project to have a polished, professional finish, sourcing high-quality materials makes a big difference.
Where to find pressed botanicals:
Etsy (look for pre-pressed, color-preserved flowers)
Local craft stores
DIY from your own garden
Best clear ornament options:
Amazon: Clear fillable acrylic ornaments (2.75” flat rounds)
Michaels or Hobby Lobby: Glass ornaments with removable tops
Terrain or Joann: Designer-quality clear ornaments
Ribbon sources:
Anthropologie: Velvet ribbons in modern tones
Amazon: Silk and velvet spools in bulk
Etsy: Hand-dyed silk or frayed-edge linen ribbons
The Designer’s Touch: How to Make Them Look Expensive
Even though this is a DIY project, you can elevate it easily with a few design tricks:
Stick to a cohesive palette. Choose two or three colors and repeat them throughout your ornaments — for example, soft green, ivory, and gold.
Keep it minimal. Don’t overcrowd the ornament; let each botanical have breathing room.
Use ribbon consistently. Matching ribbon colors across all ornaments creates a designer, collected look.
Group in odd numbers. Display ornaments in sets of 3 or 5 for balance.
Incorporate subtle metallic accents. A touch of gold leaf or brass makes the design feel high-end.
A Thoughtful Touch for the Holidays
Pressed botanical ornaments are more than just a craft — they’re a reflection of your home’s personality and a celebration of nature’s quiet beauty. Each one captures a small piece of the outdoors and turns it into art, adding warmth and authenticity to your decor.
They also make beautiful, meaningful gifts: give a set of three in a linen pouch, tie one around a candle or bottle of wine, or personalize with initials for family members. It’s a heartfelt gesture that feels custom and handmade — something that resonates deeply during the holidays.
Creating pressed botanical ornaments is the perfect DIY for anyone who loves design, nature, and craftsmanship. It’s relaxing, sustainable, and endlessly customizable — and the results are stunning.
From delicate ferns and pressed petals to gold-dusted leaves, each ornament tells a tiny story. Whether you’re decorating your own tree, hosting a crafting night, or creating handmade gifts, these ornaments are guaranteed to spark joy — and Pinterest saves.
So grab your ribbon, gather some botanicals, and start pressing!