27 Creative Wall Shelf Projects and Ideas to Elevate Your Home Decor

Wall shelves have quietly become one of the most versatile design tools in modern homes, combining practical storage with instant personality. Whether you need a tidy spot for books, a stage for curated knickknacks, or a platform for trailing plants, the right shelf can transform an empty wall into a functional focal point. Contemporary designs—from sleek floating planks to sculptural metal brackets—blur the line between furniture and wall art, letting you solve everyday clutter while reinforcing your decorating style.

For makers and decorators alike, shelves are a perfect canvas for creativity: they’re easy to customize, inexpensive to build or swap out, and endlessly adaptable to different rooms and moods. In this roundup of 27 creative wall shelf projects and ideas, Designer & the Diyer highlights ways to elevate your space with clever layouts, mixed materials, and thoughtful finishes that marry utility with aesthetic impact. Expect practical how-tos, inspirational looks, and simple tweaks that will help you maximize vertical space and make every wall count.

1. Alcove-Ready Wooden Shelves: Simple Storage with Style
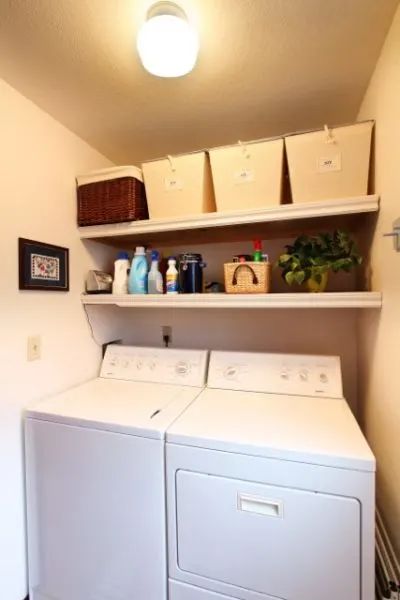
Alcove-Ready Wooden Shelves: Simple Storage with Style

These pared-back wooden shelves are a straightforward solution for alcoves, linen nooks, or shoe closets where three walls form a natural frame. Built from basic lumber—or upgraded with furring strips for added texture—they provide sturdy, custom-fit storage without fuss. A quick sand and coat of paint or stain instantly elevates the look, keeping compact spaces tidy while leaving plenty of room to personalize hardware and finish.

Key Design Elements

  • Furring strips add depth and a subtle trim detail for a finished, built-in appearance.
  • Designed for three-sided alcoves—perfect for linen closets, shoe nooks, and tight spaces.

Pro Tip: Install continuous cleats screwed into studs on the back and sides for rock-solid support; finish (paint or stain) shelves before mounting to avoid touch-ups in tight alcoves.

2. Welcome-Ready Entry Shelf
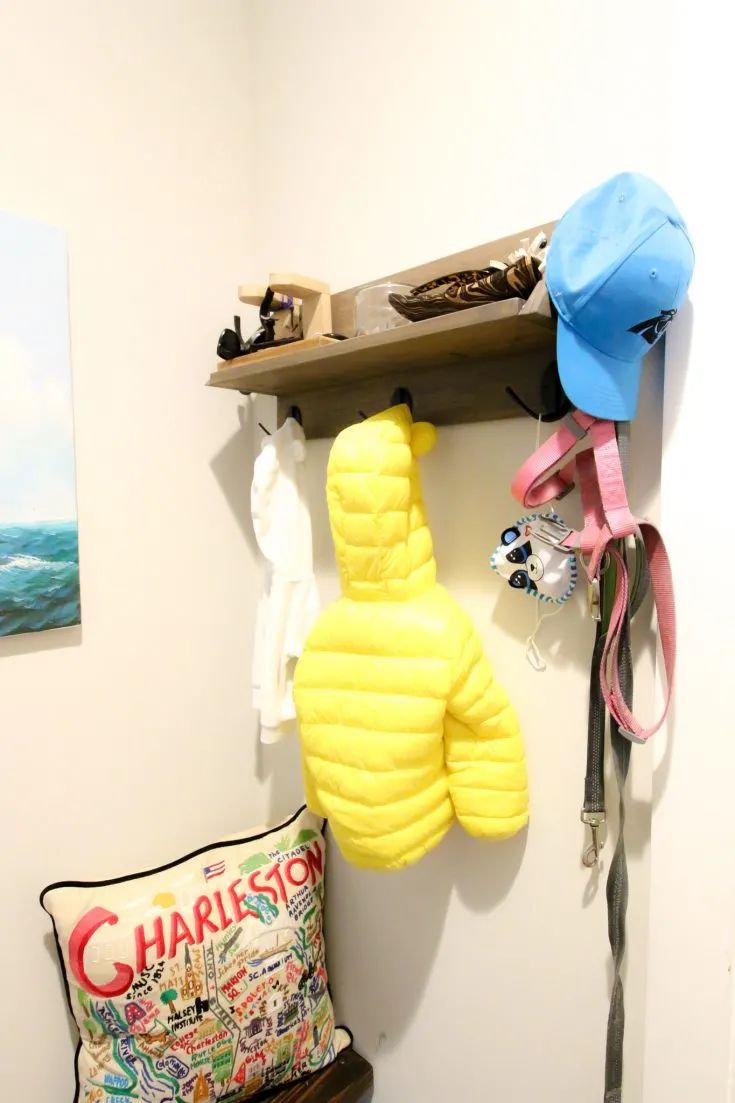
Welcome-Ready Entry Shelf

The entry shelf creates a polished first impression while taming everyday clutter. A sleek wooden ledge paired with hooks offers a spot to display decor and a practical place to hang coats, bags, and hats. Tuck baskets or small bins beneath for shoes and umbrellas, and style the top with a lamp or a couple of curated accents to make the entry both useful and inviting.

Key Design Elements

  • Floating wood shelf paired with sturdy metal hooks
  • Baskets or cubbies below for concealed shoe and accessory storage

Pro Tip: Mount the shelf so hooks sit about 65–70 inches from the floor for easy reach; fasten into studs or use heavy-duty anchors for weighty coats. Add a shallow tray on top to corral keys and mail for a tidy look.

3. Coastal Driftwood Display Shelf
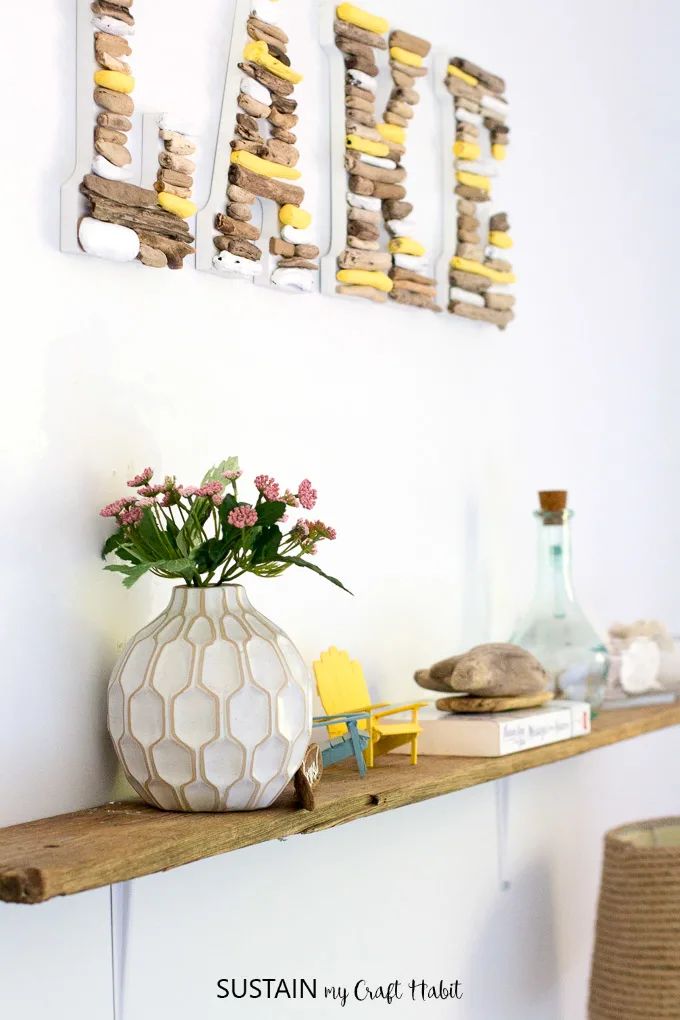
Coastal Driftwood Display Shelf

Found driftwood makes a gorgeous, low-effort shelf—just cut, sand, and mount a sturdy slab of weathered timber to bring subtle coastal charm to any room. Its irregular edges and sun-bleached patina create an artful, natural focal point perfect for framed photos, potted succulents, or small curios. For a layered look, attach two staggered boards; the organic texture contrasts beautifully with modern hardware for a relaxed, collected feel.

Key Design Elements

  • Weathered texture adds instant coastal character
  • Staggered levels create depth for photos and plants

Pro Tip: Pre-drill the driftwood, then secure with heavy-duty wall anchors or toggle bolts rated for the load; finish with a clear matte sealer to lock in color and prevent shedding.

4. Reclaimed Wood Shelves with an Industrial Edge
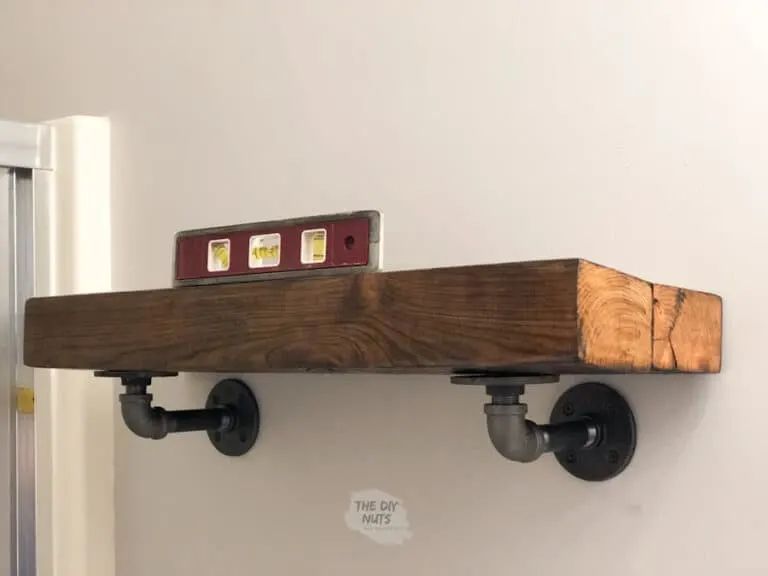
Reclaimed Wood Shelves with an Industrial Edge

Chunky reclaimed-wood shelves bring warmth and texture to a bathroom, complementing both modern minimalism and relaxed coastal or farmhouse styles. Thick planks grounded with visible grain add an organic counterpoint to glossy tiles and chrome fixtures. Swap traditional supports for black iron pipe brackets to introduce an industrial edge, or choose brushed brass for a softer, upscale contrast. Use the wide surface to display rolled towels, potted greenery, and glass apothecary jars for a curated, lived-in look.

Key Design Elements

  • Use thick, reclaimed planks for visual weight and pronounced grain.
  • Choose pipe brackets for industrial contrast or brass mounts for warmth.

Pro Tip: Anchor shelves into studs with long lag bolts; if studs aren’t available use heavy-duty toggle anchors. Pre-seal the wood with a water-resistant oil or marine polyurethane to protect against humidity, and let it fully cure before styling so finishes don’t transfer to linens or decor.

5. Shuttered Shelf: Rustic Wall Rack with Hooks
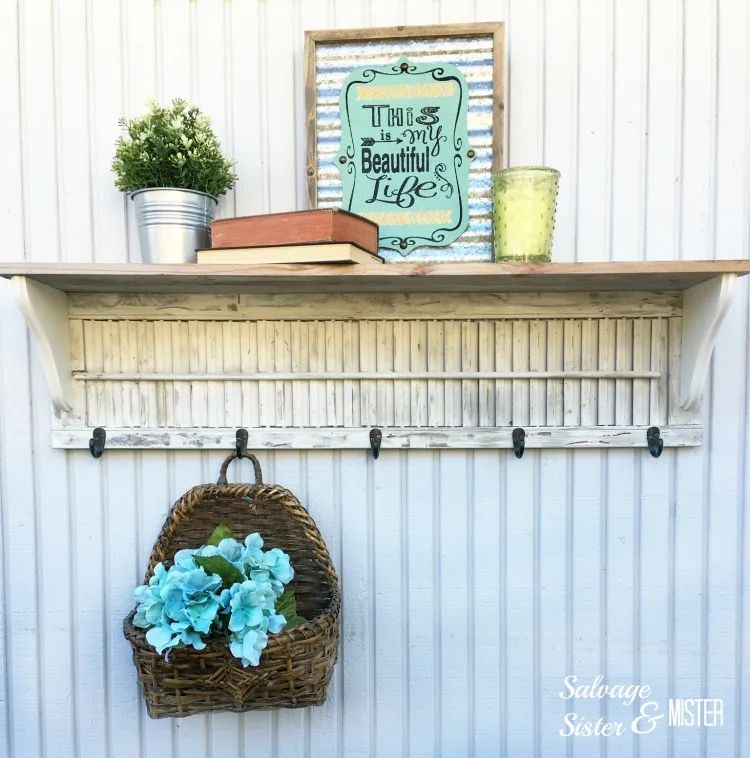
Shuttered Shelf: Rustic Wall Rack with Hooks

Transform an old wooden shutter into a stylish, space-saving wall shelf that mixes vintage charm with everyday function. Sand and refresh the slats, secure a narrow ledge to hold books or small plants, and orient the piece vertically or horizontally to suit your layout. Fit a row of hooks along the bottom to hang coats, bags, or hanging planters—an ideal solution for an entryway, living room, or any spot that needs both display and storage.

Key Design Elements

  • Attach a slim reclaimed-wood ledge across the slats for books and greenery
  • Fit heavy-duty hooks along the bottom for coats, bags, or hanging planters

Pro Tip: For a secure installation, mount the shutter using a French cleat or screw into wall studs and pre-drill holes for the hooks; if you’ll display live plants, seal the shelf with a waterproof finish to protect the wood.

6. Triangular Braces for Stylishly Sturdy Shelves
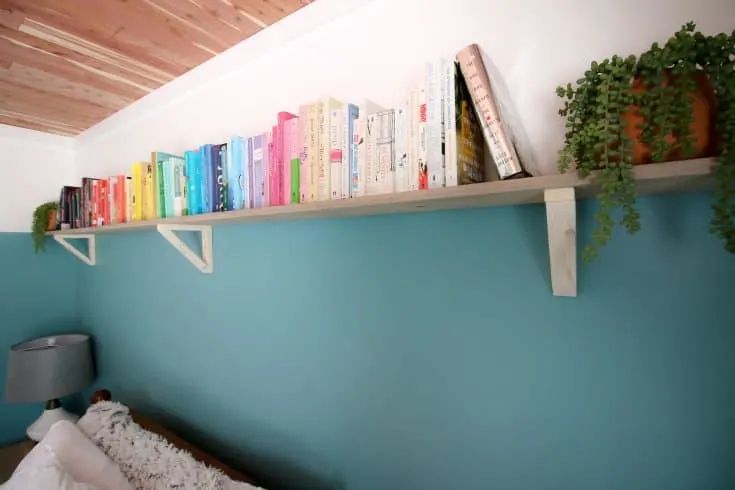
Triangular Braces for Stylishly Sturdy Shelves

Triangle shelf brackets marry clean geometry with practical support — a smart way to reinforce floating shelves while introducing sculptural detail. Cut from leftover wood, these right-angle braces handle stacks of books and heavy plants without bulky hardware getting in the way. Sand, stain, or paint them to coordinate with your décor, or choose a contrasting color to make the angles a focal point. Quick to build, they elevate both stability and visual interest in any room.

Key Design Elements

  • Geometric accent that doubles as reliable structural support
  • Perfect for using wood offcuts — stain to match or paint for contrast

Pro Tip: Pre-drill and countersink holes, apply wood glue at the joint, then clamp before driving screws into wall studs. For heavy loads, use 3/4" hardwood braces and space brackets 12–16 inches apart; finish with a clear topcoat for added durability.

7. Vintage-Inspired Triple-Tier Display
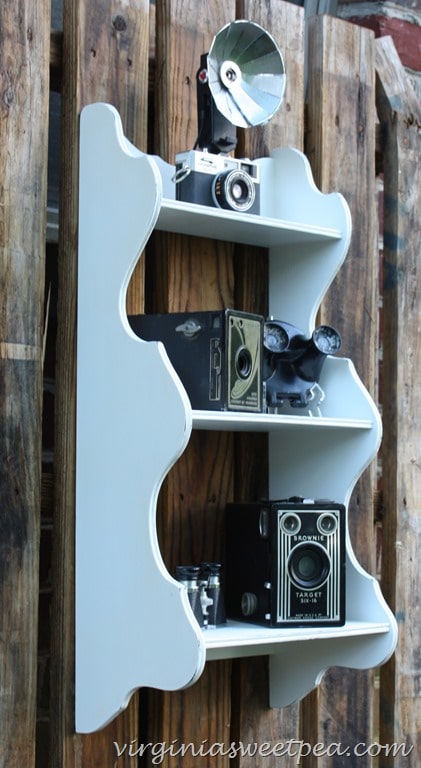
Vintage-Inspired Triple-Tier Display

Transform a tired wall shelf into a three-tier focal point that pairs vintage charm with contemporary flair. Sand and refinish the wood or paint each shelf in contrasting hues, then personalize with stencils or subtle decals. Arrange plants, books, small ceramics and framed prints across the tiers to create depth and rhythm—mixing textures and heights turns this simple piece into a custom statement that works beautifully in entryways, kitchens, or living rooms.

Key Design Elements

  • Combine natural wood stain with painted risers for layered, vintage-modern contrast.
  • Layer objects of varying heights—books, plants, and sculptural pieces—for visual balance.

Pro Tip: Secure the shelf with a French cleat or heavy-duty anchors and place the bulkiest items on the lowest tier to keep the unit stable and well-balanced.

8. Built-In Closet Shelving Upgrade
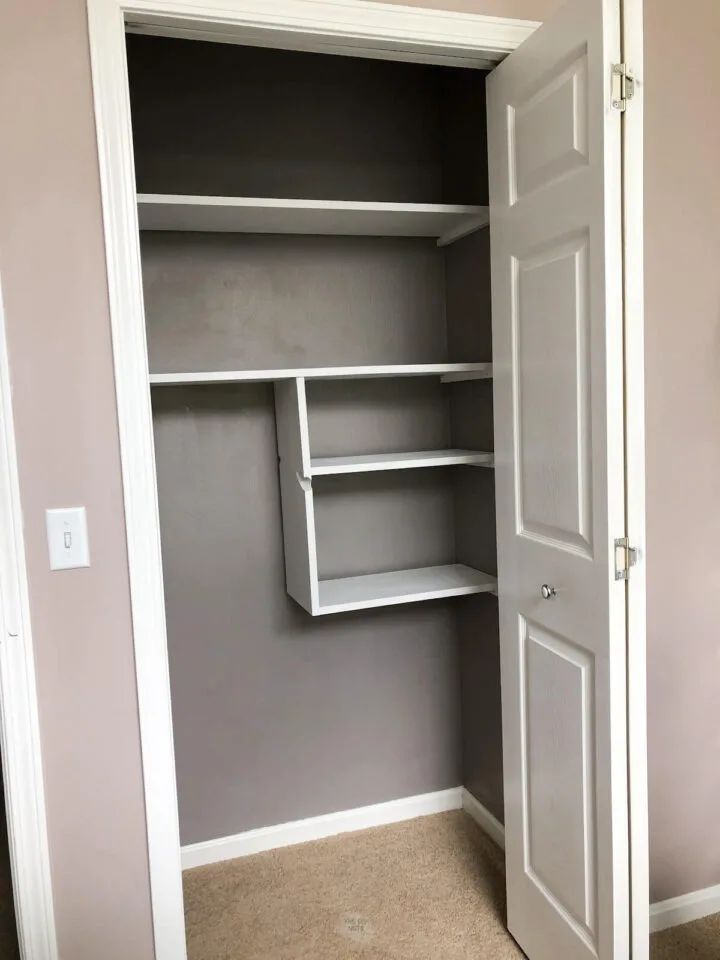
Built-In Closet Shelving Upgrade

Empty closet space is an opportunity to add custom shelving that turns wasted volume into smart storage. Fit shelves to your closet’s depth and height—combine shallow tiers for shoes and deeper shelves for folded garments or bins. Open shelving keeps things visible and accessible, while baskets or labeled boxes hide excess clutter. With simple cuts, brackets, and a thoughtful layout you can craft a tailored system that adapts to awkward nooks and maximizes every inch.

Key Design Elements

  • Install adjustable standards and brackets for flexible, reconfigurable shelving.
  • Alternate open shelves with woven baskets to balance display and concealed storage.

Pro Tip: Before cutting, measure from floor to hanging rods and plan shelf spacing accordingly; stagger shelf heights for shoes vs. folded clothing and anchor brackets into studs or use heavy-duty anchors to prevent sagging.

9. Live-Edge Floating Shelf: Seamless Rustic Charm

Live-Edge Floating Shelf: Seamless Rustic Charm

Give a minimalist room a touch of woodland character with a live-edge floating shelf. The concealed hardware keeps the silhouette clean, while a chunky, rustic wood block brings texture and organic warmth. Position the raw, rugged edge outward as the visual anchor and fasten the smooth back against the wall so brackets stay hidden. It becomes a striking display ledge for plants, ceramics, or a small stack of books—blending modern simplicity with handcrafted charm.

Key Design Elements

  • Choose a thick live-edge slab to contrast sleek wall lines.
  • Use concealed floating brackets for a clean, weight-bearing installation.

Pro Tip: Mount with a heavy-duty French cleat or concealed floating bracket anchored into studs; pre-drill and test the shelf level before final fastening. When styling, balance the shelf’s mass with low-profile decor—succulents, a slim lamp or a neat book stack—to keep the wood grain the focal point.

10. From Thrifted Box to Bathroom Shelf: Rustic-Chic Storage

From Thrifted Box to Bathroom Shelf: Rustic-Chic Storage

Give a tired wooden box a second life as a stylish bathroom wall shelf. Find a sturdy cabinet at a flea market or thrift store, clean and sand it, then refresh the surface with paint or stain that complements your fixtures. Add simple hardware or a decorative lining for personality—this compact piece creates cubby storage for toiletries and folded towels while keeping counters clutter-free. Seal the finish to protect against steam and splashes.

Key Design Elements

  • Sand and finish with moisture-resistant paint or stain to match your bathroom palette.
  • Opt for open-front cubbies or small shelves inside for tidy, visible storage.

Pro Tip: For a secure, level installation in a humid bathroom, apply a water-resistant sealant and hang the cabinet with a French cleat system anchored into studs.

11. Stacked Crate Shelving

Stacked Crate Shelving

Transform a few wooden crates into a warm, modular shelving unit by stacking and securing them together. After a thorough clean and light sanding, refresh the wood with stain or paint to suit your room’s palette. Arrange crates in a vertical column, offset grid, or stepped formation to create sculptural storage for books, plants, and collectibles. The exposed wood grain brings rustic charm while the open-front design keeps items accessible and artfully displayed.

Key Design Elements

  • Mix stained and painted crates for visual contrast and cohesion
  • Vary orientations—open-front, sideways, or stacked—to create display zones

Pro Tip: Assemble and fasten all crates on the floor first, then mount the complete unit to wall studs with a French cleat or screwed-in brackets for even weight support; style with heavier items on the bottom and use thin liners to protect the wood.

12. Extended Mantel Shelf: Style and Storage Above the Hearth

Extended Mantel Shelf: Style and Storage Above the Hearth

A widened mantel turns the area above your fireplace into a versatile display shelf for photos, plants, and even a mounted TV. Top an existing mantel with a single wide plank or build a shallow ledge to increase surface area without a full remodel. Pick a stain or paint that coordinates with the room, then style using layered objects and purposeful negative space to keep the look polished yet lived-in.

Key Design Elements

  • Use a single reclaimed or stained plank for warmth and visual continuity
  • Keep decor layered—mix frames, books, and greenery for balance

Pro Tip: Fasten the added shelf to studs with hidden brackets and confirm mantel depth clears both your TV and fireplace heat; leave a few inches of airspace or add a heat-resistant backing, and route cords through an internal chase for a neat finish.

13. From Milk Crates to Wall-Worthy Shelves

From Milk Crates to Wall-Worthy Shelves

Turn forgotten milk crates into character-filled shelving with minimal tools and time. Sand and refinish the wood—or paint in a bold hue—then mount the crates on their sides or backs to create cubby-style storage for books, plants, and art. Group several crates in a grid or a staggered composition for a custom modular unit that adds texture and utilitarian charm to a living room, entryway, or bathroom while keeping everyday items within easy reach.

Key Design Elements

  • Paint or stain crates to match your room’s palette—bright colors for modern contrast or warm stains for rustic appeal.
  • Arrange crates horizontally for long shelves or vertically as stacked cubbies; mix orientations for dynamic visual interest.

Pro Tip: Reinforce the crate backs with a thin sheet of plywood and anchor the mounting screws into studs or heavy-duty wall anchors so the shelves hold books and plants safely.

14. Industrial Pipe Shelves with Mid‑Century Warmth

Industrial Pipe Shelves with Mid‑Century Warmth

Channel an urban-meets-midcentury vibe with DIY pipe shelving: black iron pipes and rich wooden planks create an antique-industrial display that feels both rugged and refined. Built from scratch, the modular design lets you tailor shelf count, depth, and spacing to your wall and collection—books, ceramics, plants, and vintage accents look right at home. The industrial pipes add architectural interest while warm wood tones soften the look for a balanced, timeless statement piece in living rooms, entryways, or home offices.

Key Design Elements

  • Matte black iron pipe hardware for authentic industrial edge
  • Warm reclaimed wood shelves to introduce mid-century warmth

Pro Tip: Mount pipe flanges into wall studs whenever possible for maximum strength; if studs aren’t accessible, use heavy-duty anchors and finish the wood with clear oil or wax to protect grain and enhance color.

15. Suitcase Revival: Vintage Medicine Cabinet Shelf

Suitcase Revival: Vintage Medicine Cabinet Shelf

Unearth an old suitcase and transform it into a charming wall-mounted medicine cabinet. With a fresh coat of paint, a decoupage-lined interior, and a couple of small shelves, the vintage suitcase becomes a compact, character-filled storage solution. Leave the original hardware exposed for industrial charm or replace it with brass fittings for a more polished look. This quick upcycle blends practicality with nostalgia—perfect for bathrooms, entryways, or a bedroom vanity where space and personality matter.

Key Design Elements

  • Hinged lid converts into a cabinet door with interior shelving for organized stowage
  • Keep original patina and hardware or add new finishes and fabric lining for contrast

Pro Tip: Use a French cleat anchored to studs to support the weight of toiletries; reinforce the suitcase base from inside with a thin plywood panel and glue in a small mirror on the lid for added function.

16. Garage Command Center Shelving

Garage Command Center Shelving

Garages are prime real estate for organized storage — build heavy-duty shelves to corral bins, tools, and seasonal gear off the floor. Open, adjustable shelving gives you quick visibility and easy access to frequently used items, while thicker planks and robust brackets handle bulky loads. Use uniform containers and clear labeling to keep everything tidy and make sweeping and maintenance easier. A smart shelving system turns chaotic piles into a functional wall of storage that grows with your needs.

Key Design Elements

  • Heavy-duty brackets with 3/4" plywood or metal decking for reliable weight capacity
  • Adjustable shelf spacing and open-front design for quick access and visibility

Pro Tip: Mount brackets into studs with lag screws and plan shelf heights to accommodate your tallest bins; finish boards with a wipeable sealer and use matching, labeled containers to simplify maintenance and find items fast.

17. Corner Pop: Angled Pipe-Forward Shelf

Corner Pop: Angled Pipe-Forward Shelf

Give an overlooked corner instant character with a wooden plank pushed forward on metal pipe fittings. Pulling the shelf a few inches out and angling it slightly adds depth and a sculptural feel that refreshes tight spaces. Ideal for plants, ceramics, or a curated stack of books, the exposed hardware lends an industrial-modern edge while keeping the installation visually light and surprisingly functional.

Key Design Elements

  • Cantilevered plank mounted on pipe supports
  • Exposed industrial hardware for modern contrast

Pro Tip: Anchor pipe fittings into wall studs or use heavy-duty toggle anchors rated for the shelf’s load; sand and seal the wood before mounting and coat the pipes with rust-resistant paint for a clean, durable finish.

18. Wall-to-Wall Pegboard Command Center

Wall-to-Wall Pegboard Command Center

Turn the wall above your workbench into an organized, visual toolkit with a large pegboard that keeps everything within reach. Tools are hung where you can see and grab them, so projects proceed smoothly and searching through drawers becomes a thing of the past. Swap hooks, baskets and small shelves to reconfigure storage as your needs change — a single expansive panel transforms chaotic clutter into an efficient, attractive workspace.

Key Design Elements

  • Full-wall layout maximizes storage capacity for extensive tool collections.
  • Combine hooks, bins and mini-shelves to create task-specific zones.

Pro Tip: Mount a horizontal ledger or furring strips to the studs first so the pegboard sits ¾–1" off the wall — hooks will engage securely. Paint the pegboard before installation and outline tool shapes with a marker for fast visual organization.

19. Prismatic Bracket Shelves

Prismatic Bracket Shelves

Prism-style shelf brackets turn ordinary shelving into a sculptural statement. Their angular, geometric profiles add architectural interest while delivering solid support for books, plants, and decor. Available in slim metal silhouettes or warm brass finishes, they pair beautifully with reclaimed wood or minimalist floating shelves. Because the form is both decorative and functional, a couple of well-placed prism brackets can transform a blank wall into a modern vignette without sacrificing durability.

Key Design Elements

  • Angular geometric silhouette adds modern architectural interest
  • Robust metal construction supports books, plants, and heavier items

Pro Tip: For secure installation, fasten brackets into studs when possible; otherwise use heavy-duty wall anchors or toggles. Space brackets every 16–24 inches for heavy loads and match the bracket finish to your shelf material for a seamless look.

20. Drawer-to-Shelf: Upcycled Wall Cubby Unit

Drawer-to-Shelf: Upcycled Wall Cubby Unit

Give discarded drawer fronts new life as a modular wall unit—simple, sustainable, and full of character. Mount single or stacked drawers to create open cubbies perfect for plants, books, or display objects. Finish each piece with paint, stain, or decoupaged paper to create a cohesive look—or mix finishes for eclectic charm. Swapping in stylish pulls instantly elevates the piece, turning salvaged wood into a functional focal point that adds texture and personality to any room.

Key Design Elements

  • Combine painted and natural-stained drawers for visual contrast
  • Change pulls or knobs to shift between modern and vintage vibes

Pro Tip: For sturdy hanging, attach a plywood backing to the drawer interiors and use a French cleat anchored into studs; finish by lining drawer bases with patterned paper or felt to protect displayed items and add a polished touch.

21. Recessed Display Nook

Recessed Display Nook

Recessed shelves tuck into the wall for a sleek, architectural accent that showcases small plants, ceramics, and treasured keepsakes. Transform an empty cavity into layered cubbies with leftover wood and adjustable shelf pins so you can swap heights as your collection evolves. Paint or wallpaper the back for contrast and add subtle lighting to spotlight pieces — a compact, elegant solution that increases display space without encroaching on the room.

Key Design Elements

  • Use adjustable shelf pins to customize spacing for varying object heights.
  • Paint or paper the recessed back to add depth and a focal pop of color or texture.

Pro Tip: Before cutting, scan the wall for studs, pipes, and wiring with a reliable detector. Frame the opening with sturdy plywood, install shelf-pin hardware for flexibility, and hide a thin LED strip at the top for soft, even illumination.

22. Upward Storage: Stylish Wall Shelves for Bathrooms

Upward Storage: Stylish Wall Shelves for Bathrooms

Install slim wall shelves to instantly reclaim counter space and add sculptural interest to your bathroom. These compact shelves are perfect for corralling everyday toiletries, stacking hand and face towels, or displaying small plants and decorative jars. By using vertical space, you can keep essentials within reach while maintaining a clean, spa-like surface below. Choose finishes and materials that resist humidity to keep the look fresh and maintenance minimal.

Key Design Elements

  • Moisture-resistant materials and sealed finishes for longevity
  • Mix open shelves with baskets for tidy, layered storage

Pro Tip: Anchor shelves into studs or use high-quality toggle anchors for secure mounting; leave a 6–8 inch gap above the vanity for easy access and to avoid water splashes, and group items in matching containers for a curated look.

23. Stacked Basket Laundry Organizer

Stacked Basket Laundry Organizer

Tame laundry chaos with a budget-friendly stacked basket shelving system that mimics drawers. Gather matching laundry baskets and arrange them in vertical tiers inside a simple open frame or on sturdy wall-mounted shelves. Each basket becomes a dedicated slot for whites, darks, delicates, or socks, turning piles into an orderly, accessible routine. The result is a clean, cottage-chic laundry nook that feels intentional and makes sorting, folding, and putting away that much faster.

Key Design Elements

  • Uniform baskets create a streamlined, drawer-like look and improve visual cohesion.
  • A basic plywood frame or cube shelf keeps stacks stable while allowing easy basket removal.

Pro Tip: Add narrow wooden runners or adhesive felt strips inside the frame so baskets slide smoothly; secure the unit to the wall and label basket fronts for tidy, kid-friendly sorting.

24. Medicine Cabinet Makeover: Airy Open Shelves

Medicine Cabinet Makeover: Airy Open Shelves

Give an old medicine cabinet new life by removing the door and inserting a custom shelf to create an open-front storage unit. Build a simple inner frame, cut a shelf to fit, then sand and finish to match your bathroom’s palette. The result is a chic, accessible display for toiletries, folded linens, and decorative accents that opens up the wall visually while keeping everyday items organized and within easy reach.

Key Design Elements

  • Open-front design brightens the space and provides easy access to daily essentials.
  • Match the finish to surrounding wood tones or paint a contrasting color for a curated look.

Pro Tip: Anchor the unit into studs or use heavy-duty toggle anchors for a secure mount; for bathrooms, line the shelf with waterproof adhesive vinyl or a clear sealant to protect the wood from moisture.

25. Rustic Wood-Slice Plant Ledges

Rustic Wood-Slice Plant Ledges

Turn raw wood rounds into sculptural wall shelves that bring warmth and greenery to compact spaces. Cut and sand each slice to your preferred depth, stain or seal for moisture resistance, then fasten with discreet brackets or floating hardware. They're perfect for cascading pothos, a trio of succulents, or a small collection of ceramics — pairing natural texture with living plants adds instant character and saves floor space in bedrooms or tight corners.

Key Design Elements

  • Mix slice diameters and stagger heights to create a dynamic, organic display.
  • Finish and seal each shelf to protect wood from pot moisture and dirt.

Pro Tip: Anchor each shelf into a stud or use high-strength wall anchors for heavier plants, and always coat the wood with a waterproof finish; place small saucers or removable trays under pots to prevent water damage and make maintenance easy.

26. Rooftop Ledge: House-Shaped Wall Shelf

Rooftop Ledge: House-Shaped Wall Shelf

Turn simple lumber into a charming mini home for your favorite accents with a house-shaped wall shelf that’s perfect for beginners. Its peaked-roof profile and clean lines add instant architectural interest without complicated joinery. With just a few measured cuts, basic fasteners and a little sanding, you can build a custom-sized piece to fit any wall. Finish with stain or paint and display small plants, candles or books on its cozy, sculptural ledges.

Key Design Elements

  • Peaked roof silhouette adds architectural charm and visual focus
  • Open ledges and cubbies ideal for plants, books, and small decor

Pro Tip: Install with a French cleat or heavy-duty anchors into studs for a secure, flush mount; paint the interior back panel a contrasting color to make displayed items stand out.

27. Stud-Smart Storage Wall

Stud-Smart Storage Wall

Transform an underused wall into a streamlined storage system by building shelving directly off the studs. This approach clears clutter, frees floor space and supports heavy boxes, paint cans and tools without bulky shelving units. By running ledger boards and shelving between studs you create a sturdy, custom layout that adapts to bins, baskets and hooks. The result is a clean, efficient wall of storage that makes it easy to see, access and organize your gear.

Key Design Elements

  • Fasten 2×4 ledger boards into studs with long lag screws for reliable weight support.
  • Use plywood shelves sized to stud spacing and add adjustable brackets for flexible storage heights.

Pro Tip: Find and mark studs accurately, pre-drill pilot holes, and use lag bolts (not drywall anchors) for a safe, load-bearing installation—finish with paint and matching bins for a polished look.

Conclusion

From practical floating ledges and minimalist brackets to bold geometric installations and built-in units, the 27 projects showcased here prove that a well-chosen wall shelf does more than hold things — it reorganizes chaos into calm and instantly elevates a room’s aesthetic. Thoughtful shelving maximizes vertical space, creates pockets for display and storage, and anchors the eye so your decor feels intentional rather than haphazard. Whether you’re working with a tiny apartment wall or a roomy living area, the right size, material, and placement can make the difference between clutter and a curated vignette.

When planning your next shelving project, consider scale, function, and the balance between negative space and objects to keep things both usable and beautiful. Mix practical items with personal treasures, rotate pieces seasonally, and don’t be afraid to layer books, art, and greenery for depth. With just a few well-chosen shelves, you can transform storage into statement-making styling—an easy, high-impact way to make your home feel more organized and distinctly yours.

Leave a Reply

Your email address will not be published. Required fields are marked *