20 Creative DIY Upgrades for IKEA Besta to Build Custom Storage and Stylish Organization

Upgrading IKEA Besta units is one of the smartest, most budget-friendly ways to create tailored storage that actually looks intentional in your home. With a handful of simple materials—new fronts, trim, legs, paint, and clever internal inserts—you can turn basic boxes into media consoles, entryway benches, or built-in-looking cabinetry that reflects your style.

Whether you’re a DIY beginner or a seasoned maker, Besta’s modular design makes it easy to mix and match upgrades for function and flair. These 12 ideas focus on practical changes that improve organization, elevate finishes, and maximize space, so you can create custom storage solutions that belong on your Pinterest board and work in real life.

1. Sculpted BESTA: 3D Door Upgrade
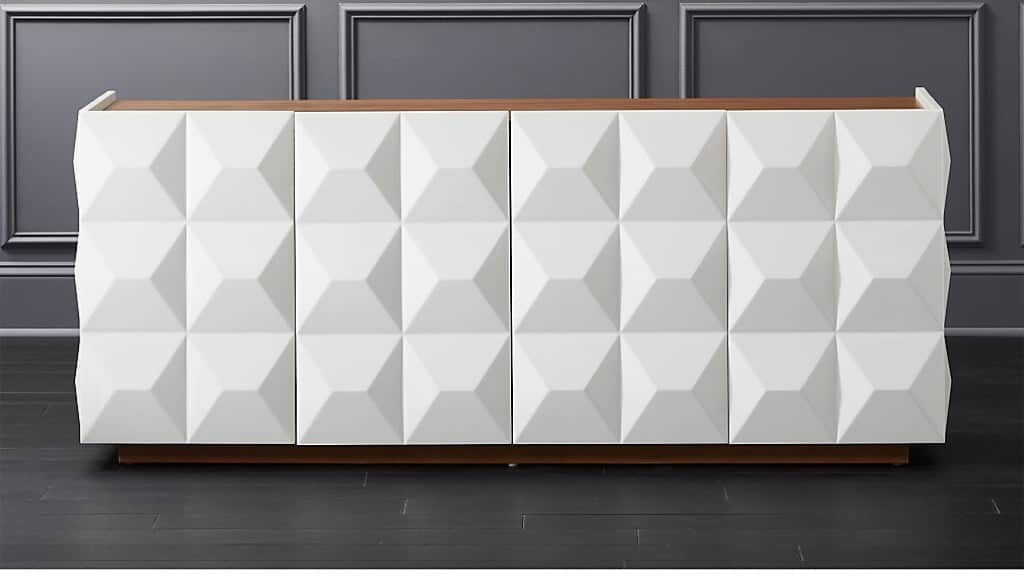
Sculpted BESTA: 3D Door Upgrade

Give a basic BESTA a high-design makeover by mounting decorative 3D panels to its doors. Start with a standard cabinet, trim panels to fit, and attach them with strong construction adhesive or small screws from the inside. Finish with paint, stain, or a matte black for a contemporary media console or a sculptural buffet. The added texture instantly elevates the silhouette and casts dynamic shadows for depth, turning an affordable frame into a statement piece for modern interiors.

Key Design Elements

  • Assemble the BESTA normally, then apply lightweight 3D panels to the door fronts.
  • Choose paint or stain to match your scheme; matte black creates a striking media console.

Pro Tip: Finish the 3D panels (paint or seal) before attaching to avoid drips and get clean edges; use construction adhesive plus one or two short screws driven from the inside of the door for secure, invisible fastening.

2. Grasscloth Glow-Up for a Better BESTA
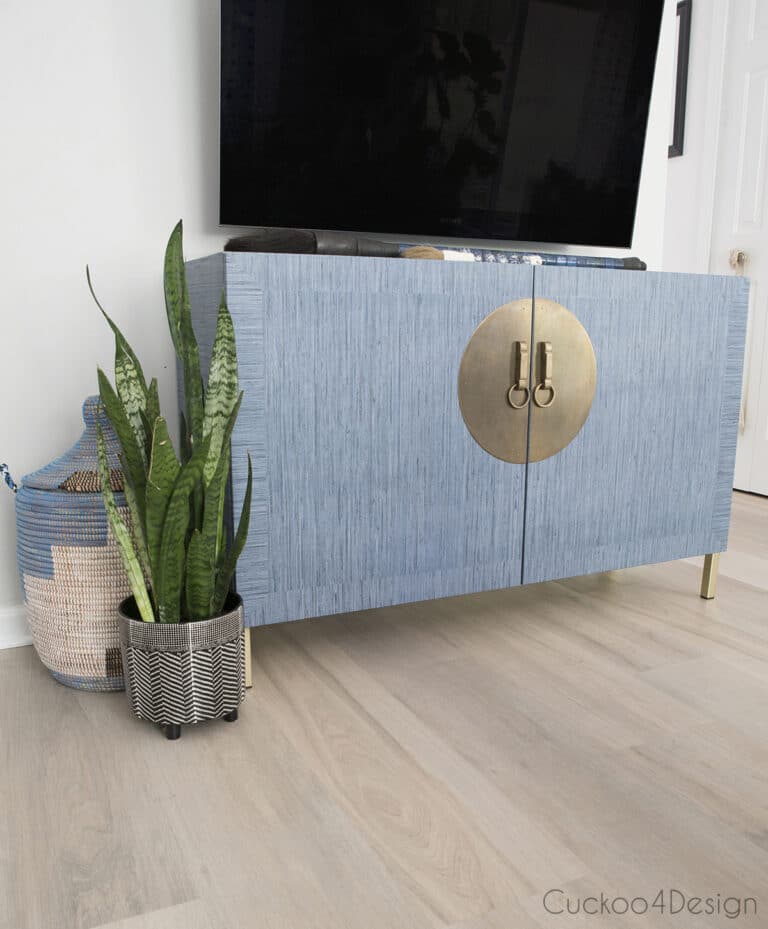
Grasscloth Glow-Up for a Better BESTA

Give a plain BESTA unit a high-end makeover by covering its doors and drawer fronts with grasscloth wallpaper. Using peel-and-stick grasscloth is fast and forgiving, and comes in textures and hues to complement any decor—natural, modern, or global-inspired. Materials needed: peel-and-stick grasscloth, utility knife, straightedge, measuring tape, and a smoothing tool. The textured surface adds warmth and depth while masking wear, transforming an affordable frame into a custom-looking piece with tactile, designer appeal.

Key Design Elements

  • Peel-and-stick options cut install time and are easy to reposition.
  • Textured finish conceals dents and introduces layered, warm style.

Pro Tip: Remove doors and hardware, clean and lightly sand surfaces, then use a temporary painter’s-tape hinge to position the grasscloth before smoothing and trimming with a fresh utility blade for crisp edges.

3. Warm-Textured Floating Sideboard
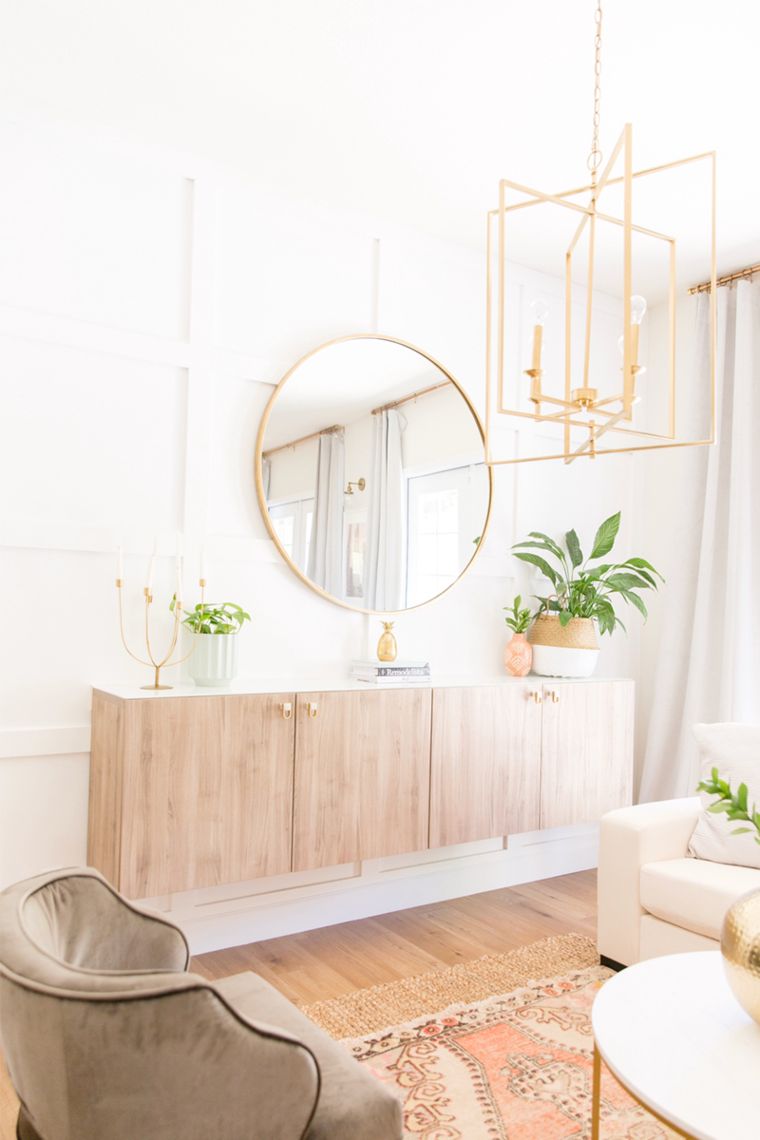
Warm-Textured Floating Sideboard

This floating sideboard refresh turns a modular cabinet into a warm, boho-inspired focal piece with a stained-oak finish and clean lines. Mount it on concealed floating hardware, remove bulky legs, and style sparingly—think a woven tray, a couple of ceramic vessels, and trailing plants to soften edges. The natural grain and low profile bring warmth and visual lightness while keeping storage hidden, resulting in a curated, relaxed centerpiece that reads both intentional and comfortably lived-in.

Key Design Elements

  • Key materials: stained-oak finish, concealed floating brackets, simple hardware and matte or brass accents.
  • Styling rule: limit to two tactile textures and add trailing greenery for an effortless boho feel.

Pro Tip: When wall-mounting, use a sturdy French cleat or heavy-duty floating brackets secured to studs (or quality toggle anchors), and add a slim plywood backer inside the cabinet to distribute weight and prevent sagging from plants or decor.

4. Speakeasy-Style Besta Bar
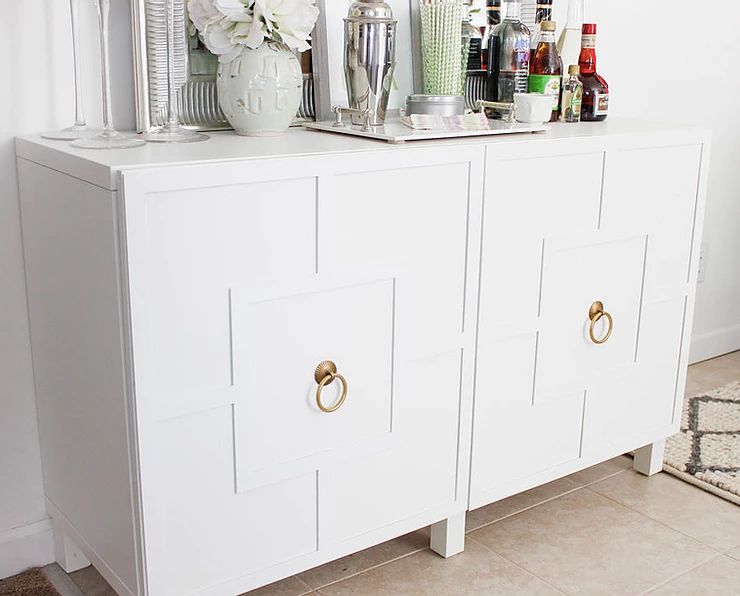
Speakeasy-Style Besta Bar

Turn an IKEA Besta into a sophisticated bar cabinet that reads like a boutique cocktail lounge. Refinish the frame and doors with a rich, deep-green paint (Caldwell Green is a great match), add brass or matte-black hardware, interior shelving for bottles and glassware, and a mirrored or LED-backlit back panel to showcase spirits. The result is a compact, elegant focal point that elevates entertaining, pairs well with warm woods and jewel tones, and tucks neatly into living or dining spaces.

Key Design Elements

  • Deep-green finish and upgraded hardware create a luxe, high-end vibe.
  • Custom shelving and lighting organize bottles and turn the cabinet into a display piece.

Pro Tip: Remove doors and drawers before painting, use a good primer to prevent bleed-through, and install removable silicone shelf liners and dimmable LED strips for easy cleanup and mood lighting.

5. The Clean-Line Sideboard: Minimal Storage, Maximum Impact
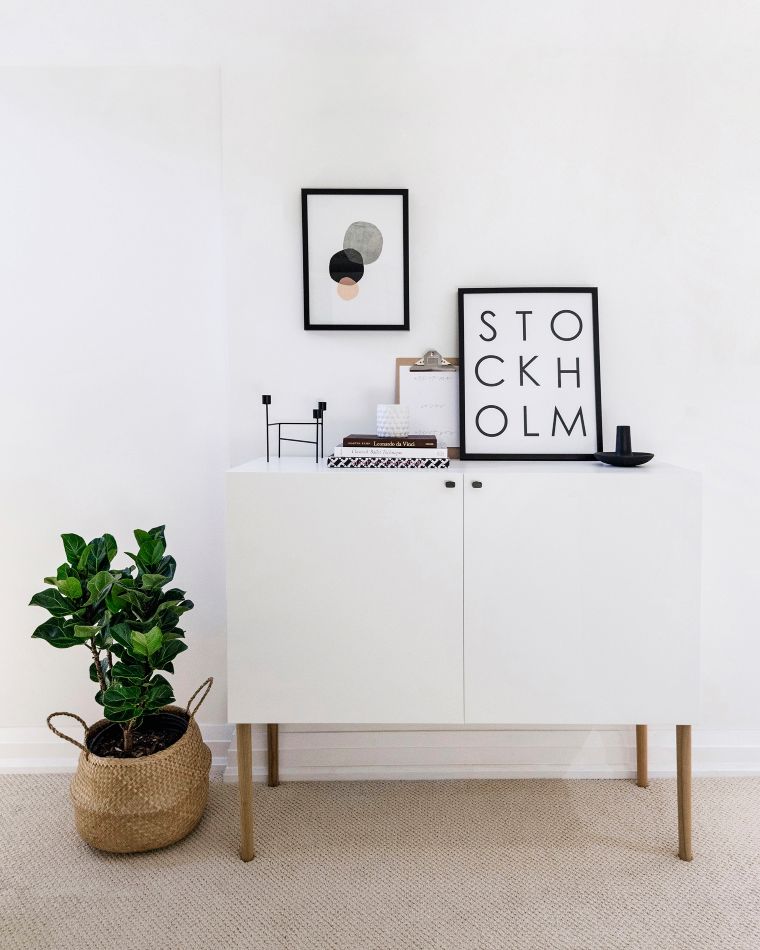
The Clean-Line Sideboard: Minimal Storage, Maximum Impact

Build a refined, ultra-minimal sideboard by joining a few modular cabinet boxes with clean-front doors, simple round knobs, and tapered wooden legs. The result is a low-profile Scandinavian-inspired piece that blends into modern interiors while adding smart hidden storage. Use it in an office to hide paperwork, in a nursery for discreet diaper storage, or in an entryway to corral shoes and umbrellas. Top it with a tray and a bowl to catch keys, mail, and daily essentials.

Key Design Elements

  • Simple components create a sleek, adaptable storage unit that suits any room.
  • Low-profile design hides clutter while providing a surface for everyday items.

Pro Tip: Bolt cabinet boxes together from the inside, then add a single continuous top or back panel to hide seams; pre-drill and use threaded leg plates for perfectly level, secure wooden legs.

6. Pastel Minimalist Entry Console
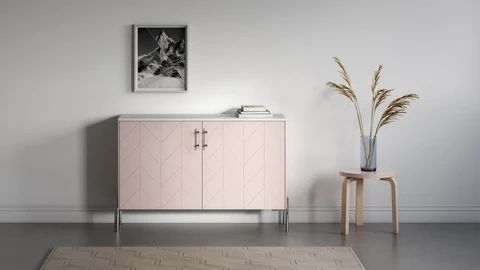
Pastel Minimalist Entry Console

Transform a compact modular cabinet into a sleek pastel hallway table by adding a thin oak top, slender metal legs, and soft-hued paint. Swap standard knobs for brushed brass pulls and install a single shallow drawer for everyday essentials. The low-profile silhouette keeps the entryway airy, while the muted palette creates a calm, contemporary feel that doubles beautifully as a vanity or dressing station when paired with a mirror. This project balances practical storage with pared-down Scandinavian-inspired styling.

Key Design Elements

  • Streamlined silhouette provides hidden storage without bulk
  • Subdued colors create a calming, modern foyer or vanity

Pro Tip: Sand and prime before painting, use painter’s tape for crisp two-tone edges, apply two thin coats of paint and a matte sealer, then anchor the console to wall studs for stability.

7. Marble Look, Mini Budget: Besta Makeover
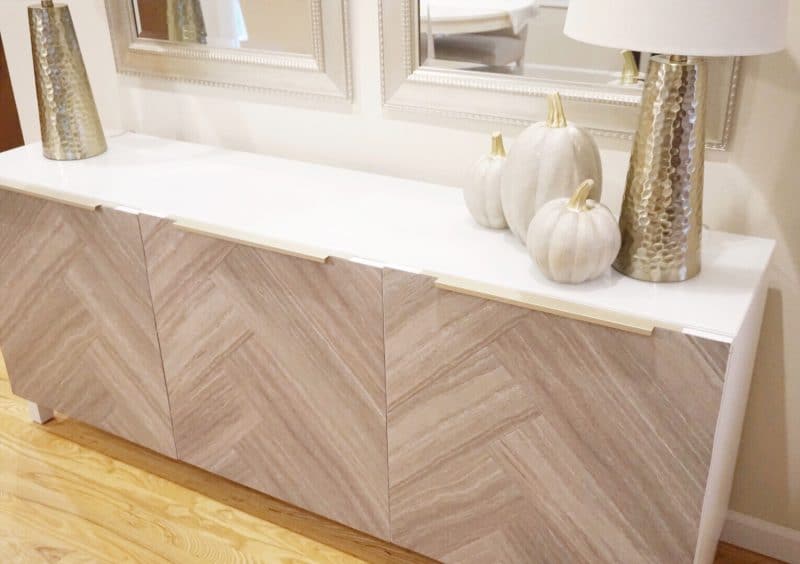
Marble Look, Mini Budget: Besta Makeover

Transform a basic IKEA BESTA unit into a luxe focal point by applying self-adhesive marble-effect vinyl to the doors. With just adhesive sheets, a utility knife, a squeegee and a hairdryer, you can replicate natural stone’s soft veining and polished sheen without the cost or weight. The result is an elegant, timeless surface that’s easy to clean and far less permanent than real marble, making it ideal for renters or anyone seeking a quick, high-impact upgrade.

Key Design Elements

  • Affordable way to get a luxe marble appearance without real stone.
  • Quick DIY application — cutting tools, a squeegee, and heat are all that’s needed.

Pro Tip: Wipe doors with isopropyl alcohol first, then plan sheet placement so veins flow across adjacent doors. Smooth from the center with a squeegee, use a hairdryer to warm and stretch the vinyl around edges, trim flush with a sharp blade, and finish with a thin bead of clear silicone to lock down edges for durability.

8. Cane-Front Besta: Warm Walnut Makeover
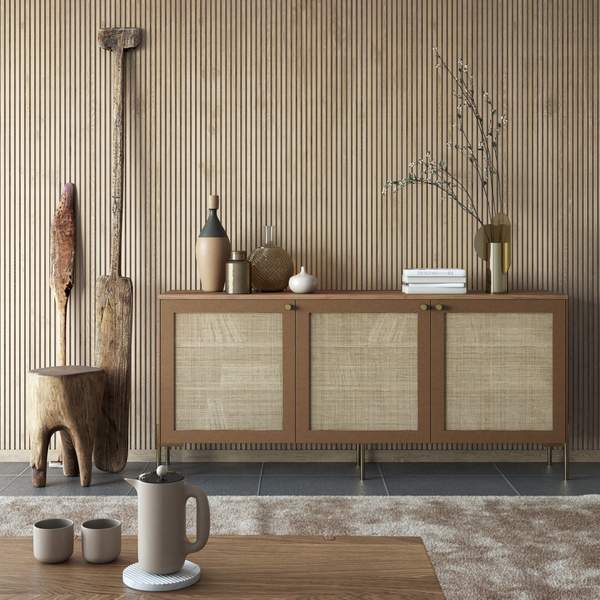
Cane-Front Besta: Warm Walnut Makeover

Transform a Besta cabinet by replacing or overlaying its doors with natural cane webbing framed in a walnut finish for a warm, textured look. This build uses cane panels, thin plywood or replacement doors, glue, staples, and stain or walnut veneer to match existing pieces. The result is a smart, semi-formal appearance that feels inviting while still polished—ideal for a home office, living room, or dining area seeking subtle midcentury texture and breathable, light-filtering fronts.

Key Design Elements

  • Adds midcentury warmth and texture while letting light and air pass through.
  • Easily customized—stain or paint frames to match walnut or create a contrasting accent.

Pro Tip: Soak cane briefly to increase flexibility, stretch and staple it to the door backing from the inside, then seal with a clear matte varnish to prevent fraying and discoloration.

9. Gilded Geometry: Besta Console Makeover

Gilded Geometry: Besta Console Makeover

Transform a modular Besta console into an affordable Art Deco showpiece by lining its doors and panels with geometric tiles or tile-print contact paper. Add low-profile acrylic or brass-look feet for a floating, vintage feel and choose metallic paints or mirror accents to amplify glamour. This simple makeover elevates the storage piece into a focal point—bringing bold shapes, shine, and period flair into a living room without expensive custom cabinetry or heavy construction.

Key Design Elements

  • Use peel-and-stick tiles or printed contact paper for an easy, budget-friendly finish.
  • Swap feet for acrylic or brass-look stands to enhance the Art Deco silhouette.

Pro Tip: Dry-fit a centerline with painter’s tape and lay out a row of tiles before sticking; use tile spacers for consistent gaps and finish edges with a clear matte sealer. For contact paper, warm it with a hair dryer to smooth bubbles and conform to edges.

10. Floating Facet Sideboard

Floating Facet Sideboard

This project transforms an IKEA storage cabinet into a floating geometric sideboard by adding layered cut‑out panels and mounting the unit on a hidden cleat. You’ll need an IKEA base cabinet, thin plywood or MDF for the faceted front, wood glue and screws, a sturdy French cleat or steel bracket, primer and an antique‑effect paint to deepen the angles, plus a large mirror above to amplify light and space. The outcome is a sculptural, space‑saving piece with rich, dimensional character.

Key Design Elements

  • Creates a sculptural focal point while freeing floor space.
  • Antique-style paint emphasizes facets and adds warm depth.

Pro Tip: Paint and seal all geometric panels before attaching them and number each piece for easier alignment. Anchor a continuous French cleat into multiple wall studs and test the mounting with a temporary board to confirm level and weight capacity before hanging the finished sideboard.

11. BESTA Makeover: Diagonal-Accent Media Console

BESTA Makeover: Diagonal-Accent Media Console

This makeover turns a tired BESTA cabinet into a sleek modern media console using simple, affordable supplies: sandpaper, painter’s tape or insulation tape for patterning, quality primer and paint, and new mid-century style legs. Mask off a diagonal or geometric motif, spray or roll on two coats of durable paint, then attach fresh legs. The result reads custom and high-end—crisp lines and contrasting color elevate the piece while keeping costs low and sustainable compared with buying new.

Key Design Elements

  • Budget-friendly refresh using basic tools and inexpensive legs.
  • Fully customizable pattern and finish to match your decor.

Pro Tip: Press tape edges down firmly and remove the tape while the topcoat is still slightly tacky for razor-sharp lines; always prime and lightly sand between coats to ensure a durable, smooth finish.

12. Built-In Bliss: Floor-to-Ceiling Modular Wall

Built-In Bliss: Floor-to-Ceiling Modular Wall

Transform an ordinary wall into a streamlined, floor-to-ceiling storage feature using a mix of IKEA BESTA and BILLY modules. Stack and align units, attach trim and panels, then finish with paint or stain for a seamless built-in appearance. This approach is budget-friendly, customizable to any room, and balances open display shelves with hidden cabinetry to reduce clutter. Ideal for living rooms, it adds vertical visual interest, consolidates media and decor, and creates a polished, designer-built look without the cost of custom carpentry.

Key Design Elements

  • Combine BESTA bases with BILLY bookcases to mix closed storage and open shelving.
  • Finish with matching trim and paint for a seamless, built-in appearance.

Pro Tip: Shim and level each unit, fasten adjacent cabinets together, and anchor the assembled system into studs before adding top trim or crown molding to eliminate gaps and ensure a secure, built-in finish.

13. The Floating Besta: Sleek DIY TV Console

The Floating Besta: Sleek DIY TV Console

Create a sleek floating media console by combining IKEA BESTA frames with SELSVIKEN doors for a clean, modern look. Mount the assembled cabinets to wall studs and add recessed cleats for secure suspension; hide cables through drilled pass-throughs and a compartment for electronics. Choose matte paint or wood veneer to coordinate with your room, and configure multiple modules to fit any wall. This inexpensive, modular approach delivers high-end style with practical storage and a low-profile silhouette.

Key Design Elements

  • Modular design adapts to any wall width and storage need.
  • Conceals wiring and devices for a minimalist, clutter-free look.

Pro Tip: Attach a 3/4" plywood backer spanning studs, fix a French cleat to the back of the BESTA units, and pre-cut ventilation and cable access holes before hanging to ensure secure support, easy wiring, and proper cooling.

14. Rustic Revival: Turn a Besta into a Reclaimed Timber Cabinet

Rustic Revival: Turn a Besta into a Reclaimed Timber Cabinet

Give a standard Besta unit a handcrafted reclaimed-wood makeover by cladding it in salvaged planks or thin timber veneers. You’ll need an existing cabinet, reclaimed boards (or rustic plywood), wood glue, screws, sandpaper, stain or oil, and a varnish or wax finish. Cut and plane the boards to uniform thickness, attach with adhesive and hidden screws, then sand and seal. The result adds patina, warmth and an artisanal touch that complements farmhouse, industrial, or contemporary interiors.

Key Design Elements

  • Budget-friendly way to achieve authentic reclaimed wood charm without buying custom furniture
  • Finish and color are easy to tailor so the piece suits farmhouse, industrial, or modern styles

Pro Tip: Dry reclaimed boards indoors for at least 48 hours and plane them to an even thickness; pre-stain each board before installation to reduce seam visibility and avoid blotchy finish.

15. Low-Profile Marble Bench Nook

Low-Profile Marble Bench Nook

Transform a Besta base into a relaxed seating alcove by lining two low cabinets side-by-side and topping them with a slim faux-marble benchtop. Use durable laminate or real stone for the surface, and paint or veneer the cabinet fronts to match your palette. The units hide shoes and gear while the bench creates a casual spot for putting on shoes or hosting a couple of guests. This low-profile installation suits hallways, entryways, or compact living rooms seeking understated, modern charm.

Key Design Elements

  • Hidden storage keeps entry clutter out of sight.
  • Marble-look top elevates the aesthetic without heavy renovation.

Pro Tip: Mount the benchtop to a simple cleat screwed into the Besta carcasses for secure support, and line the cabinet floors with a breathable, non-slip shelf liner to protect surfaces and keep shoes from sliding.

16. Lifted Besta: Asymmetrical Floating Storage

Lifted Besta: Asymmetrical Floating Storage

Elevate a Besta unit off the floor to create a sleek floating cabinet that frees ground space for shoes, crates, or woven baskets. Mount higher on studs with heavy-duty wall brackets and add staggered, asymmetrical internal shelves to introduce visual depth and layered storage. Finish with paint, wood veneer, or integrated LED strip lighting for polished contrast. The result is a modern, airy vignette that maximizes usable square footage while making compact rooms feel larger and intentionally curated.

Key Design Elements

  • Creates usable floor space for bins, shoes, and decorative baskets
  • Asymmetrical shelving adds depth and a custom, modern look

Pro Tip: Mount the cabinet using a French-cleat or heavy-duty bracket system anchored to studs and leave about 4–6 inches of clearance at the base so baskets and shoe boxes slide underneath easily; use adjustable shelf pins inside to reconfigure storage as needs change.

17. Cabinet-to-Seat: Cozy Window Nook

Cabinet-to-Seat: Cozy Window Nook

Transform a window alcove into a cozy reading bench by repurposing low-profile Besta cabinets as the base. Stack or align two or more units, secure them to the wall, and top with a custom-cut foam cushion wrapped in durable upholstery. Add layered throw pillows and a textured blanket to soften the silhouette. The built-in storage keeps books and blankets tucked away while the seat height aligns with the sill for a clear view. Neutral finishes emphasize a calm, Scandinavian-inspired retreat.

Key Design Elements

  • Conceals clutter with ample hidden storage while doubling as comfortable seating
  • Adjustable height, cushion thickness, and fabrics make it easy to match your decor

Pro Tip: Screw the cabinets to wall studs and fasten a 3/4" plywood topper across their tops before fitting the cushion; this creates a solid, gap-free seat surface and prevents sagging—choose high-density foam for longevity and trim foam so the finished seat aligns flush with the window sill.

18. Breezy Cane Sideboard Upgrade

Breezy Cane Sideboard Upgrade

Transform a BESTA cabinet into a breezy, boho-inspired sideboard by swapping its doors for cane webbing. You'll need a BESTA unit, a sheet of cane webbing, strong-hold all-purpose adhesive, a utility knife, measuring tape and basic clamps; no power tools required for a clean result. The cane brings warm texture and lightness, softening modern lines while keeping practical storage. It’s an affordable way to refresh a room with handcrafted appeal and subtle midcentury charm.

Key Design Elements

  • No power tools required—perfect for beginners and apartment-friendly builds.
  • Adds airy texture and warmth while preserving functional storage.

Pro Tip: Attach a thin wooden trim around the door opening to hide raw cane edges; use painter’s tape to temporarily hold the webbing in place, then add a flat board and weights while the glue cures to prevent puckering and ensure full contact.

19. Panel Play: Color-Blocked BESTA Makeover

Panel Play: Color-Blocked BESTA Makeover

Turn basic BESTA cabinets into a playful, polished storage solution by painting each door panel in a different hue. Sand and prime the doors, then use durable spray or acrylic paint for even coverage. Choose a coordinated palette—pastels for a nursery, bright primaries for a playroom—to create visual rhythm and personality. This simple update adds color, hides wear, and customizes mass-market furniture to fit your room's vibe while remaining reversible if you ever want a neutral look again.

Key Design Elements

  • Kid-friendly pop of color without buying new furniture
  • Reversible update—easy to repaint or swap doors later

Pro Tip: Remove doors and hardware, label the hinge side on the back, sand and prime, then spray several light, overlapping coats for smooth, drip-free coverage and perfect reinstallation.

20. Streamlined BESTA Media & Buffet Console

Streamlined BESTA Media & Buffet Console

This project transforms BESTA units into a sleek, minimal media console or buffet by combining frames, shelves and simple cabinet doors with streamlined knobs. Use the original BESTA carcasses, matching doors, and low-profile hardware — add paint or veneer for a cohesive finish and optional hairpin or tapered legs for elevation. The result is a clean, low-slung piece that hides cords and clutter while keeping a restrained, modern profile perfect for living rooms or dining areas where understated storage and elegant surfaces are desired.

Key Design Elements

  • Conceals electronics and cables for a tidy, modern setup.
  • Finish, hardware, and legs are easy to customize to match your decor.

Pro Tip: Mount a slim power strip to the interior back panel and drill a tidy cable access hole so devices stay powered yet out of sight; add soft felt pads behind doors for quiet, gap-free closure.

Conclusion

Small upgrades to IKEA Besta units yield big visual and functional payoffs: improved organization, cohesive design, and furniture that feels custom-made rather than off-the-shelf. With a few thoughtful changes, you’ll not only make better use of your space but also craft storage pieces that enhance your home’s personality and longevity.

Leave a Reply

Your email address will not be published. Required fields are marked *