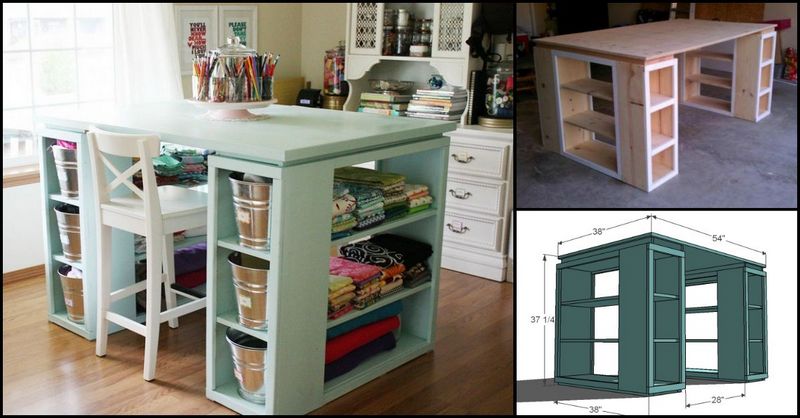
23 Creative DIY Craft Desk Ideas to Transform Your Workspace

Your craft desk should be more than a surface — it should be the engine of your creativity, a place where ideas land, projects take shape, and clutter fades into organized calm. Whether you’re sewing late-night prototypes, sketching designs, or building miniature worlds, the right workspace can speed your process and elevate your craft. This collection of 23 DIY craft desk ideas is designed to spark inspiration and give you practical solutions for everything from storage and lighting to surfaces that withstand glue, paint, and heavy use.

Inside you’ll find approachable builds and clever upgrades—think upcycled tables turned into specialty stations, modular desks that grow with your hobbies, built-in pegboards and hidden drawers, and compact fold-away solutions for small spaces. Each concept focuses on marrying beauty with function: smart ergonomics, tidy tool zones, customizable finishes, and budget-friendly materials you can personalize. Ready your measuring tape and favorite paintbrush—these ideas will help you design a workspace that keeps supplies visible but orderly, invites long stretches of focus, and looks beautiful in your home.

1. Crafting Corner: Compact Sewing Workstation
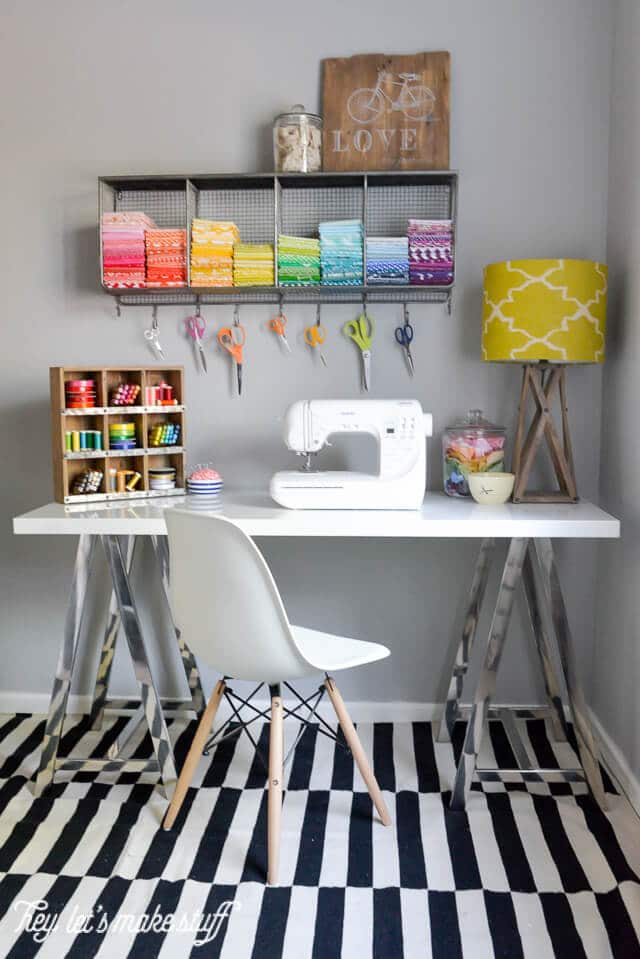
Crafting Corner: Compact Sewing Workstation

A tailored workstation built around your machine keeps all essentials within reach while presenting fabrics and notions neatly. A wall-mounted metal grid displays folded textiles by color and provides mounting points for scissors and rulers. A compact freestanding shelf on the desktop creates tiered storage for thread spools, patterns and small bins. The design is scalable and easy to adapt—resize compartments to suit your habit of stash organization and speed up project flow.

Key Design Elements

  • Wall grid makes fabrics visible and provides hooks for tools.
  • Desktop shelf adds tiered organization for spools, patterns, and small containers.

Pro Tip: Stick adhesive Velcro strips to the shelf base and the bottoms of small bins so you can reposition compartments quickly and prevent spools or notions from sliding while you work.

2. Craft Command Center: Pegboard-Powered Desk
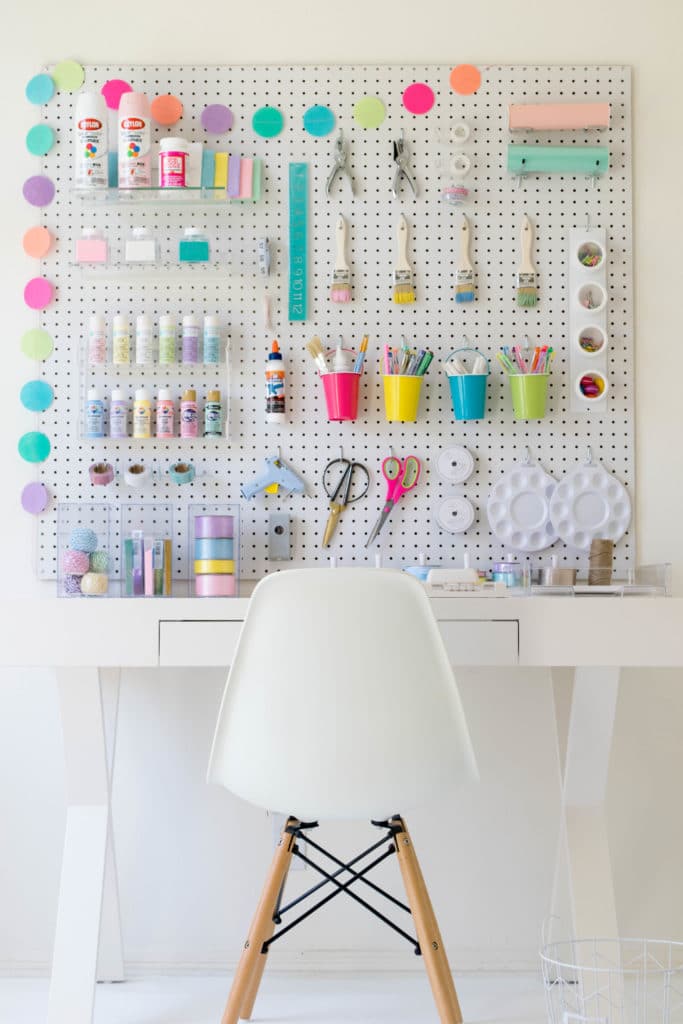
Craft Command Center: Pegboard-Powered Desk

Turn your craft desk into an organized showcase by mounting a pegboard behind your workspace to display tools and supplies where you can see and reach them. Install the pegboard first, leaving at least a 1/2-inch stand-off so hooks and accessory fittings can be inserted easily. Plan your layout — group frequently used items within arm’s reach and reserve higher or lower spots for occasional tools. Finishing with paint or removable labels makes the setup both attractive and practical.

Key Design Elements

  • Maintain a 1/2" spacer between board and wall to accommodate hooks and accessories.
  • Sort tools by frequency and function so the most-used items are closest to your work surface.

Pro Tip: Before mounting, cut kraft paper to pegboard size and tape tool outlines onto it; adjust positions and mark exact hook types on the template to avoid rearranging holes later.

3. Clean Canvas: Minimalist Craft Hub
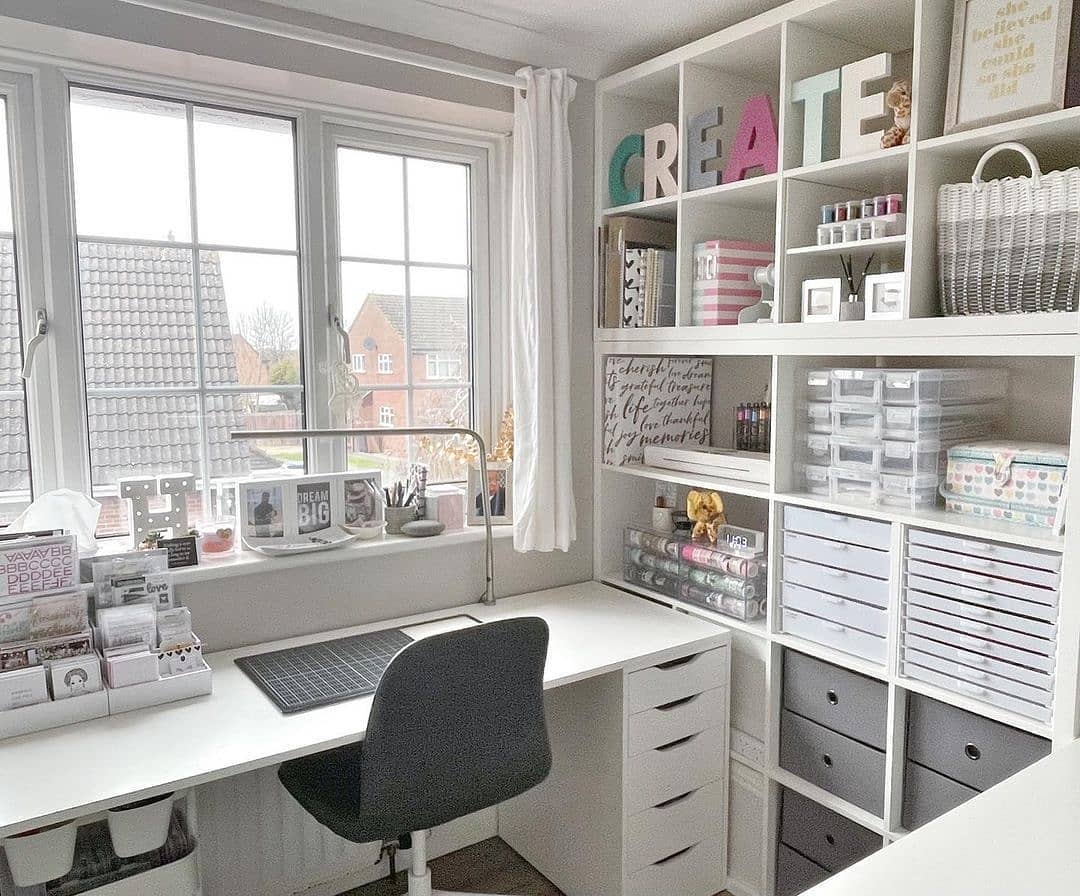
Clean Canvas: Minimalist Craft Hub

A crisp white workspace creates a neutral backdrop that makes vibrant crafts pop while keeping the area feeling calm and efficient. Choose minimalist organizers that merge with the surface so tools don’t distract. Keep frequently used supplies within arm’s reach—use wall-mounted bins, side trays under the table, and a portable caddy—to avoid constant trips away from your work. The result: a tidy, light-filled station where color and creativity take center stage.

Key Design Elements

  • Match organizers to the desktop for a seamless look that highlights your projects.
  • Maximize under-table, wall, and portable storage to keep supplies within arm’s reach.

Pro Tip: Paint the desktop in a satin or matte white to reduce glare, and use magnetic or Velcro-backed containers so you can reposition storage quickly as your projects change.

4. Mint Maker's Workbench with Built-In Storage

Mint Maker's Workbench with Built-In Storage

This robust mint-green craft table is built to withstand years of intensive projects, offering a roomy work surface and smart storage beneath. Flip your gaze under the tabletop to find a versatile organizer: six long shelves paired with six square cubbies that corral supplies, tools, and finished pieces. The decorative cake stand doubles as an attractive organizer for pens and small notions while keeping a treat or mug handy. A subtle textured finish softens the straight edges for a handcrafted look.

Key Design Elements

  • Heavy-duty frame and thick top designed for long, frequent crafting sessions.
  • Multiple shelf sizes and cubbies keep tools, paper, and small items neatly separated.

Pro Tip: Finish the paint with two coats of clear polyurethane for scratch- and stain-resistance, and line cubby bottoms with removable felt or adhesive shelf liners for easy cleaning and protection.

5. Suspended-Bucket Maker’s Workbench
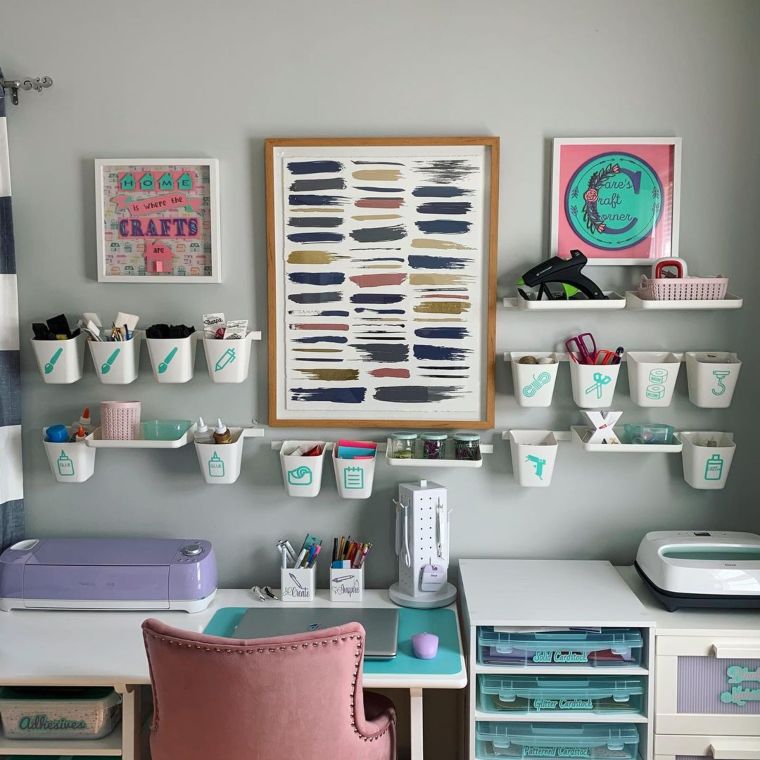
Suspended-Bucket Maker’s Workbench

Turn a basic tabletop into a functional maker’s station that flows into twin drawer chests, giving abundant surface and hidden storage. A dedicated outlet tucked into one corner powers a printer or charging hub, while a railing along the back carries small hanging planter-style tubs for brushes, pens, adhesives, and other supplies. The modular setup is ideal for personalization—swap buckets, add dividers, or source similar pieces from IKEA to create a curated, efficient craft zone.

Key Design Elements

  • Hanging tubs free up desktop space while keeping frequently used tools within arm’s reach.
  • Integrated corner power eliminates messy extension cords and keeps devices plugged in nearby.

Pro Tip: Mount a slim surge-protected power strip to the underside of the desk near the corner outlet and route cables through a grommet to hide wiring; line the hanging tubs with removable fabric liners for easy cleaning and to protect paint and delicate items.

6. Six-Cubby Craft Station on a Shoestring
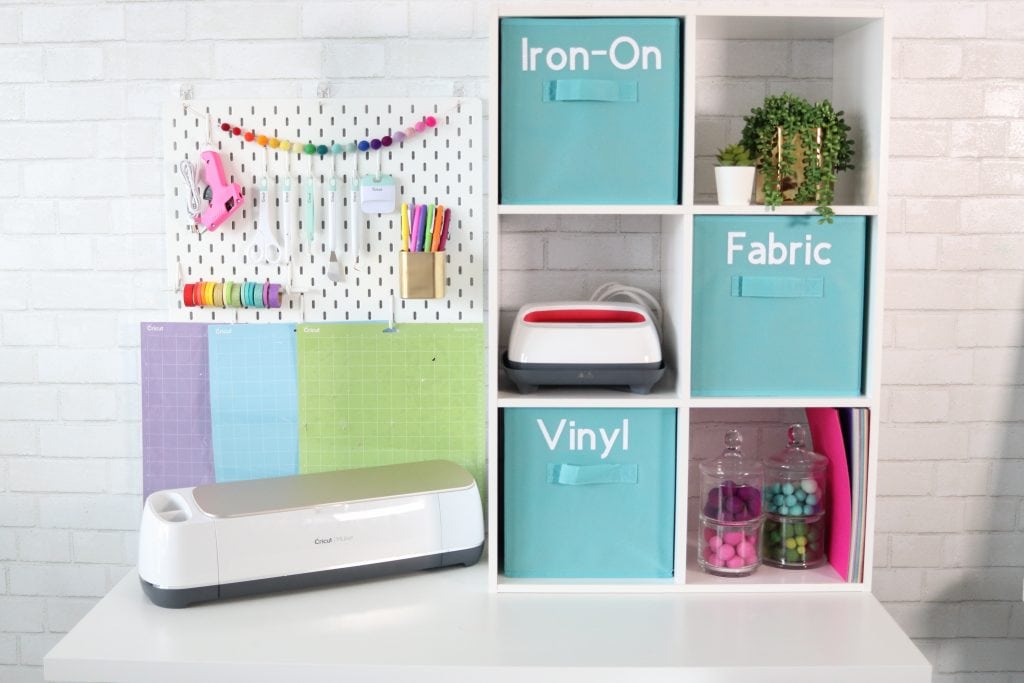
Six-Cubby Craft Station on a Shoestring

Build a practical craft workstation without breaking the bank using basic materials and a compact footprint. This design provides a wide work surface with six easily reachable storage cubbies underneath, ideal for sorting tools and supplies. With straightforward construction and modest materials—totaling under $100—you can pair it with a comfy chair and later mount a pegboard or add a compact printer. Slip-in fabric bins keep small items organized and pull out smoothly for daily use.

Key Design Elements

  • Six built-in cubbies keep supplies within arm’s reach.
  • Complete build can stay under $100; add a pegboard or compact printer later.

Pro Tip: Prime and seal the desktop before assembly, and buy fabric bins that match the cubby inner dimensions so they slide in and out cleanly.

7. Hideaway Craft Nook
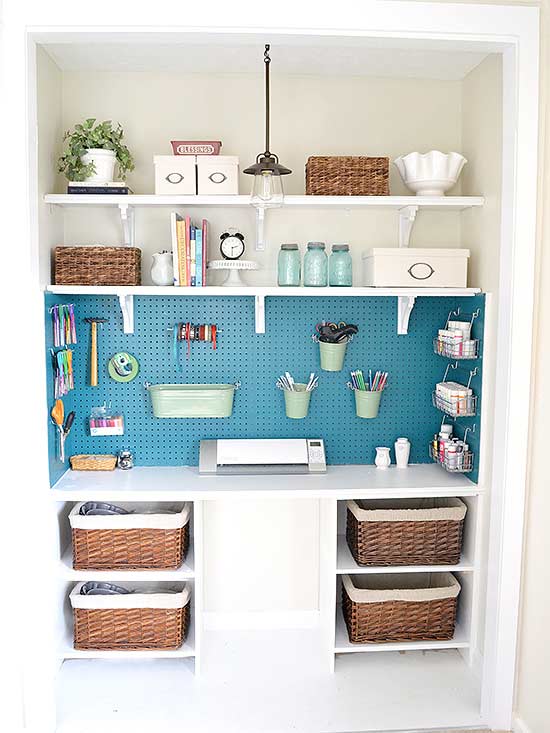
Hideaway Craft Nook

Got an underused closet, spare cabinet, or roomy armoire? Retrofit it into a compact craft workstation that tucks neatly away when not in use. Install a fold-down work surface or pull-out shelf, add task lighting and small bins, and suddenly you have a tailored creative nook. If you prefer to keep things visible in living or dining areas, group colorful beads, buttons, yarn and fabric scraps in clear jars and tins for an organized, decorative display that keeps supplies accessible without feeling messy.

Key Design Elements

  • Install a fold-down desktop, pull-out shelves, and cubbies to maximize tight spaces.
  • Display small supplies in clear jars and tins to keep tools organized and decorative.

Pro Tip: Use removable pegboard on the inside of the door and non-slip shelf liner so tools stay put and can be rearranged without damage.

8. Tiny Nook, Big Craft: Build a Budget-Friendly Workstation
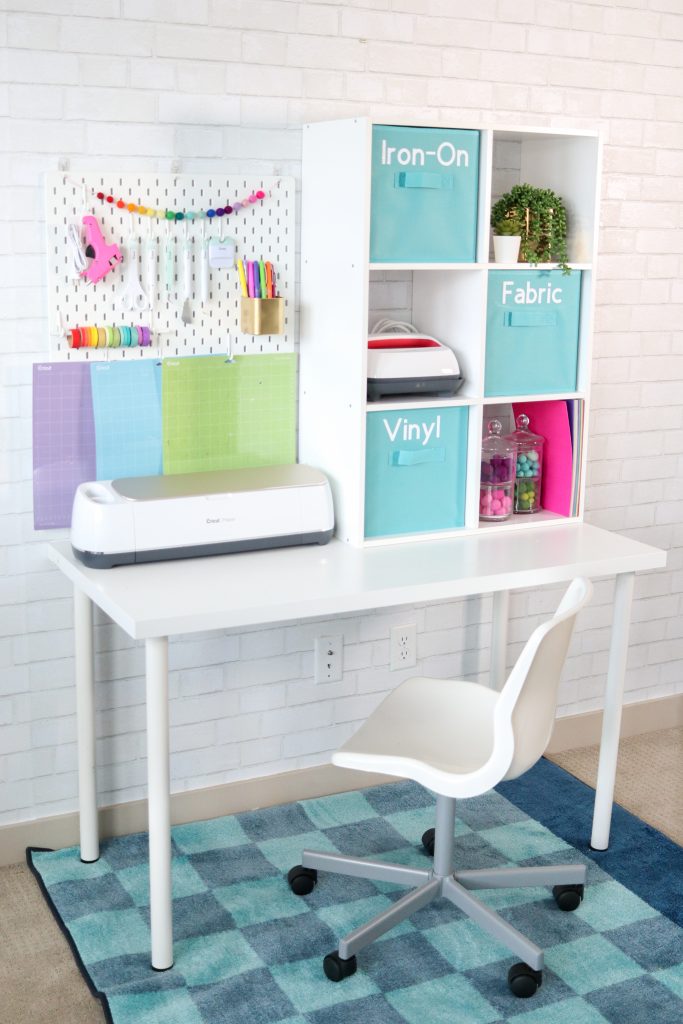
Tiny Nook, Big Craft: Build a Budget-Friendly Workstation

Transform a small alcove into a clever craft station using affordable store-bought components and a few simple DIY tweaks. This plan relies on compact tabletops and modular storage—like the shallow bucket drawers available in-store or online—to maximize utility without crowding the space. With some basic assembly, paint, and a couple of installed shelves or a mounted pegboard, you’ll get a highly functional, customizable workspace that stays on budget and adapts as your supplies grow.

Key Design Elements

  • Uses common, easy-to-source pieces so you can assemble quickly and affordably.
  • Modular bucket drawers and shelves make storage adaptable to any craft setup.

Pro Tip: Mount a slim pegboard above the desk and use labeled clear containers or magnetic jars so tools stay visible, accessible, and can be rearranged without extra drilling.

9. Craft Hub on a Shoestring: Build a Modular Workbench

Craft Hub on a Shoestring: Build a Modular Workbench

Transform a small budget into a highly functional crafting hub with this smart workbench build. For just over one hundred dollars you can construct a tailored table surrounded by cubbies and low bookshelves that neatly corral supplies and tools. The layout adapts to available floor space and specific storage needs, so you can customize sizes and compartment layouts. With a taller-than-average tabletop, it's easy to set up as a standing workstation to reduce strain during long projects.

Key Design Elements

  • Cost-effective build (~$100) with surrounding cubbies and shelves for supplies.
  • Customizable footprint and height; easily converted into a standing workstation.

Pro Tip: Add adjustable shelf inserts and heavy-duty locking casters so you can reconfigure storage heights and roll the unit for cleaning or repositioning.

10. Spectrum Station: Color-Blocked Craft Corner

Spectrum Station: Color-Blocked Craft Corner

Turn your craft area into a coordinated spectrum by arranging tools and supplies into hue-based blocks. Line up jars, boxes and bins by color to create geometric bands of tone, then top the display with a handmade tassel garland marquee hung above the workstation for instant cheer. This approach makes supplies easier to find while transforming clutter into an intentional, vibrant arrangement—choose muted pastels for calm or saturated primaries for energetic play.

Key Design Elements

  • Organizes supplies by hue for quick access and a visually calming desk
  • Handmade tassel garland is an easy, budget-friendly accent that brightens the wall

Pro Tip: Lay out paint swatches to map your color order before arranging supplies, and hang the tassel garland with clear removable hooks so you can reposition without damaging paint.

11. Grid & Work: Wall Cubby Desk Makeover

Grid & Work: Wall Cubby Desk Makeover

Transform a plain wall into a functional workstation by building a wall-mounted desk with a grid of open cubbies. The desktop stays simple—think reclaimed wood—while the storage configuration becomes the standout feature. Success depends on precise measurements and a clear layout: plan compartment sizes, mark stud locations and decide fasteners, and picture where items like chargers or binders will live. With a solid blueprint, installation is smooth and the result is stylish, compact storage.

Key Design Elements

  • Draft a scaled diagram to finalize compartment proportions and cable paths.
  • Secure shelving to studs or use rated wall anchors for heavy loads.

Pro Tip: Assign each cubby a purpose on your plan (printer, files, supplies) and build/test one section first to confirm access, shelf height, and cable routing before completing the whole unit.

12. Pink Pop Craft Desk Makeover

Pink Pop Craft Desk Makeover

Turn a neglected desk into a cheerful crafting hub with bold color and smart storage. Start by thoroughly cleaning and lightly sanding the surface, then choose a durable, high-gloss hot-pink finish to make the workspace pop against soft green pegboards. Add organized zones for tools and materials, and complement the setup with a compact rolling three-tier cart for frequently used supplies. The result is a bright, inviting area that motivates creativity and keeps essentials within easy reach.

Key Design Elements

  • Bold hot-pink paint creates an energizing focal point while pale jade pegboards keep tools visible and tidy.
  • A three-tier rolling cart delivers mobile, compact storage for frequently used supplies and frees up desktop space.

Pro Tip: Degloss with light sanding, apply an adhesion-promoting primer, then use a durable enamel or spray lacquer; finish with a clear polyurethane to resist scuffs and spills.

13. Mini Makers’ Studio: A Colorful Craft Nook

Mini Makers’ Studio: A Colorful Craft Nook

Create a dedicated craft station where kids can focus, invent, and share projects with you. This playful setup pairs a painted cerulean work table with sun-bright shelving, a stackable rainbow drawer unit for easy supply organization, and a whimsical car-shaped metal wall organizer that keeps tools visible and off the floor. The layout balances color, accessibility and storage so children of varying ages can independently reach materials while you supervise or join in the fun.

Key Design Elements

  • Bright, low-height furniture encourages independent creativity and safe reach.
  • Modular drawers and wall racks simplify clean-up and teach organizing skills.

Pro Tip: Mount a craft paper roll under the tabletop with Velcro or a simple holder—unroll for instant drawing and tear off for fast, mess-free cleanup.

14. Rustic Crate Workstation Makeover

Rustic Crate Workstation Makeover

Transform a simple tabletop and wooden crates into a compact, rustic-inspired workspace that looks thoughtfully designed. Stack or fasten crates as legs and storage, then paint them the same rich brown as the top to create a cohesive finish. Perfect for breathing new life into an old garage table or a flea-market find, this project blends functional storage with vintage charm and is easy to personalize with hardware or a distressed finish.

Key Design Elements

  • Crates double as both support and built-in storage — no separate legs required.
  • Painting crates to match the tabletop instantly unifies the whole piece.

Pro Tip: Pre-fit and clamp the crates to the tabletop, then secure with wood glue and screws driven from underneath; fill screw holes and finish with stain or paint for a seamless, sturdy result.

15. Coastal Craft Nook With Integrated Storage

Coastal Craft Nook With Integrated Storage

Create a calm, organized workspace with a warm, plank-style tabletop and crisp white shelving built into a corner for art supplies. This design balances aesthetics and function: a comfortable, colorful chair personalizes the spot while rows of cubbies keep paints, brushes, and paper within easy reach. Ideal for watercolor, paper crafts, and small projects, the nook encourages lingering creativity without clutter, delivering a serene studio vibe in a compact footprint.

Key Design Elements

  • Plank-effect top paired with light shelving offers a warm, breathable surface that reads tidy and inviting.
  • Tailored cubbies and shallow drawers keep tubes, jars, and paper sorted and immediately accessible.

Pro Tip: Finish the tabletop with a matte polyurethane for stain resistance, and use removable adhesive felt pads under jars and tools to stop slipping and make cleanup effortless.

16. Studio Command Workbench

Studio Command Workbench

Create a roomy central workbench that melds generous storage with a solid, functional surface. Cupboards line both ends and the center section, with an open lower shelf that accommodates wire carts, bins, or modular organizers. A built-in electrical outlet keeps sewing machines, lighting, and chargers within easy reach, and the heavy-duty tabletop doubles as a cutting surface when topped with a purpose-made mat. Sleek and practical, this build streamlines your workflow and tames clutter in one elegant fixture.

Key Design Elements

  • Plentiful cabinet space plus open lower bay for wire carts and storage bins.
  • Built-in electrical outlet and a durable top suited for cutting and machine work.

Pro Tip: Mount a recessed power strip inside a central cubby to hide cords, fit full-extension slides on drawers for easy access to machines, and secure a thin self-healing mat with removable double-sided tape so it stays put but can be replaced.

17. Compact Craft Command Center

Compact Craft Command Center

Transform a tiny corner into a full craft workshop with a wall-mounted, space-saving desk that folds away when not in use and unfolds into a wide work surface flanked by extending shelves. Customize shelf heights, drawer placements, and hanging racks to suit paints, paper, and tools. Every niche becomes purposeful — fill with baskets, trays, and labeled bins for instant access and tidy storage. Buy ready-made organizers or source economical bulk baskets online to outfit the design affordably.

Key Design Elements

  • Maximizes vertical space with adjustable, extendable shelving
  • Modular baskets and trays keep supplies sorted and mobile

Pro Tip: Mount removable pegboard or slatwall panels on the fold-out sides so hooks, baskets, and small bins can be reconfigured quickly; pair with soft-close hinges to prevent spills when closing.

18. Spectrum Sewing Sanctuary

Spectrum Sewing Sanctuary

Create a bright, organized crafting alcove with a streamlined desk, long open shelving, and layered lighting. A muted multicolor palette balances pops of color while roomy, labeled cubbies keep threads, notions, and patterns within reach. Built-in outlet near the workspace means no tangled extension cords for your sewing machine, and a nearby window floods the area with soft daylight — ideal for accurate color work and long hours of stitching. This setup blends form and function for serious makers.

Key Design Elements

  • Expansive, adjustable shelves keep spools, trims, and baskets neatly visible.
  • Integrated power outlet and layered task lighting streamline machine use and detail work.

Pro Tip: Install a slim surge protector beneath the desk and use clear, labeled bins on the shelves so you can spot thread colors and supplies at a glance without digging.

19. Wall-Hugging Retro Craft Station

Wall-Hugging Retro Craft Station

This wall-mounted craft desk channels retro-bohemian charm with warm wood tones and a compact work surface perfect for handcrafts like macramé or embroidery. Tuck a leather-upholstered chair beneath, line floating shelves above with supplies and a few potted plants, and you’ve got a cozy, productive corner. The project involves cutting and securing multiple shelves and assembling the desk frame yourself, so it’s rewarding but hands-on — a great weekend build for someone who enjoys a blend of form and function.

Key Design Elements

  • Floating shelves create vertical storage for tools, yarn, and decorative plants.
  • Requires moderate DIY skills: measuring, cutting, and multiple shelf installations.

Pro Tip: Locate studs and mark them before mounting; use appropriate anchors or toggles for drywall, pre-drill pilot holes, and use a long level so all shelves sit perfectly straight.

20. Masonite Makeover: Jumbo Upcycled Workbench

Masonite Makeover: Jumbo Upcycled Workbench

This upcycled project transforms a primed masonite door into a roomy 36" x 80" creative workbench perfect for sewing, paper crafts, and large layouts. The door becomes a smooth tabletop mounted on a shelf unit for stash storage, while a wall rack with hanging bins keeps tools within reach. Because the base is simple, you can build a durable, low-cost station with basic hardware and a little sanding and sealing—ideal for makers who want a big surface without buying new furniture.

Key Design Elements

  • Repurposes a primed masonite door into a spacious 36" x 80" tabletop.
  • Combine an under-table shelving unit and wall-mounted rack with hanging bins for tidy, accessible storage.

Pro Tip: Reinforce the underside with 2×4 cleats and bolt the tabletop to the shelf unit to prevent sagging; sand edges and finish with polyurethane for a smooth, durable, water-resistant surface.

21. Craft Command Center

Craft Command Center

Clean, functional setup that’s quick to build and perfect for maximizing craft workflow. Mount pegboard across the back wall for instant organization and hang tools, scissors, and small bins within easy reach. Add stackable tiered racks, similar to kitchen spice organizers, to create vertical storage on the desktop, freeing surface space and keeping frequently used supplies visible. This layout prioritizes accessibility and modularity so you can rearrange storage as projects evolve.

Key Design Elements

  • Cover the back wall with pegboard panels for customizable tool and supply placement.
  • Add stackable, spice-rack style shelves to build vertical tiers without eating desk space.

Pro Tip: Use clear, labeled containers on each rack and attach small baskets or magnetic strips to the pegboard so you can spot and swap supplies instantly.

22. Tidewater Studio Worktable

Tidewater Studio Worktable

This project channels the functionality of a kitchen island into a dedicated craft station, featuring a generous tabletop and seating for a barstool. Flanking the legs are built-in cabinets painted Sherwin Williams' Tidewater blue, each side fitted with nine deep shelves—ample room for bolts of fabric, sewing notions, spools, and small tools. Open and concealed storage keeps supplies organized and off the work surface, so you can maintain a clear, efficient area for cutting, pinning, and assembling projects.

Key Design Elements

  • Generous, raised work surface ideal for cutting, layout, and seated tasks.
  • Eighteen deep shelves (nine per side) provide abundant, organized storage for supplies.

Pro Tip: Mount a slim power strip under the tabletop and add locking casters to the base so your worktable stays tidy, powered, and easy to move when needed.

23. Chalkboard Craft Bar with Built-In Storage

Chalkboard Craft Bar with Built-In Storage

This sleek black tabletop, finished in chalkboard paint, sits on adjustable legs and pairs perfectly with a bar stool to create a casual craft bar overlooking the family room. Underneath, eight generous cubbies store paper, tools, and bins so your supplies stay organized yet within reach. The chalkboard surface invites quick sketches, to-do lists, recipes, or family notes—making it as functional for daily chores as it is for creative projects while keeping you part of the household activity.

Key Design Elements

  • Eight roomy cubbies hide and organize supplies within arm’s reach.
  • Adjustable-height legs and bar-stool seating let you craft comfortably while staying connected to the family room.

Pro Tip: Season the chalkboard by rubbing the entire surface with the side of a piece of chalk, then wipe clean—this prevents ghosting and makes future marks erase cleanly.

Conclusion

A custom DIY craft desk is more than a piece of furniture — it's a personal command center where style and function meet. Inspired by the desire to tailor every inch to your workflow, these projects celebrate thoughtful details: the perfect tabletop for cutting and painting, smart storage that keeps supplies visible but tidy, task lighting that flatters your work, and materials chosen for budget, sustainability, or bold aesthetic. Building your own desk lets you fuse designer sensibility with hands-on problem solving, creating a workspace that reflects how you create.

Pick the project that speaks to your needs and space, then give yourself permission to start small and iterate. Measure first, sketch a plan, gather a few tools and materials, and carve out an afternoon or two to get the bones in place. Whether you repurpose reclaimed wood, install a modular system, or paint a compact fold-down station, the act of making will transform your process as much as your room. So choose your favorite design, roll up your sleeves, and begin—your perfect craft desk is waiting to be built.

Leave a Reply

Your email address will not be published. Required fields are marked *