If your closet feels more like a chaotic catch-all than a calm, organized sanctuary, you are not alone — and the good news is that a stunning wardrobe upgrade does not have to come with a jaw-dropping price tag. IKEA’s versatile, affordable product lineup has become the secret weapon of savvy home organizers and DIY enthusiasts everywhere, offering endless potential for creative customization without the cost of a professional renovation. Whether you have a tiny reach-in closet or a sprawling walk-in, there is an IKEA hack on this list that will work for your space and your budget.
From repurposing bookshelves as shoe displays to building a glamorous closet island from shelving cubes, these 20 ideas prove that a little ingenuity goes a long way. We have rounded up the most inspiring, practical, and budget-conscious IKEA closet hacks available, complete with tips to help you execute each project with confidence. Get ready to roll up your sleeves — your dream closet is closer than you think.
1. Illuminate Your IKEA Kallax as a Lit Display Cabinet
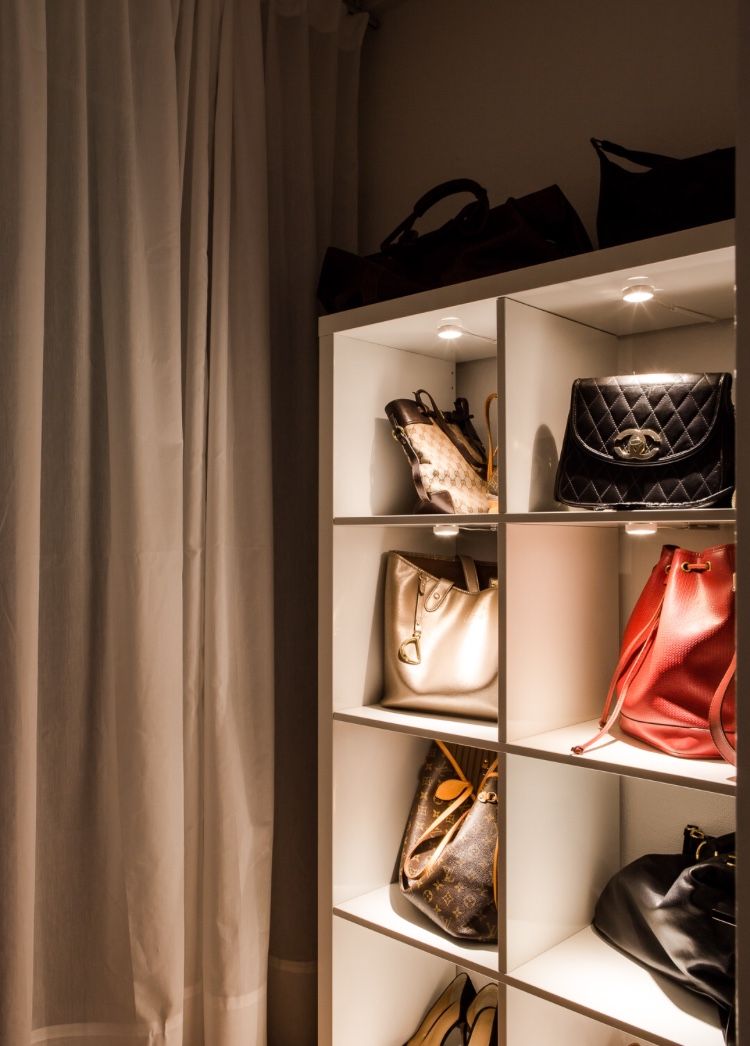
Turn the iconic IKEA Kallax shelving unit into a dramatic display case for your handbag collection, sneakers, or prized collectibles. By mounting a small downlight or stick-on LED strip to the top of each shelf compartment, you create a boutique-style glow that highlights your most treasured items. Peel-and-stick LED lights make installation simple and tool-free, while a hardwired system allows all lights to operate on a single switch for a more polished, seamless result.
Key Design Elements
- Stick-on LED puck lights or LED strip lights are the easiest no-wire solution for illuminating individual Kallax cubbies.
- Painting the interior back panel of each cube in a contrasting color intensifies the lighting effect and adds visual depth.
Pro Tip: Use warm-white LEDs rather than cool-white to give your displayed items a rich, gallery-like ambiance that feels intentional rather than clinical.
2. Budget Closet Makeover Using Stacked IKEA Trofast Units
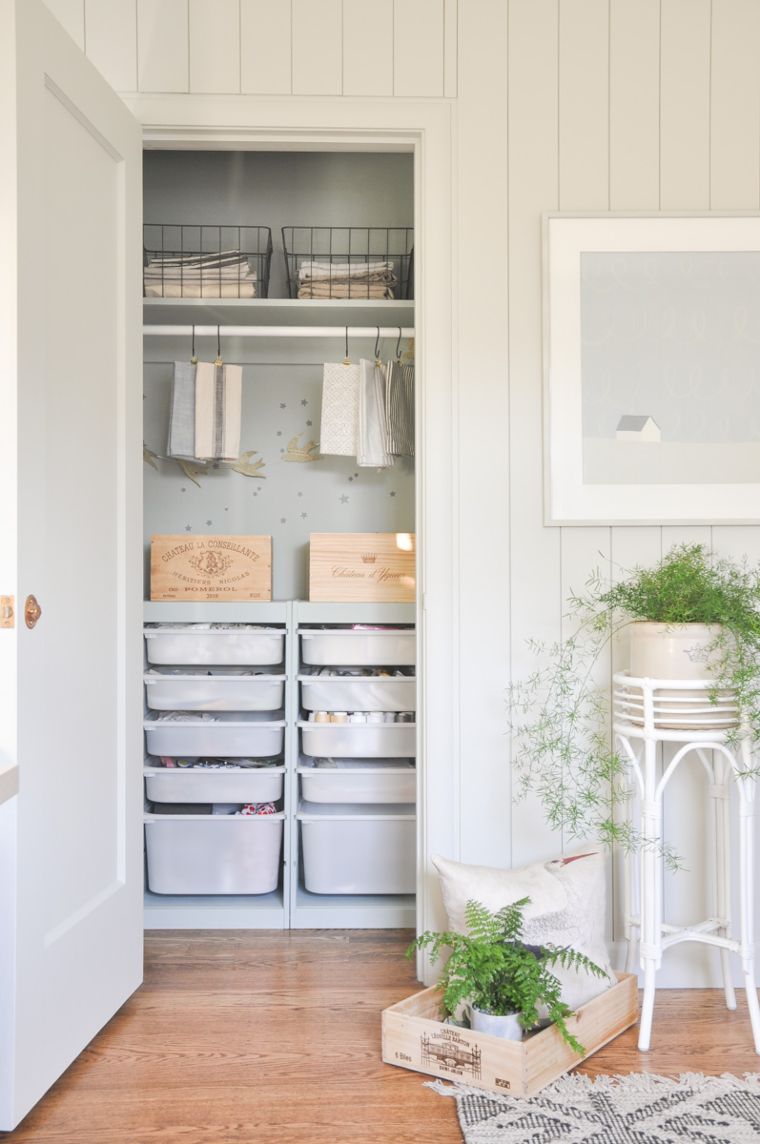
The IKEA Trofast storage system is one of the most affordable and adaptable products in the entire IKEA lineup, making it an ideal foundation for a DIY closet overhaul. Stack multiple units side by side inside a bedroom or office closet to dramatically multiply your storage capacity without touching a single wall. Choose a cohesive color palette — painting the closet interior and the Trofast frames a primary color while reserving an accent shade for handles, rods, and trim — to create a pulled-together, intentional look.
Key Design Elements
- Adding a closet rod above the Trofast units creates a hybrid hanging-and-drawer storage system that works for both adults and children.
- S-hooks attached to a wall-mounted rail above the units offer a modern, open-storage option for bags, belts, and accessories.
Pro Tip: Before painting, lightly sand the Trofast surfaces and apply a bonding primer to ensure the paint adheres evenly and resists chipping over time.
3. Elevate Your Closet Aesthetic with Coordinated Velvet Hangers
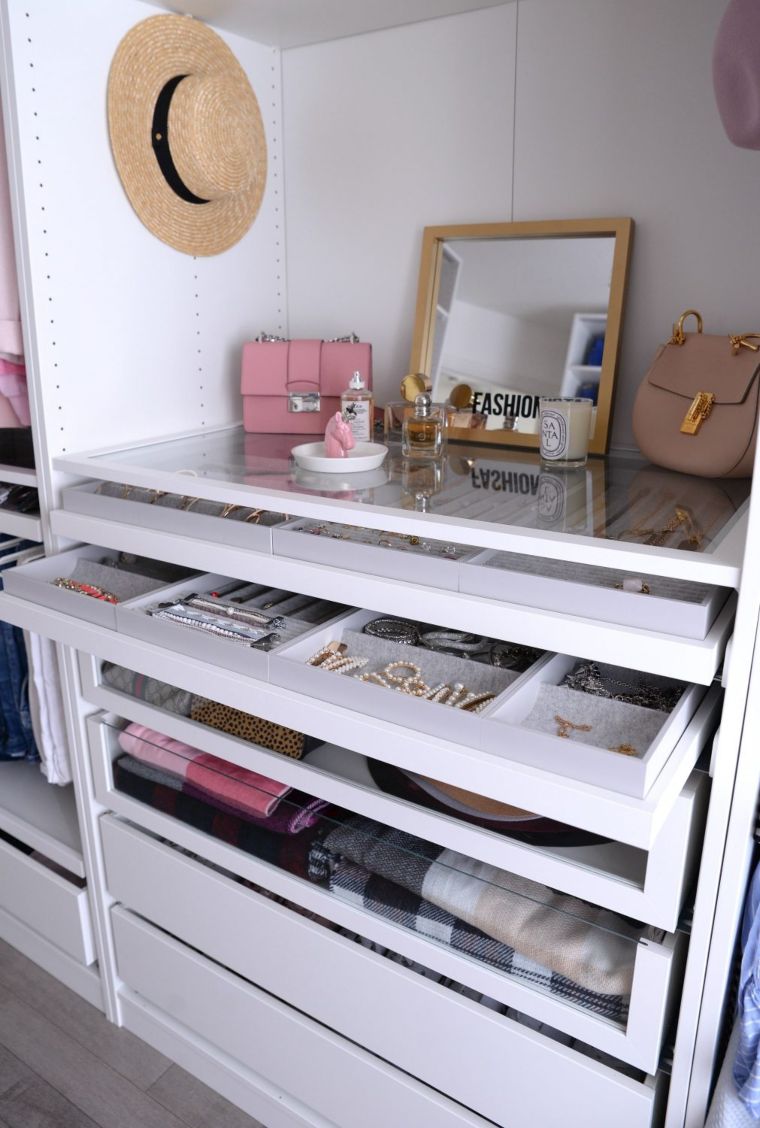
It may seem like a minor detail, but swapping out mismatched plastic hangers for a uniform set can completely transform the look and feel of any closet. Much like the right seasoning elevates a dish, coordinated hangers bring cohesion and polish to even the most basic wardrobe setup. Pairing a slide-out pull-out rack with slim velvet hangers — such as IKEA’s BUMERANG style — keeps garments neatly spaced, prevents slipping, and lends the space a boutique-quality finish that looks far more expensive than it is.
Key Design Elements
- Velvet hangers take up significantly less horizontal rod space than bulky plastic versions, instantly creating room for more clothing.
- Grouping garments by category and color on matching hangers makes getting dressed faster and keeps the closet looking tidy longer.
Pro Tip: Introduce your new hangers gradually by replacing one clothing category at a time — starting with tops or dresses — so the transition feels manageable rather than overwhelming.
4. Clever Tie and Accessory Storage for Sloped Ceiling Corners
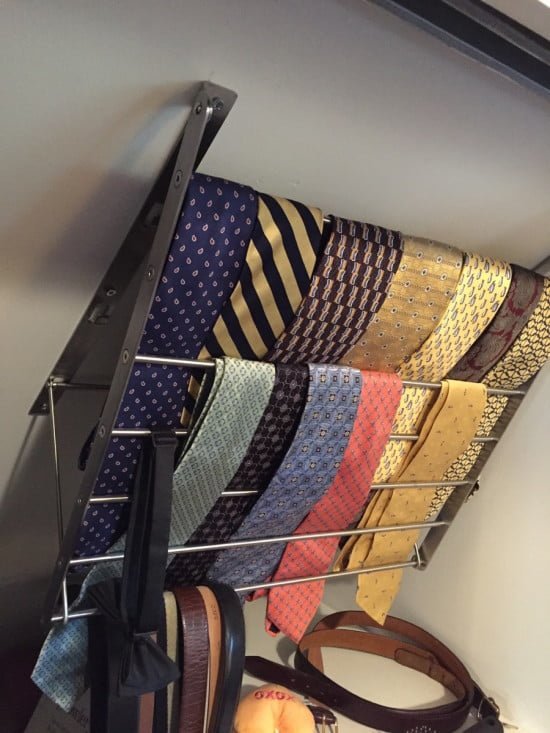
That awkward triangular corner beneath a sloping roofline is one of the most underutilized spaces in any home, but it does not have to stay empty. The IKEA Grundtal Drying Rack, originally designed for the kitchen or laundry room, can be cleverly repurposed as a wall-mounted tie hanger or accessory bar in a low-clearance closet nook. No specialized tools are required beyond basic fasteners, making this one of the quickest and most satisfying small-space hacks on the list.
Key Design Elements
- The Grundtal’s horizontal bars accommodate multiple ties, scarves, or belts when hung vertically along the sloped wall.
- Because the rack mounts flush to the wall, it fits comfortably in spaces too narrow or low for any standard shelving unit.
Pro Tip: Spray-paint the Grundtal rack in a matte black or brushed gold finish before mounting it to give this utilitarian piece a more intentional, decorative appearance.
5. Personalize the IKEA Hemnes Wardrobe to Match Any Room Style
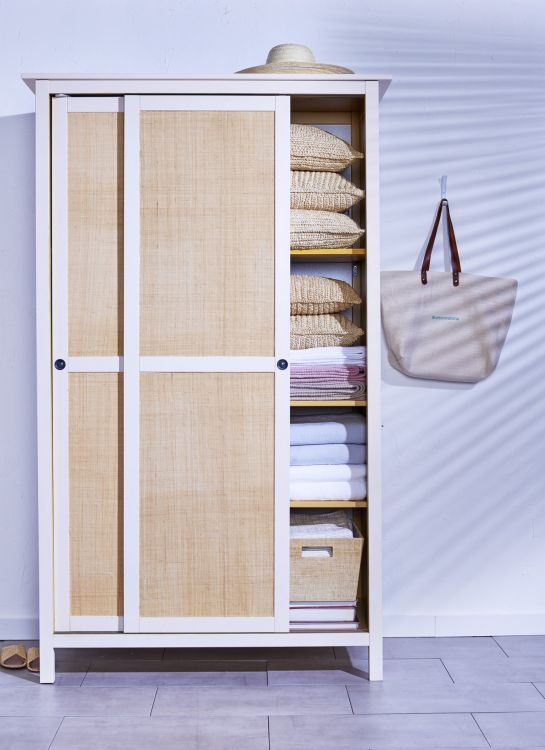
The IKEA Hemnes wardrobe’s clean lines, sliding door design, and generous interior storage make it one of the most versatile canvases for a DIY closet project. Its large, flat door panels are practically begging for a creative update. Swap out the center door panels for frosted or clear acrylic sheeting for a modern, craft-room-ready look, or repaint the entire unit in a coastal sky blue and swap hardware for rattan pulls for a relaxed, beachy bedroom vibe. The Hemnes adapts effortlessly to virtually any interior design direction.
Key Design Elements
- Replacing solid door panels with acrylic or wire mesh inserts improves ventilation inside the wardrobe, which is especially beneficial for storing leather goods.
- Swapping the original hardware for statement knobs or pulls is one of the fastest, most affordable ways to give the Hemnes a completely new personality.
Pro Tip: When repainting the Hemnes, use a furniture-specific chalk paint for excellent adhesion on the lacquered surface without the need for heavy sanding.
6. Build a Glass-Front Accessory Display with IKEA KOMPLEMENT Drawers
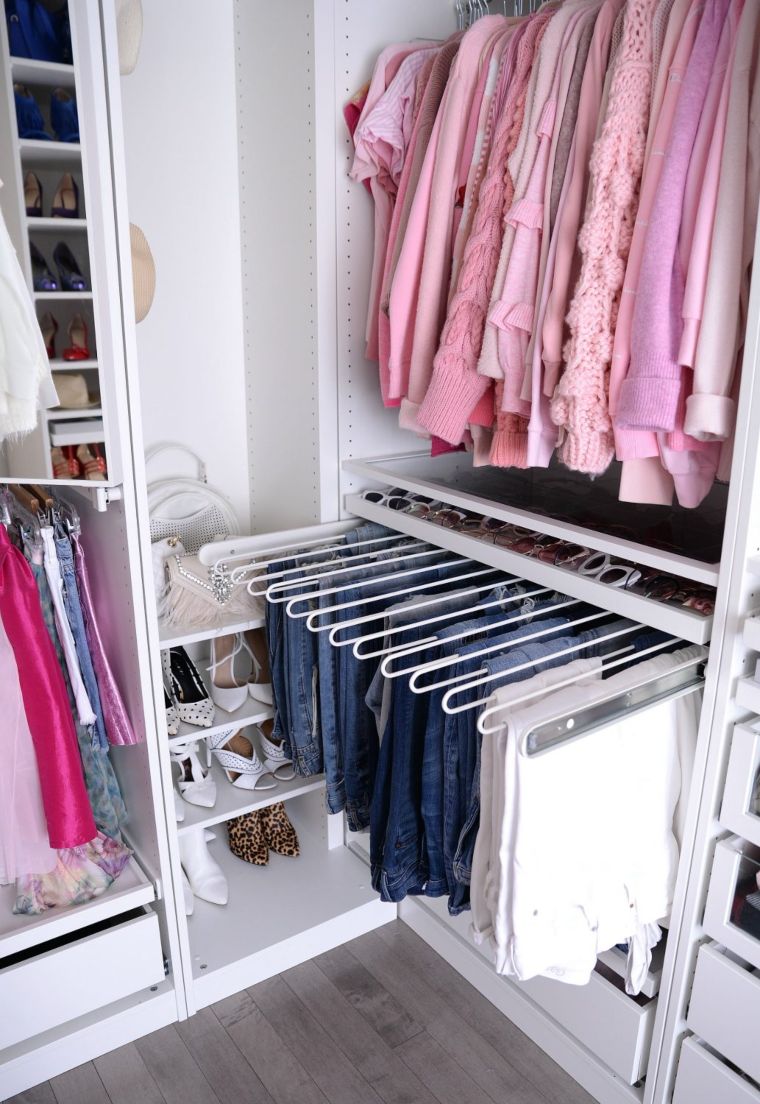
The IKEA KOMPLEMENT drawer system is available in both solid and glass-front styles, and the glass-front option is a game-changer for accessory organization. Typically found only in high-end, Hollywood-style dressing rooms, a glass-front accessory display serves a dual purpose: it keeps your jewelry, sunglasses, and small accessories neatly organized while also putting them on beautiful display. Being able to see your full accessory collection at a glance makes outfit building faster, more intuitive, and genuinely more enjoyable every single day.
Key Design Elements
- Lining the inside of glass-front KOMPLEMENT drawers with a contrasting velvet fabric insert adds a luxurious, jewelry-store aesthetic.
- Grouping accessories by type — rings in one drawer, bracelets in another — makes the display both visually cohesive and highly functional.
Pro Tip: Add a small battery-powered LED strip to the underside of the shelf above the glass-front drawers to spotlight your accessories and make the display look truly high-end.
7. Transform the IKEA DOMBAS Wardrobe into a Chalkboard Storage Unit
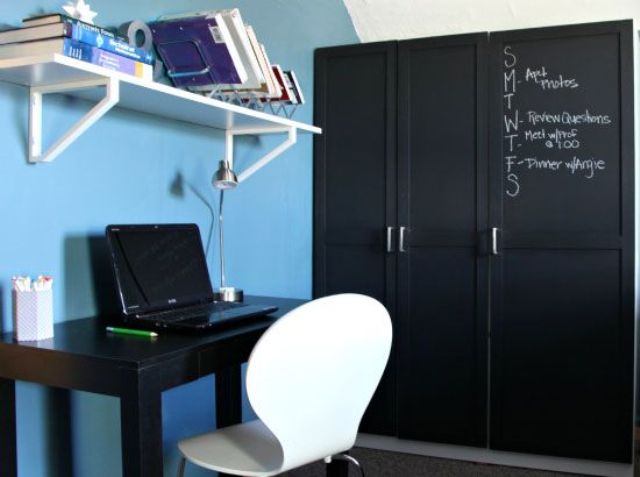
The IKEA DOMBAS wardrobe, with its three wide doors and generous interior compartments, is an ideal storage solution for craft rooms and home offices. Its large, smooth exterior door panels offer the perfect surface for a coat of chalkboard paint, instantly converting the outside of the unit into a functional writing surface for notes, project ideas, to-do lists, and sketches. The result is a storage piece that is as creatively inspiring as it is practically useful — a true workhorse for any creative workspace.
Key Design Elements
- Apply at least two coats of chalkboard paint and allow full curing time before use to ensure a smooth, smudge-resistant writing surface.
- Using chalk markers instead of traditional chalk produces crisper lines and reduces dust, making it ideal for detailed notes or diagrams.
Pro Tip: Before writing on the chalkboard surface for the first time, season it by rubbing the side of a chalk stick across the entire surface and then erasing it — this prevents ghosting from your first use.
8. Build a Rolling Open Wardrobe from a Flipped IKEA Kallax
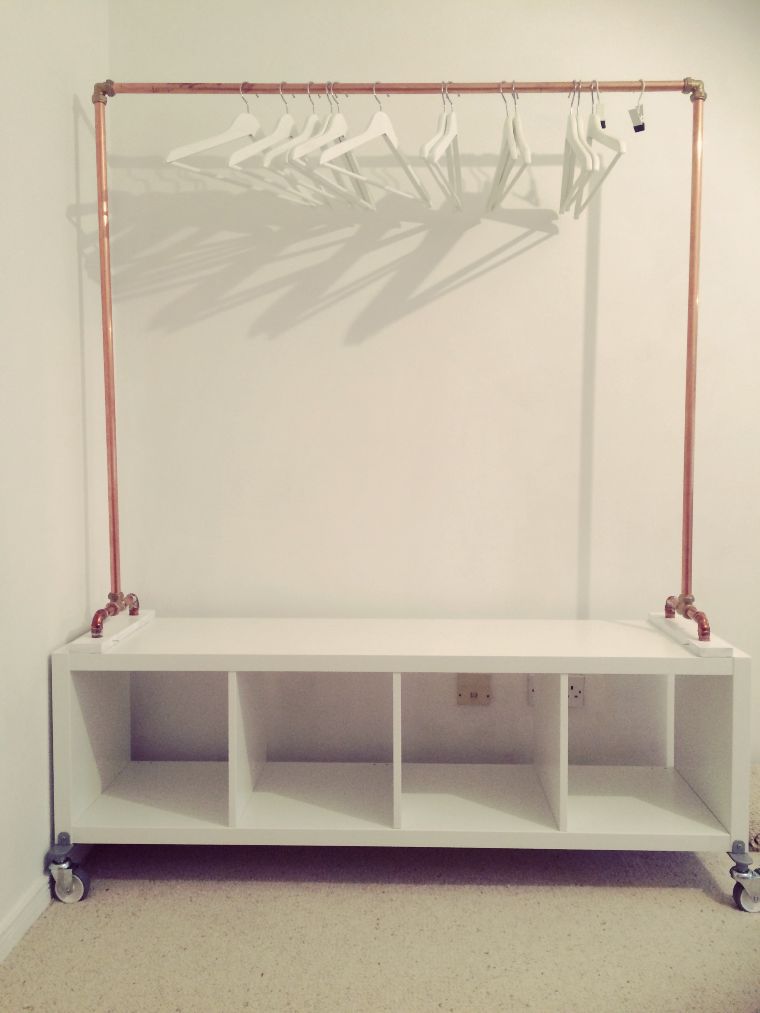
For renters, minimalists, or anyone who needs flexible wardrobe storage, this Kallax hack delivers serious style on a shoestring budget. Flip the Kallax unit onto its side, then attach copper or brass piping along the top edge to create a sleek hanging rail for clothing. Screw furniture casters onto the bottom of the unit to make the entire wardrobe mobile — perfect for repositioning as your space evolves. Paint the Kallax in a bold color or add a custom MDF back panel in a contrasting accent shade for a truly one-of-a-kind piece.
Key Design Elements
- Locking casters allow the unit to stay firmly in place during daily use while still offering the flexibility to move it when needed.
- Copper piping is available at most hardware stores and can be cut to any length, making it easy to customize the rail width to your exact Kallax configuration.
Pro Tip: Use pipe flanges to mount the copper rail securely to the top of the Kallax rather than balancing it in place — this ensures the rail can safely support the full weight of hanging garments.
9. Create a Kid-Sized Closet from an IKEA Billy Bookcase
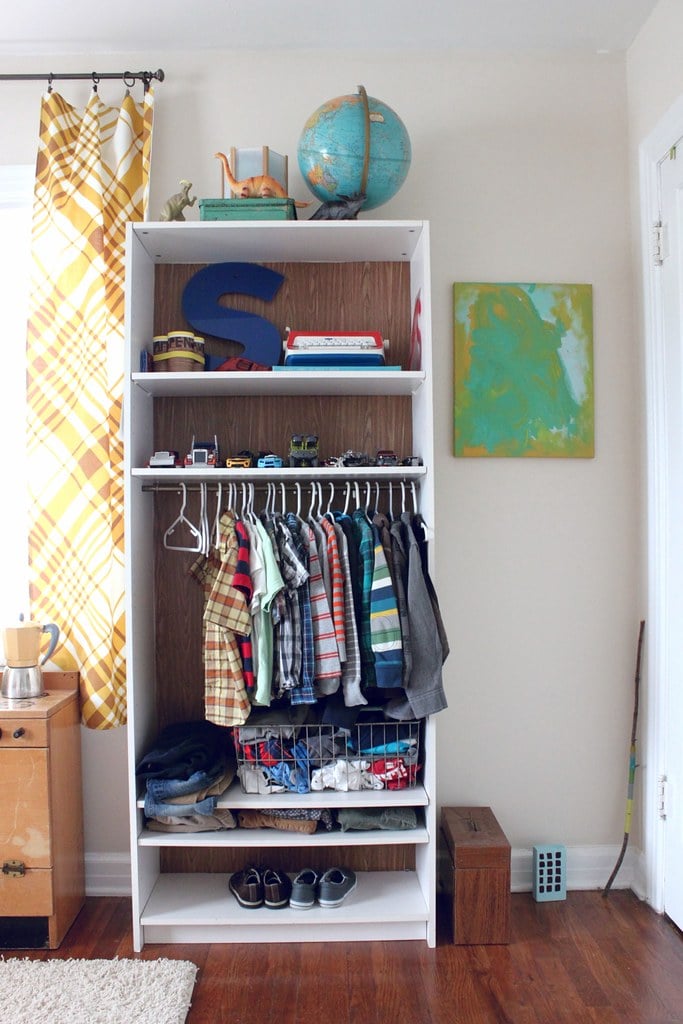
As children grow and begin taking ownership of their wardrobe choices, they need a closet system that is accessible, easy to use, and genuinely fun. The IKEA Billy Bookcase scales beautifully to child-height and can be transformed into a fully functional mini closet with just a few simple modifications. Line the interior back panel with colorful contact paper for a playful accent, adjust the shelves to suit folded items and shoes, and add a short hanging rod or a few S-hooks for jackets and dress-up clothes. It is an affordable, adorable upgrade that grows with your child.
Key Design Elements
- Placing the Billy at child height — or removing the top shelf entirely — makes it easy for kids to independently select and put away their own clothes.
- Contact paper is completely removable, so you can update the interior color or pattern as your child’s tastes evolve without any damage to the bookcase.
Pro Tip: Secure the Billy Bookcase to the wall with the included anti-tip hardware, which is especially important in a child’s room where climbing is always a possibility.
10. Add Crown Molding to a PAX Closet for a Built-In Look
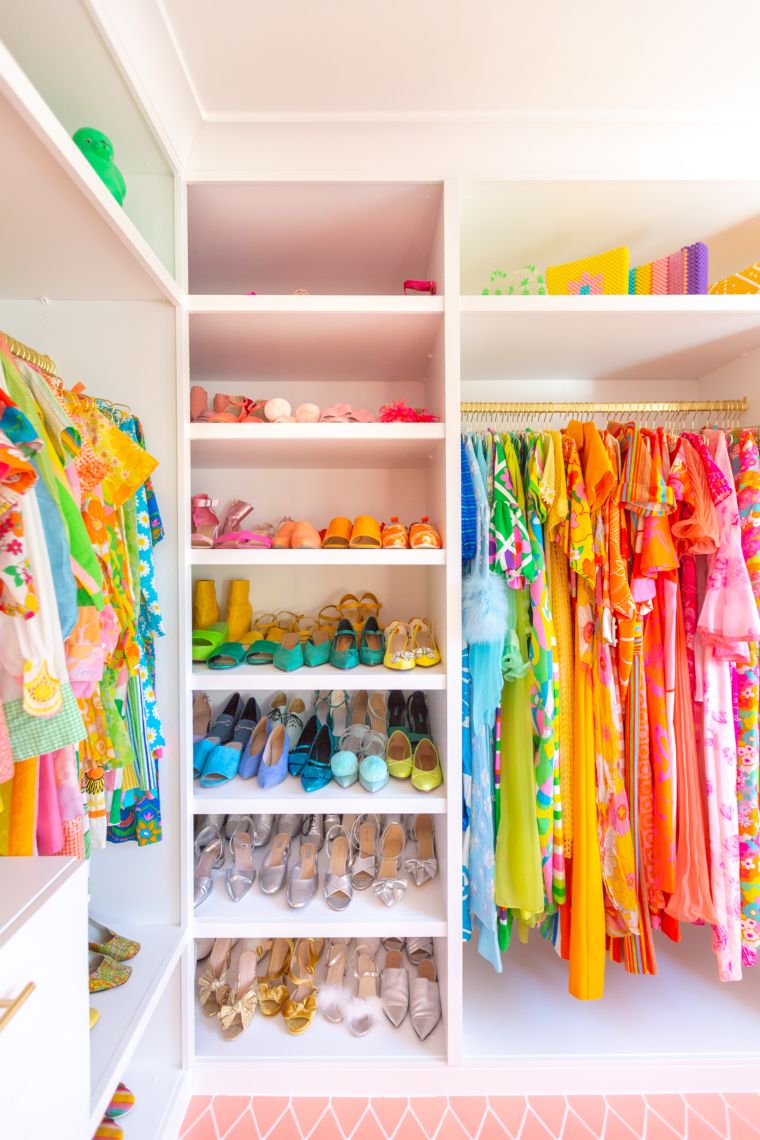
The IKEA PAX wardrobe system is a staple in millions of homes, but its boxy, freestanding appearance can look out of place in a room with architectural details. Adding crown molding trim to the top of a PAX unit is one of the most effective and affordable ways to make a flat-pack wardrobe look like a fully custom, built-in installation. The molding bridges the gap between the top of the unit and the ceiling, creating a seamless transition that makes the entire closet feel like it was designed specifically for the room.
Key Design Elements
- Caulking and painting the crown molding the same color as the PAX unit creates a flawless, monolithic built-in appearance.
- This hack works especially well in rooms that already feature crown molding elsewhere, as it visually connects the wardrobe to the room’s existing architecture.
Pro Tip: Measure the gap between the top of your PAX unit and the ceiling carefully before purchasing molding — choosing a profile depth and height that fills this gap precisely will produce the most convincing built-in effect.
11. Design a Functional and Organized Nursery Closet on a Budget
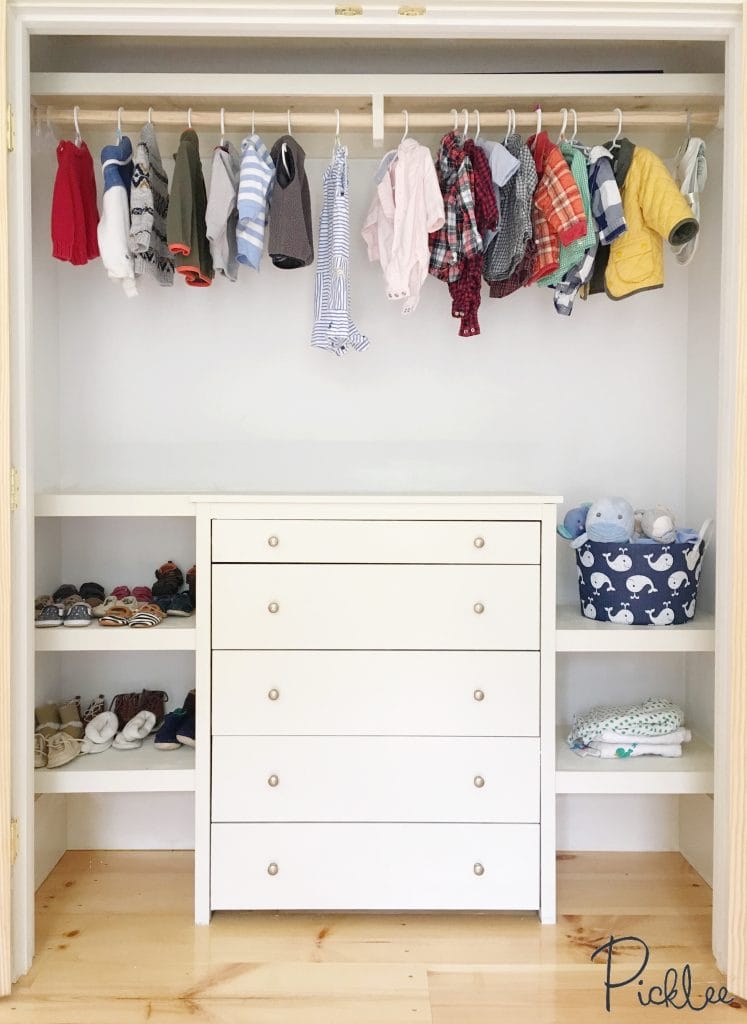
Designing a nursery closet that keeps tiny clothes, shoes, and accessories beautifully organized requires a thoughtful approach to every inch of available space. Centering a low-profile dresser — such as an IKEA Koppang-style chest — inside the closet provides deep drawer storage for folded items while keeping the top surface accessible for diaper changes or folding. Flanking the dresser with narrow shoe shelves on each side maximizes vertical space, while the existing closet rod above handles hanging garments like sleepers, jackets, and special occasion outfits.
Key Design Elements
- A low dresser inside the closet keeps the room’s floor space completely clear, which is invaluable in typically compact nursery layouts.
- Labeling each drawer and shelf section with simple tags makes it easy for any caregiver to quickly locate and return items to the right place.
Pro Tip: Organize the nursery closet by size — grouping newborn, 0–3 month, and 3–6 month clothing in separate labeled sections — so you can quickly transition between sizes as your baby grows.
12. Customize Your Closet with IKEA Tarva and Ivar Dressers
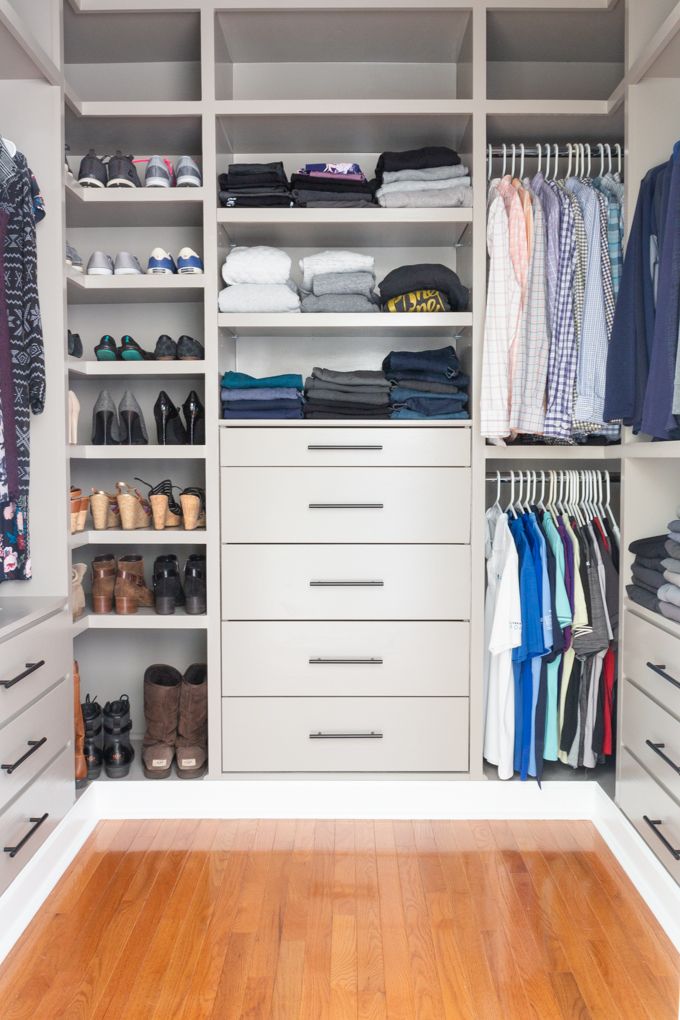
The IKEA Tarva and Ivar dressers are two of the most beloved pieces in the IKEA hack community, and for very good reason — their solid wood construction and simple, unfinished surfaces make them extraordinarily easy to paint, stain, and modify. Placed inside a closet, either dresser provides excellent folded-clothing storage while serving as a stylish design statement. Paint them in a deep matte black and swap the original hardware for sleek chrome pulls for a sophisticated, modern wardrobe, or go warm and natural with an oil finish that highlights the wood grain.
Key Design Elements
- Both the Tarva and Ivar are made from solid pine, which accepts paint and stain beautifully and holds hardware modifications without issue.
- Mixing one painted dresser with one stained dresser in the same closet can create a curated, eclectic look that feels intentional rather than mismatched.
Pro Tip: Replace the original drawer pulls with hardware that matches other metal finishes in the room — such as light fixtures or door handles — to create a cohesive, designer-level aesthetic throughout the space.
13. Build a DIY Walk-In Closet Using MALM Drawers and Mirrored Doors
If a walk-in closet feels like an unattainable luxury, this clever IKEA hack will change your mind. By positioning a MALM four-drawer chest in a bedroom corner and flanking it with IKEA mirrored sliding doors, you can construct the frame and interior of a fully functional walk-in closet without any major renovation work. The mirrored doors section off the closet area while making the room feel larger and brighter, and the MALM drawers provide ample internal storage for folded items, accessories, and more.
Key Design Elements
- Mirrored doors visually expand the surrounding bedroom space, making this hack especially valuable in smaller rooms.
- Positioning the MALM chest at the back center of the closet allows you to add hanging rods on each side for a balanced, symmetrical layout.
Pro Tip: Install a simple overhead LED light bar inside the closet frame before hanging the doors — even a battery-powered option — so the interior is well-lit and easy to navigate.
14. Upgrade IKEA PAX Drawers with Custom Wood Drawer Fronts
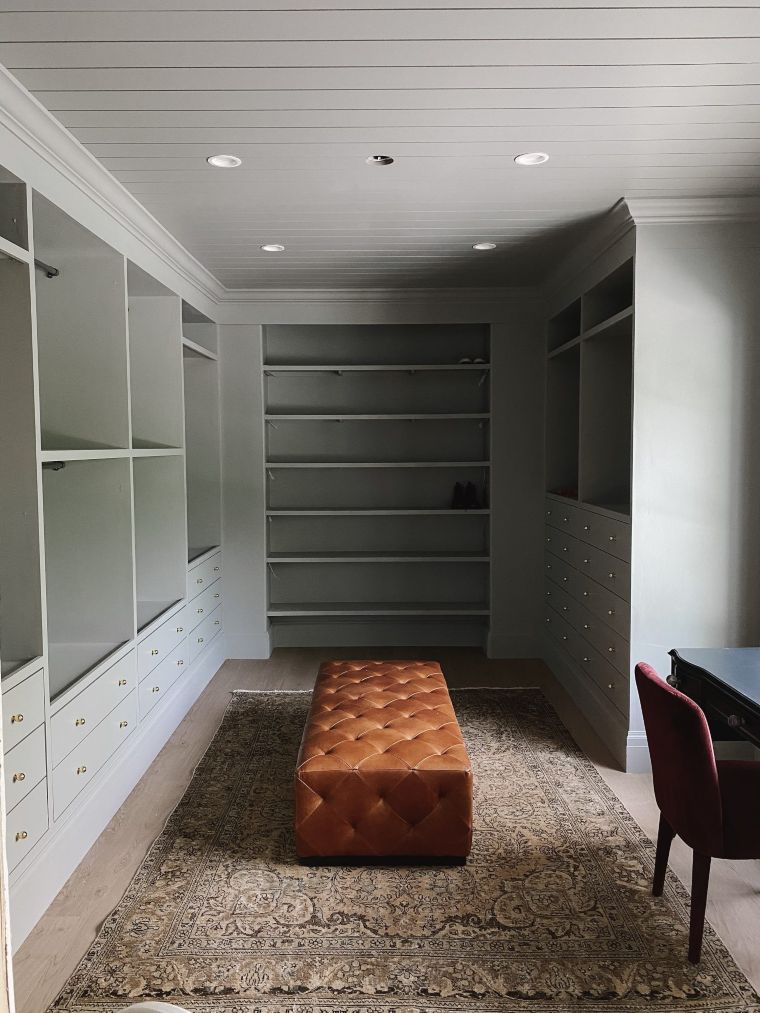
The standard PAX drawer fronts are perfectly functional, but swapping them out for custom solid wood panels is one of the most impactful upgrades you can make to an IKEA closet system. Remove the original fronts and replace them with cut-to-size panels in pine, oak, walnut, or any hardwood that complements your room’s aesthetic. Leave the wood natural and finish it with oil to showcase the grain for a warm, organic feel, or paint it in any color to match your existing décor. The result looks and feels entirely custom-built.
Key Design Elements
- Solid wood drawer fronts add tactile warmth and visual texture that standard laminate panels simply cannot replicate.
- Oiling rather than painting the wood preserves the natural grain and requires minimal maintenance — just a light re-oiling every year or two.
Pro Tip: When cutting replacement drawer fronts, add an extra 2mm of overlap on each side compared to the original front for a more furniture-quality, seamless appearance when the drawers are closed.
15. Floor-to-Ceiling Shoe Shelves Using the IKEA Billy Bookcase
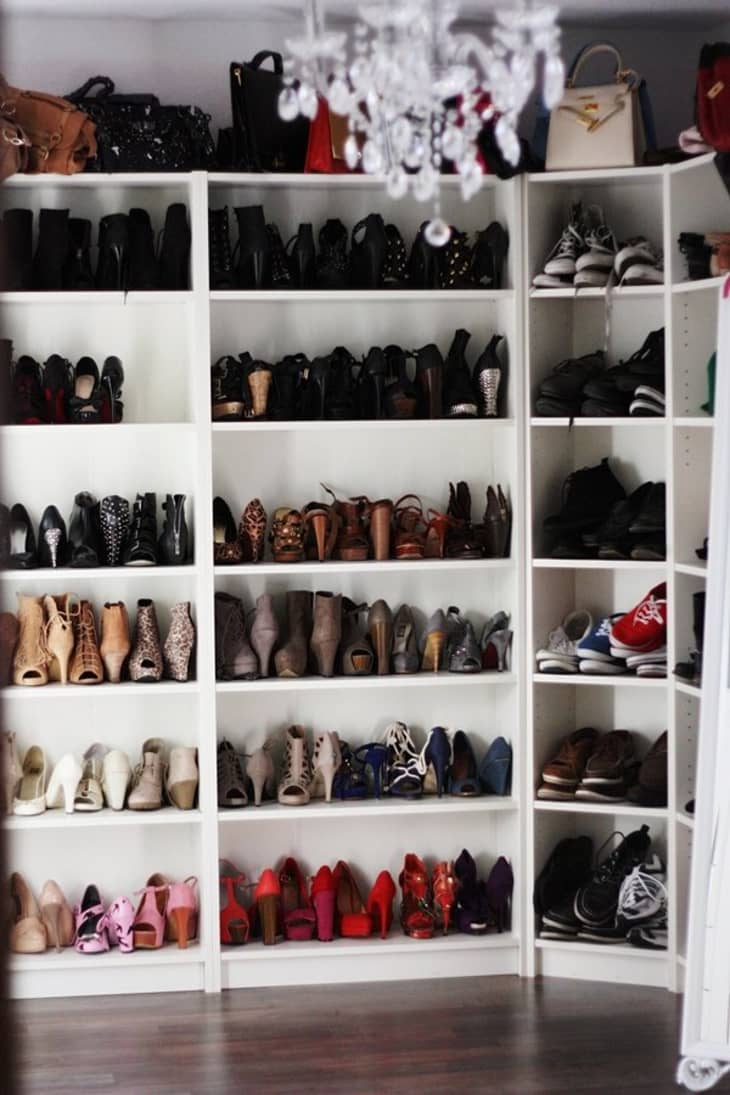
For serious shoe collectors, a dedicated floor-to-ceiling display is the ultimate storage dream — and the IKEA Billy Bookcase makes it surprisingly achievable on a modest budget. Lining an entire bedroom wall with Billy units, painted to match the room’s color scheme, creates a sleek and spectacular shoe gallery that showcases your collection like a high-end boutique. Adjust the shelf heights to accommodate everything from flat sandals to knee-high boots, and add small lighting fixtures to each unit to transform the display into a true showpiece.
Key Design Elements
- Adjustable Billy shelves can be repositioned to accommodate different shoe heights, maximizing the number of pairs stored per unit.
- Painting the Billy units the same color as the wall creates a seamless, built-in effect that makes the shoe display look architecturally intentional.
Pro Tip: Angle the shelves very slightly downward using thin adhesive felt pads under the front edge of each shelf — this tilts shoes toward you for easier visibility and a more dynamic, retail-inspired display.
16. Complete a Whole-House Closet Overhaul for Under $100 with IKEA Billy
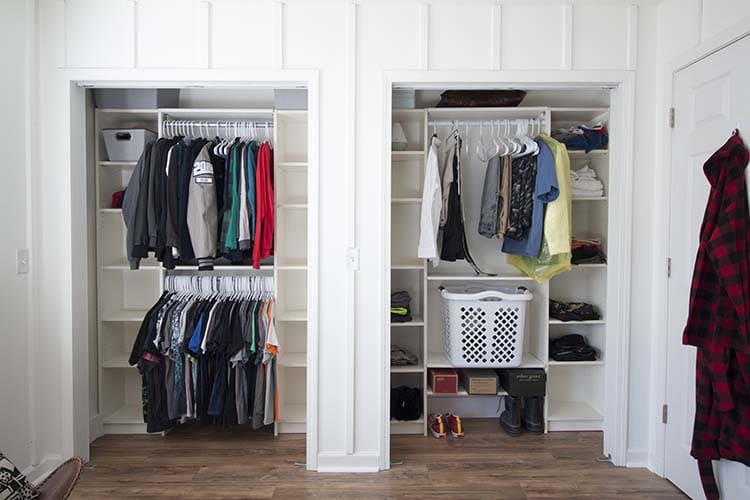
Not every closet in your home needs a luxury makeover — sometimes a smart, budget-conscious solution is all it takes to bring order to the chaos. Using IKEA Billy Bookcases as the structural backbone, this hack combines affordable closet rods, small MDF panels, and a crisp coat of white paint to deliver a clean, custom-looking closet system for under $100 per space. The beauty of this approach is its total versatility: stack multiple Billy units side by side for a wide closet, use a single unit for a compact reach-in, or mix shelf and rod configurations for a hybrid hanging-and-folding
Key Design Elements
- Stylish fabric storage boxes or woven baskets placed on the Billy shelves add texture and keep folded items neatly contained without additional cabinetry.
- A consistent white paint color across all Billy units, MDF panels, and the closet walls creates a seamless, spacious feel even in the smallest closets.
Pro Tip: Cut MDF panels to fill any gaps between Billy units and the closet walls, then caulk and paint them to match — this simple step is what separates a polished built-in look from an obviously DIY one.
17. DIY Closet Island with IKEA Expedit Shelving Cubes and a Marble Top
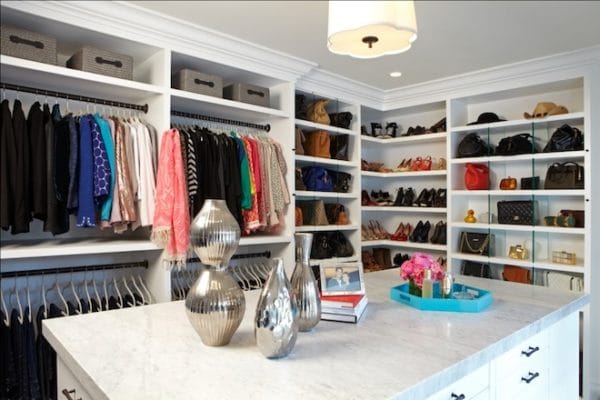
A closet island is the ultimate symbol of a luxurious dressing room — and it is far more attainable than you might think. By pairing two IKEA Expedit shelving cube units, adding sleek metal legs, and topping the structure with a slab of marble or a realistic marble-effect contact paper, you can create a stunning closet island for a fraction of the cost of a custom installation. The open cubbies provide accessible storage for folded items, bags, and accessories, while the marble surface offers a gorgeous spot for laying out outfits or styling accessories.
Key Design Elements
- Marble contact paper is an excellent budget alternative to real stone and is available in a wide range of vein patterns and background tones.
- Adding hairpin or tapered metal legs elevates the unit off the floor, making it easier to clean beneath and giving the island a more refined, furniture-quality appearance.
Pro Tip: Line the open cubbies of the Expedit island with fabric bins in a single coordinating color to keep folded items tidy and give the overall piece a cohesive, high-end boutique look.
18. Create Extra Hanging Space Using IKEA Shelf Brackets as Clothing Rails
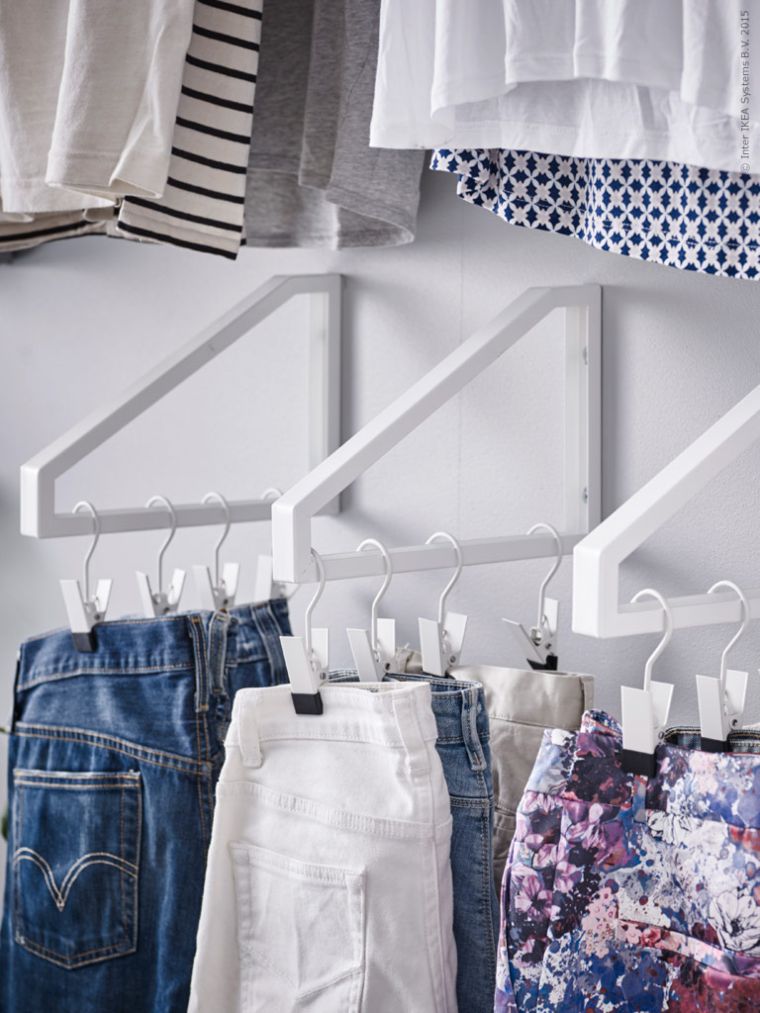
One of the most underrated IKEA closet hacks requires almost no tools and costs very little: repurposing standard IKEA shelf brackets as wall-mounted clothing rails. Simply mount the brackets horizontally on the wall with the open end facing outward, and hang garments directly from the bracket’s lower edge. This approach is ideal for smaller closets that need extra hanging capacity without sacrificing floor space, and it allows you to group clothing by category — dresses, jeans, shirts — for a more intuitive and efficient daily routine.
Key Design Elements
- Mounting brackets at two different heights — one for full-length items and one for shorter pieces — doubles the hanging capacity of a single wall section.
- Because the brackets are wall-mounted, the floor beneath remains completely clear, making the space feel less cluttered and easier to clean.
Pro Tip: Paint or spray-coat the brackets in a metallic finish — matte gold or brushed brass work especially well — before mounting them so the hardware becomes a decorative feature rather than a purely utilitarian one.
19. Revamp a Reach-In Closet with an IKEA Billy Bookcase Overhaul
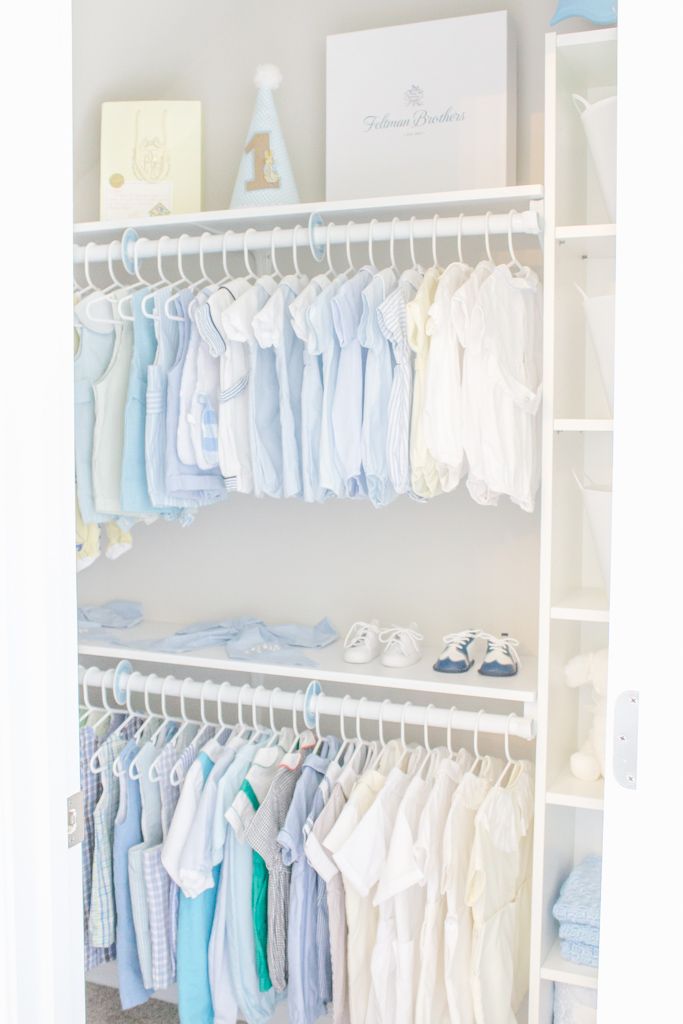
The IKEA Billy Bookcase is the unsung hero of the DIY closet world, and this straightforward hack proves exactly why. Replacing tired, sagging wire shelves with a Billy-based system instantly upgrades both the look and the functionality of any reach-in closet. The entire project — Billy unit, paint, and hardware store supplies — comes in at roughly $120, yet the finished result looks sleek, modern, and completely custom. Adjust shelf heights, add a hanging rod, and paint everything in your preferred color for a closet that finally feels like it was designed for you.
Key Design Elements
- Removing wire shelving and replacing it with solid Billy shelves eliminates the frustration of items falling through gaps or leaving imprints on folded clothing.
- The Billy’s adjustable shelf pins allow you to reconfigure the interior layout as your storage needs change over time, without any additional cost.
Pro Tip: Paint the closet interior walls the same color as the Billy unit before installation so the bookcase blends seamlessly into the space and reads as a true built-in rather than a freestanding piece.
20. Build a Full Wardrobe from Two IKEA Rast Dressers
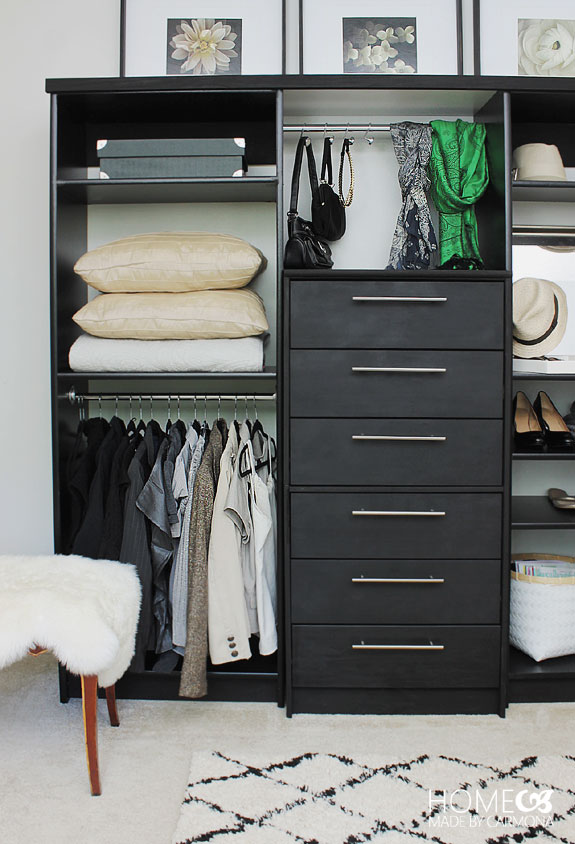
If a custom wardrobe feels financially out of reach, this inspired IKEA Rast dresser hack delivers a remarkably convincing alternative at a fraction of the price. By placing two Rast dressers side by side and constructing a simple MDF frame and top panel to unite them, you create the bones of a full-sized wardrobe that lives outside your standard closet. Finish the build with paint — a classic white for a bright, airy feel or a bold black with chrome hardware for a dramatic, modern statement — and the result is a bespoke-looking wardrobe that is entirely your own creation.
Key Design Elements
- The solid pine construction of the Rast dresser makes it easy to drill, sand, and paint, giving you full creative control over the finished aesthetic.
- Adding a top rail between the two dressers creates a hanging section above the drawers, transforming the unit into a true wardrobe with both folded and hanging storage.
Pro Tip: Before painting, fill any visible knots or wood grain texture on the Rast with a lightweight wood filler and sand smooth — this step is what gives the finished piece a factory-quality, furniture-store appearance.
Conclusion
Transforming your closet from a cluttered disaster zone into a beautifully organized space is entirely achievable, even on a tight budget, when you tap into the incredible versatility of IKEA’s product range. Whether you chose a single statement hack like crown molding on a PAX unit or went all-in with a full DIY walk-in closet build, each of these projects proves that thoughtful design and a little elbow grease can rival even the most expensive custom installations. The best part? Every hack on this list is fully customizable to suit your personal style, spatial constraints, and organizational needs — so your finished closet will look and feel uniquely yours.